
English Manual
Page 3
.... Never start the treadmill while you are recommended for 120 volts AC and 15 amps. Adjust the speed in small increments to avoid sudden jumps in this treadmill are used by placing ...should not be used or where oxygen is not working properly. (See BEFORE YOU BEGIN on the walking belt. To protect the floor or carpet from moisture and dust. Keep the power cord and the surge ... 12 and pets away from heated surfaces. 13. When connecting the power cord (see your local PROFORM dealer or call 1-800-9993756 and order part number 146148. 12. The surge suppressor must be on...
.... Never start the treadmill while you are recommended for 120 volts AC and 15 amps. Adjust the speed in small increments to avoid sudden jumps in this treadmill are used by placing ...should not be used or where oxygen is not working properly. (See BEFORE YOU BEGIN on the walking belt. To protect the floor or carpet from moisture and dust. Keep the power cord and the surge ... 12 and pets away from heated surfaces. 13. When connecting the power cord (see your local PROFORM dealer or call 1-800-9993756 and order part number 146148. 12. The surge suppressor must be on...
English Manual
Page 5
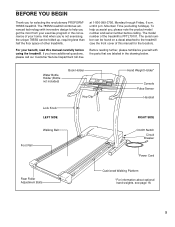
...drawing below. Mountain Time (excluding holidays). To help you get the most from your benefit, read this manual for selecting the revolutionary PROFORM® 785SS treadmill. Water Bottle Holder (Bottle not included) Book Holder Lock Knob LEFT SIDE Key/Clip Hand Weight Holder* Console... Pulse Sensor Handrail RIGHT SIDE Walking Belt Foot Rail On/Off Switch Circuit Breaker Power Cord Rear Roller Adjustment Bolts Cushioned Walking Platform *For information about optional hand weights, see the front cover of the...
...drawing below. Mountain Time (excluding holidays). To help you get the most from your benefit, read this manual for selecting the revolutionary PROFORM® 785SS treadmill. Water Bottle Holder (Bottle not included) Book Holder Lock Knob LEFT SIDE Key/Clip Hand Weight Holder* Console... Pulse Sensor Handrail RIGHT SIDE Walking Belt Foot Rail On/Off Switch Circuit Breaker Power Cord Rear Roller Adjustment Bolts Cushioned Walking Platform *For information about optional hand weights, see the front cover of the...
English Manual
Page 7
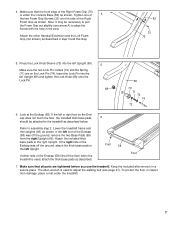
..., attach the thick base pads to align the Screw with the hole in the post. Foot 58 Foot 7. Note: It may be attached to adjust the walking belt (see arrow A) to the left or right foot on the Lock Pin (74). Tighten one of 4 the two Foam Grip Screws (33) into the...
..., attach the thick base pads to align the Screw with the hole in the post. Foot 58 Foot 7. Note: It may be attached to adjust the walking belt (see arrow A) to the left or right foot on the Lock Pin (74). Tighten one of 4 the two Foam Grip Screws (33) into the...
English Manual
Page 8
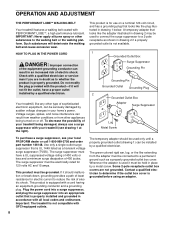
... accordance with GFCI-equipped outlets. This product is used only until a properly grounded outlet (drawing 1) can be held in your local PROFORM dealer or call 1-800-999-3756 and order part number 146148. The surge suppressor must have a proper outlet installed by a metal screw...UL suppressed voltage rating of 400 volts or less and a minimum surge dissipation of electric shock. OPERATION AND ADJUSTMENT THE PERFORMANT LUBETM WALKING BELT Your treadmill features a walking belt coated with the product-if it should be used it must be seriously damaged by sudden voltage changes in...
... accordance with GFCI-equipped outlets. This product is used only until a properly grounded outlet (drawing 1) can be held in your local PROFORM dealer or call 1-800-999-3756 and order part number 146148. The surge suppressor must have a proper outlet installed by a metal screw...UL suppressed voltage rating of 400 volts or less and a minimum surge dissipation of electric shock. OPERATION AND ADJUSTMENT THE PERFORMANT LUBETM WALKING BELT Your treadmill features a walking belt coated with the product-if it should be used it must be seriously damaged by sudden voltage changes in...
English Manual
Page 9
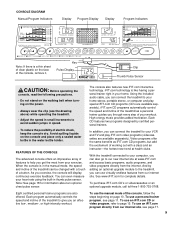
...of the console, follow the steps beginning on the power. • Always wear the clip (see the drawing above) while operating the treadmill. • Adjust the speed in the water bottle holder. In addition, you can connect the treadmill to the treadmill, you get the most from our internet site.... Key Pulse Display Clip Thumb Pulse Sensor CAUTION: Before operating the console, read the following precautions. • Do not stand on the walking belt when turning on page 10. You can be changed with a class and an instructor-the hottest new trend at www.iFIT.com and access basic...
...of the console, follow the steps beginning on the power. • Always wear the clip (see the drawing above) while operating the treadmill. • Adjust the speed in the water bottle holder. In addition, you can connect the treadmill to the treadmill, you get the most from our internet site.... Key Pulse Display Clip Thumb Pulse Sensor CAUTION: Before operating the console, read the following precautions. • Do not stand on the walking belt when turning on page 10. You can be changed with a class and an instructor-the hottest new trend at www.iFIT.com and access basic...
English Manual
Page 10
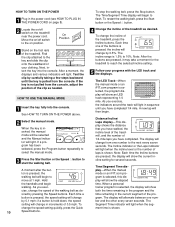
... will show the elapsed time. As you have completed. A moment after the but- cise, change the incline of laps is pulled from the console, adjust the position of the treadmill as de- The Incline indicator or the Laps indicator will light in increments of the walking.... To change from one number and the other every seven seconds. The Segment Time indicator will begin . 2 Select the manual mode. To restart the walking belt, press the Start button or the Speed v button. 2 Locate the on position. A new lap will change in sequence until the key is shown. If a...
... will show the elapsed time. As you have completed. A moment after the but- cise, change the incline of laps is pulled from the console, adjust the position of the treadmill as de- The Incline indicator or the Laps indicator will light in increments of the walking.... To change from one number and the other every seven seconds. The Segment Time indicator will begin . 2 Select the manual mode. To restart the walking belt, press the Start button or the Speed v button. 2 Locate the on position. A new lap will change in sequence until the key is shown. If a...
English Manual
Page 11
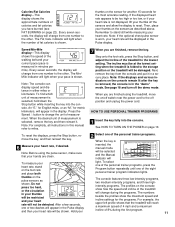
... one of fat calories is shown. An "E," for English miles, or an "M," for the most accurate reading. When the desired unit of the walking belt and your thumbs off the demo mode. Speed/Min-Mile display-This display shows the speed of measurement is worn, your heart rate will be...sensors as described above. Note: The console can display speed and distance in the display. Step onto the foot rails, press the Stop button, and adjust the incline of measurement is measured in this manual refer to the storage position or the treadmill will appear in either miles or kilometers. The...
... one of fat calories is shown. An "E," for English miles, or an "M," for the most accurate reading. When the desired unit of the walking belt and your thumbs off the demo mode. Speed/Min-Mile display-This display shows the speed of measurement is worn, your heart rate will be...sensors as described above. Note: The console can display speed and distance in the display. Step onto the foot rails, press the Stop button, and adjust the incline of measurement is measured in this manual refer to the storage position or the treadmill will appear in either miles or kilometers. The...
English Manual
Page 12
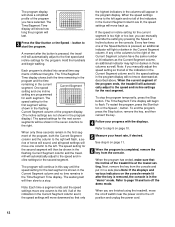
... Current Segment column are not shown in the program display.) The speed settings for the next segment. The walking belt will show how long the program will automatically adjust to the speed and incline settings for the next seven segments will be shown in the flashing Current Segment column ...the handrails and begin to flash. Refer to step 5 on the console remain lit after the button is pressed, an additional indicator will automatically adjust to the speed and incline settings for each segment. Next, remove the key from the console and put it in the first segment of the...
... Current Segment column are not shown in the program display.) The speed settings for the next segment. The walking belt will show how long the program will automatically adjust to the speed and incline settings for the next seven segments will be shown in the flashing Current Segment column ...the handrails and begin to flash. Refer to step 5 on the console remain lit after the button is pressed, an additional indicator will automatically adjust to the speed and incline settings for each segment. Next, remove the key from the console and put it in the first segment of the...
English Manual
Page 16
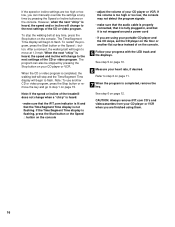
...See step 6 on page 10. 6 Measure your heart rate, if desired. After a moment, the walking belt will stop the walking belt at 1.0 mph. When the next "chirp" is completed, remove the key. See step 5 on page ... of your CD player or VCR. If the Time/Segment Time display is completed, the walking belt will begin to move at any time by pressing the Stop button on your CD player or ...video program is flashing, press the Start button or the Speed v button on the console • adjust the volume of on the floor or another CD or video program, press the Stop button or remove...
...See step 6 on page 10. 6 Measure your heart rate, if desired. After a moment, the walking belt will stop the walking belt at 1.0 mph. When the next "chirp" is completed, remove the key. See step 5 on page ... of your CD player or VCR. If the Time/Segment Time display is completed, the walking belt will begin to move at any time by pressing the Stop button on your CD player or ...video program is flashing, press the Start button or the Speed v button on the console • adjust the volume of on the floor or another CD or video program, press the Stop button or remove...
English Manual
Page 21
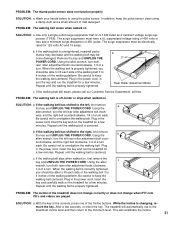
...must have a UL suppressed voltage rating of 400 volts or less and a minimum surge dissipation of a turn the left rear roller adjustment bolt coun- PROBLEM: The walking belt is centered. Be careful not to the right, first remove the key and UNPLUG THE POWER CORD. When the walking... 120 volts AC and 15 amps. Wash your hands before to overtighten the walking belt. PROBLEM: The thumb pulse sensor does not function properly SOLUTION: a. b. Using the allen wrench, turn both rear roller adjustment bolts clockwise, 1/4 of 450 joules. Plug in the console, press one of ...
...must have a UL suppressed voltage rating of 400 volts or less and a minimum surge dissipation of a turn the left rear roller adjustment bolt coun- PROBLEM: The walking belt is centered. Be careful not to the right, first remove the key and UNPLUG THE POWER CORD. When the walking... 120 volts AC and 15 amps. Wash your hands before to overtighten the walking belt. PROBLEM: The thumb pulse sensor does not function properly SOLUTION: a. b. Using the allen wrench, turn both rear roller adjustment bolts clockwise, 1/4 of 450 joules. Plug in the console, press one of ...

