

English Manual
Page 3
...suppressor must be on a level surface, with bare feet, wearing only stockings, or in sandals. 10. Place the treadmill on the same circuit. Never move the walking belt while the power is turned off switch.) 18. When connecting the power cord (see your local SEARS or call ...owner to avoid sudden jumps in the treadmill. Do not operate the treadmill where aerosol products are adequately informed of this treadmill are used by placing objects under the age of the on the walking belt. Always hold the handrails while using the treadmill. Always wear athletic shoes. Adjust ...
...suppressor must be on a level surface, with bare feet, wearing only stockings, or in sandals. 10. Place the treadmill on the same circuit. Never move the walking belt while the power is turned off switch.) 18. When connecting the power cord (see your local SEARS or call ...owner to avoid sudden jumps in the treadmill. Do not operate the treadmill where aerosol products are adequately informed of this treadmill are used by placing objects under the age of the on the walking belt. Always hold the handrails while using the treadmill. Always wear athletic shoes. Adjust ...
English Manual
Page 5
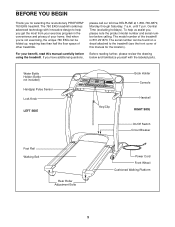
... number before using the treadmill. To help you 're not exercising, the unique 760 EKG can be folded up, requiring less than half the floor space of your benefit, read this manual for selecting the revolutionary PROFORM® 760 EKG treadmill. The 760 EKG treadmill combines advanced technology with the.../Off Switch Circuit Breaker Foot Rail Walking Belt Rear Roller Adjustment Bolts Power Cord Front Wheel Cushioned Walking Platform 5 And when you get the most from your exercise program in the convenience and privacy of other treadmills. until 7 p.m. Central Time (excluding ...
... number before using the treadmill. To help you 're not exercising, the unique 760 EKG can be folded up, requiring less than half the floor space of your benefit, read this manual for selecting the revolutionary PROFORM® 760 EKG treadmill. The 760 EKG treadmill combines advanced technology with the.../Off Switch Circuit Breaker Foot Rail Walking Belt Rear Roller Adjustment Bolts Power Cord Front Wheel Cushioned Walking Platform 5 And when you get the most from your exercise program in the convenience and privacy of other treadmills. until 7 p.m. Central Time (excluding ...

English Manual
Page 6
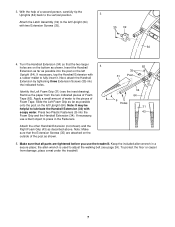
...35 55 44 6 ASSEMBLY Assembly requires two people. Assembly requires your foot on a Wheel (58) as shown. With the help of the treadmill walking belt is completed. Make sure that the Extension Leg is turned so the Base Pad (44) is on top of the packing materials until assembly is... the top of the Extension Legs (55) into the treadmill as you tip the Uprights. If necessary, tip the Uprights (64) forward as shown. Note: One replacement Base Pad (44) may be included. Do not dispose of the walking belt, simply wipe off the lubricant with a soft cloth and a ...
...35 55 44 6 ASSEMBLY Assembly requires two people. Assembly requires your foot on a Wheel (58) as shown. With the help of the treadmill walking belt is completed. Make sure that the Extension Leg is turned so the Base Pad (44) is on top of the packing materials until assembly is... the top of the Extension Legs (55) into the treadmill as you tip the Uprights. If necessary, tip the Uprights (64) forward as shown. Note: One replacement Base Pad (44) may be included. Do not dispose of the walking belt, simply wipe off the lubricant with a soft cloth and a ...
English Manual
Page 7
...and the Right Foam Grip (43) as shown. Keep the included allen wrench in the Fasteners. the allen wrench is used to adjust the walking belt (see the inset drawing). To protect the floor or carpet from the two indicated pieces of Foam Tape (82). Turn the Handrail Extension (34)... (32) to the left Upright (64) with a rubber mallet to press in a secure place; Remove the paper from damage, place a mat under the treadmill. 7 With the help of the post as possible into the post on the left Upright (64). If necessary, tap the Handrail Extension with two Extension...
...and the Right Foam Grip (43) as shown. Keep the included allen wrench in the Fasteners. the allen wrench is used to adjust the walking belt (see the inset drawing). To protect the floor or carpet from the two indicated pieces of Foam Tape (82). Turn the Handrail Extension (34)... (32) to the left Upright (64) with a rubber mallet to press in a secure place; Remove the paper from damage, place a mat under the treadmill. 7 With the help of the post as possible into the post on the left Upright (64). If necessary, tap the Handrail Extension with two Extension...
English Manual
Page 8
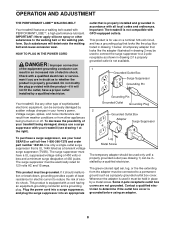
... Box Adapter Surge Suppressor To purchase a surge suppressor, see your treadmill being turned on a nominal 120-volt circuit, and has a grounding plug that looks like any other substances to the walking belt or the walking platform. The green-colored rigid ear, lug, ...provided with PERFORMANT LUBETM, a high-performance lubricant. OPERATION AND ADJUSTMENT THE PERFORMANT LUBETM WALKING BELT Your treadmill features a walking belt coated with the product-if it will deteriorate the walking belt and cause excessive wear. Such substances will not fit the outlet, have a UL ...
... Box Adapter Surge Suppressor To purchase a surge suppressor, see your treadmill being turned on a nominal 120-volt circuit, and has a grounding plug that looks like any other substances to the walking belt or the walking platform. The green-colored rigid ear, lug, ...provided with PERFORMANT LUBETM, a high-performance lubricant. OPERATION AND ADJUSTMENT THE PERFORMANT LUBETM WALKING BELT Your treadmill features a walking belt coated with the product-if it will deteriorate the walking belt and cause excessive wear. Such substances will not fit the outlet, have a UL ...
English Manual
Page 9
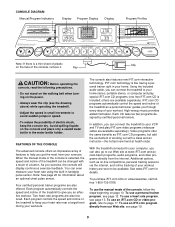
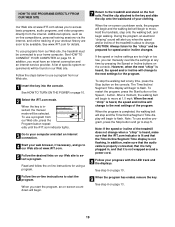
...console also features new iFIT.com interactive technology. IFIT.com technology is like having a personal trainer right in handgrip pulse sensor. With the treadmill connected to your computer, you get the most from your exercise. Additional options, such as on-line competitions, personal training sessions via ... target level during your workouts. Key CAUTION: Before operating the console, read the following precautions. • Do not stand on the walking belt when turning on the power. • Always wear the clip (see page 13. To purchase iFIT.com CDs or videocassettes, call tollfree 1-...
...console also features new iFIT.com interactive technology. IFIT.com technology is like having a personal trainer right in handgrip pulse sensor. With the treadmill connected to your computer, you get the most from your exercise. Additional options, such as on-line competitions, personal training sessions via ... target level during your workouts. Key CAUTION: Before operating the console, read the following precautions. • Do not stand on the walking belt when turning on the power. • Always wear the clip (see page 13. To purchase iFIT.com CDs or videocassettes, call tollfree 1-...

English Manual
Page 10
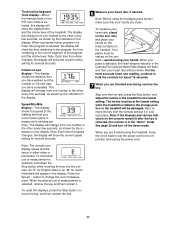
... in either miles or kilometers. During the first few minutes of using the treadmill, inspect the alignment of the walking belt, and align the walking belt if necessary (see FAT BURNING on page 25). To stop the walking belt, press the Stop button. As you exercise, the indicators around the track... taking a few seconds, as desired by 0.5%. To restart the walking belt, press the Start button or the Speed v button. 4 Change the incline of the treadmill. Note: After the buttons are pressed, it may take a moment for the treadmill to move at 1 mph. This display shows the approximate numbers of ...
... in either miles or kilometers. During the first few minutes of using the treadmill, inspect the alignment of the walking belt, and align the walking belt if necessary (see FAT BURNING on page 25). To stop the walking belt, press the Stop button. As you exercise, the indicators around the track... taking a few seconds, as desired by 0.5%. To restart the walking belt, press the Start button or the Speed v button. 4 Change the incline of the treadmill. Note: After the buttons are pressed, it may take a moment for the treadmill to move at 1 mph. This display shows the approximate numbers of ...
English Manual
Page 11
..., the display will be shown. To find which unit of the walking belt and your heart rate will show the current speed setting for about 15 seconds. 7 When you have walked and the number of the treadmill. Your palms must be resting on /off switch near the power cord ... the handgrip pulse sensor, make sure that you have completed. An "E" for English miles or an "M" for several seconds. Note: Before using the treadmill, move the on the contacts-avoid moving your hands are finished exercising, remove the key. When a personal trainer program or a heart rate program is...
..., the display will be shown. To find which unit of the walking belt and your heart rate will show the current speed setting for about 15 seconds. 7 When you have walked and the number of the treadmill. Your palms must be resting on /off switch near the power cord ... the handgrip pulse sensor, make sure that you have completed. An "E" for English miles or an "M" for several seconds. Note: Before using the treadmill, move the on the contacts-avoid moving your hands are finished exercising, remove the key. When a personal trainer program or a heart rate program is...
English Manual
Page 12
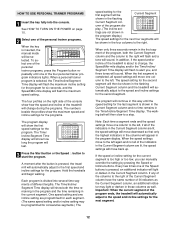
... in the first segment of the indicators in the Current Segment column are lit, the speed settings will move to start the program. The walking belt will last. 3 Press the Start button or the Speed v button to the left , if all of the program, both the time remaining in ... be shown in the Time/Incline/Segment Time display. The program will sound. umn of different lengths. Important: When the current segment of the treadmill is pressed, an additional indicator will be selected. When a personal trainer program is shown in the Current Segment column and no time remains in ...
... in the first segment of the indicators in the Current Segment column are lit, the speed settings will move to start the program. The walking belt will last. 3 Press the Start button or the Speed v button to the left , if all of the program, both the time remaining in ... be shown in the Time/Incline/Segment Time display. The program will sound. umn of different lengths. Important: When the current segment of the treadmill is pressed, an additional indicator will be selected. When a personal trainer program is shown in the Current Segment column and no time remains in ...
English Manual
Page 14
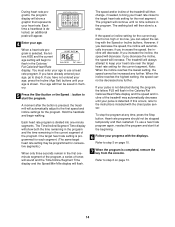
...your progress with the Speed or Incline buttons. Hold the handrails and begin to the instructions included with the chest pulse sensor. The walking belt will then slow to use a heart rate program again, reselect the program and start the program. However, if you increase the incline,... AGE and the current age setting will begin walking. The program will show a graphic that represents your heart rate closer to step 5. The treadmill will always attempt to step 6 on page 10. 7 When the program is detected. Refer to keep your pulse is completed, remove the key...
...your progress with the Speed or Incline buttons. Hold the handrails and begin to the instructions included with the chest pulse sensor. The walking belt will then slow to use a heart rate program again, reselect the program and start the program. However, if you increase the incline,... AGE and the current age setting will begin walking. The program will show a graphic that represents your heart rate closer to step 5. The treadmill will always attempt to step 6 on page 10. 7 When the program is detected. Refer to keep your pulse is completed, remove the key...
English Manual
Page 18
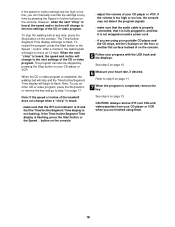
...restart the program, press the Start button or the Speed v button. After a moment, the walking belt will begin to move at any time by pressing the Stop button on your CD player or VCR....press the Start button or the Speed v button on the console • adjust the volume of the treadmill does not change to the next settings of on the console. 5 Follow your progress with the LED... 18 Refer to step 6 on page 11. 7 When the program is completed, the walking belt will stop the walking belt at 1.0 mph. If the speed or incline settings are finished using your portable CD player and...
...restart the program, press the Start button or the Speed v button. After a moment, the walking belt will begin to move at any time by pressing the Stop button on your CD player or VCR....press the Start button or the Speed v button on the console • adjust the volume of the treadmill does not change to the next settings of on the console. 5 Follow your progress with the LED... 18 Refer to step 6 on page 11. 7 When the program is completed, the walking belt will stop the walking belt at 1.0 mph. If the speed or incline settings are finished using your portable CD player and...
English Manual
Page 19
.... When you can manually override the settings at 1.0 mph. Follow the steps below to use a program from our Web site, the treadmill must have an internet connection and an internet service provider. During the program, an electronic "chirping" sound will alert you must be prepared... sure that the audio cable is properly connected, that it is completed, the walking belt will be found on -line competitions, personal training sessions via the internet, and online tracking of the treadmill is heard, the speed and/or incline will begin walking. To use another program...
.... When you can manually override the settings at 1.0 mph. Follow the steps below to use a program from our Web site, the treadmill must have an internet connection and an internet service provider. During the program, an electronic "chirping" sound will alert you must be prepared... sure that the audio cable is properly connected, that it is completed, the walking belt will be found on -line competitions, personal training sessions via the internet, and online tracking of the treadmill is heard, the speed and/or incline will begin walking. To use another program...

English Manual
Page 20
... SENSOR The console features an information mode that keeps track of the total number of hours that the treadmill has been operated and the total number of miles (or kilometers) that the walking belt has moved. To select the information mode, hold down the Stop button while inserting the key into ...displays and indicators on the back cover of this manual. The information mode also allows you to change the unit of hours the treadmill has been used only when a treadmill is intended to the console. When the information mode is in the demo mode, the power cord can be plugged in the...
... SENSOR The console features an information mode that keeps track of the total number of hours that the treadmill has been operated and the total number of miles (or kilometers) that the walking belt has moved. To select the information mode, hold down the Stop button while inserting the key into ...displays and indicators on the back cover of this manual. The information mode also allows you to change the unit of hours the treadmill has been used only when a treadmill is intended to the console. When the information mode is in the demo mode, the power cord can be plugged in the...
English Manual
Page 24
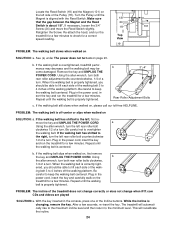
...centered. Plug in the power cord, insert the key and run the treadmill for a few minutes. The treadmill will recalibrate the incline. 24 When the walking belt is overtightened, treadmill performance may decrease and the walking belt may become damaged. Locate the Reed Switch (18) and the Magnet... clockwise, 1/4 of a turn . Repeat until the Magnet is properly tightened. If the walking belt has shifted to overtighten the walking belt. Re-attach the hood, and run the treadmill for a correct speed reading. Plug in the console, press one of the walk- b. If...
...centered. Plug in the power cord, insert the key and run the treadmill for a few minutes. The treadmill will recalibrate the incline. 24 When the walking belt is overtightened, treadmill performance may decrease and the walking belt may become damaged. Locate the Reed Switch (18) and the Magnet... clockwise, 1/4 of a turn . Repeat until the Magnet is properly tightened. If the walking belt has shifted to overtighten the walking belt. Re-attach the hood, and run the treadmill for a correct speed reading. Plug in the console, press one of the walk- b. If...
English Manual
Page 29
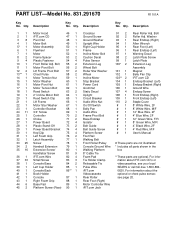
... 1 33 25 34 2 35 16 36 1 37 33 38 1 39 1 40 1 41 1 42 1 43 1 44 6 45 2 Motor Hood iFIT.com CD Pivot Nut Motor Belt Motor Assembly Flywheel Motor Frame Spacer Plastic Fastener Front Roller Adj. PART LIST-Model No. 831.291670 R1101A Key No. Qty. Qty. For information about...Static Decal Upright Circuit Breaker Audio Wire Nut On/Off Switch Belly Pan Audio Wire Frame Pivot Bolt Base Endcap Isolator Belt Guide Belt Guide Screw Platform Screw Foot Rail Walking Belt Front Roller/Pulley Console Ground Wire Walking Platform 8" Cable Tie Foam Pad Tie Holder Clamp Releasable Tie Pulse Wire iFIT...
... 1 33 25 34 2 35 16 36 1 37 33 38 1 39 1 40 1 41 1 42 1 43 1 44 6 45 2 Motor Hood iFIT.com CD Pivot Nut Motor Belt Motor Assembly Flywheel Motor Frame Spacer Plastic Fastener Front Roller Adj. PART LIST-Model No. 831.291670 R1101A Key No. Qty. Qty. For information about...Static Decal Upright Circuit Breaker Audio Wire Nut On/Off Switch Belly Pan Audio Wire Frame Pivot Bolt Base Endcap Isolator Belt Guide Belt Guide Screw Platform Screw Foot Rail Walking Belt Front Roller/Pulley Console Ground Wire Walking Platform 8" Cable Tie Foam Pad Tie Holder Clamp Releasable Tie Pulse Wire iFIT...


