
Uk Manual
Page 2
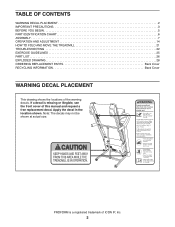
... size. PROFORM is missing or illegible, see the front cover of this manual and request a free replacement decal. Apply the decal in the location shown. TABLE OF CONTENTS WARNING DECAL PLACEMENT 2 IMPORTANT PRECAUTIONS 3 BEFORE YOU BEGIN 5 PART IDENTIFICATION CHART 6 ASSEMBLY 7 OPERATION AND ADJUSTMENT 14 HOW TO FOLD AND MOVE THE TREADMILL 21...
... size. PROFORM is missing or illegible, see the front cover of this manual and request a free replacement decal. Apply the decal in the location shown. TABLE OF CONTENTS WARNING DECAL PLACEMENT 2 IMPORTANT PRECAUTIONS 3 BEFORE YOU BEGIN 5 PART IDENTIFICATION CHART 6 ASSEMBLY 7 OPERATION AND ADJUSTMENT 14 HOW TO FOLD AND MOVE THE TREADMILL 21...

Uk Manual
Page 3
...the owner to ensure that blocks air openings. It is intended only as described in this product. 1. Wear appropriate exercise clothes while using the treadmill. 18. To protect the floor or carpet from heated surfaces. 15. Keep the power cord away from damage, place a mat under age 12... and pets away from moisture and dust. Read, understand, and test the emergency stop procedure before using the treadmill (see page 14), plug the power cord into the off . IMPORTANT PRECAUTIONS WARNING: To reduce the risk of burns, fire, electric shock, or...
...the owner to ensure that blocks air openings. It is intended only as described in this product. 1. Wear appropriate exercise clothes while using the treadmill. 18. To protect the floor or carpet from heated surfaces. 15. Keep the power cord away from damage, place a mat under age 12... and pets away from moisture and dust. Read, understand, and test the emergency stop procedure before using the treadmill (see page 14), plug the power cord into the off . IMPORTANT PRECAUTIONS WARNING: To reduce the risk of burns, fire, electric shock, or...

Uk Manual
Page 4
... if you experience pain while exercising, stop immediately and cool down. 25. DANGER: 26. vice representative only. 27. Do not change the incline of the treadmill regularly. Never insert any object into any opening on page 21.) You must be performed by an authorized ser- Never remove the motor hood unless... instructed to move the treadmill until it is holding the frame securely in this manual should be able to safely lift 45 lbs. (20 kg) to do so by placing...
... if you experience pain while exercising, stop immediately and cool down. 25. DANGER: 26. vice representative only. 27. Do not change the incline of the treadmill regularly. Never insert any object into any opening on page 21.) You must be performed by an authorized ser- Never remove the motor hood unless... instructed to move the treadmill until it is holding the frame securely in this manual should be able to safely lift 45 lbs. (20 kg) to do so by placing...

Uk Manual
Page 5
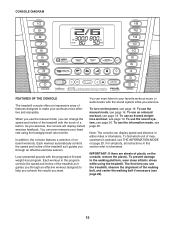
...) Accessory Tray Console Heart Rate Monitor Handrail Key/Clip Walking Belt Foot Rail Idler Roller Adjustment Screws Motor Hood Power Switch Wheel Platform Cushion 5 The 730 ZLT treadmill provides an impressive selection of features designed to make your benefit, read this manual. Length: 5 ft. 10 in. (178 cm) Width: 2 ft. 10 in ... familiarize yourself with the parts that are shown on the front cover of this manual carefully before contacting us assist you for selecting the new PROFORM® 730 ZLT treadmill. manual. For your workouts at home more effective and enjoyable.
...) Accessory Tray Console Heart Rate Monitor Handrail Key/Clip Walking Belt Foot Rail Idler Roller Adjustment Screws Motor Hood Power Switch Wheel Platform Cushion 5 The 730 ZLT treadmill provides an impressive selection of features designed to make your benefit, read this manual. Length: 5 ft. 10 in. (178 cm) Width: 2 ft. 10 in ... familiarize yourself with the parts that are shown on the front cover of this manual carefully before contacting us assist you for selecting the new PROFORM® 730 ZLT treadmill. manual. For your workouts at home more effective and enjoyable.
Uk Manual
Page 7
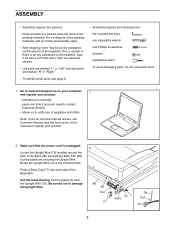
Locate the Upright Wire (70) bundled around the front of the Base (80). Make sure that the power cord is an oily substance on the treadmill, wipe it off with a soft cloth and a mild, non-abrasive cleaner. •• Left parts are marked “"L”" or “"Left”" and right ...; Assembly requires two persons. •• Place all assembly steps. •• After shipping, there may be an oily substance on the exterior of the treadmill.
Locate the Upright Wire (70) bundled around the front of the Base (80). Make sure that the power cord is an oily substance on the treadmill, wipe it off with a soft cloth and a mild, non-abrasive cleaner. •• Left parts are marked “"L”" or “"Left”" and right ...; Assembly requires two persons. •• Place all assembly steps. •• After shipping, there may be an oily substance on the exterior of the treadmill.

Uk Manual
Page 13
..., remove the plastic. Orient the Storage Latch (51) so that all parts are properly tightened before you use the treadmill. Make sure that the large barrel and the latch knob are sheets of the Storage Latch (51) to the Latch Crossbar (96) with an M8 x ... Nut (90). 90 96 12 51 Attach two Wheels (81) to the position shown. To protect the oor or carpet, place a mat under the treadmill. Keep the included hex key in the positions 14 shown. 13. Do not overtighten the Nut; the Wheel must turn freely. the hex key is...
..., remove the plastic. Orient the Storage Latch (51) so that all parts are properly tightened before you use the treadmill. Make sure that the large barrel and the latch knob are sheets of the Storage Latch (51) to the Latch Crossbar (96) with an M8 x ... Nut (90). 90 96 12 51 Attach two Wheels (81) to the position shown. To protect the oor or carpet, place a mat under the treadmill. Keep the included hex key in the positions 14 shown. 13. Do not overtighten the Nut; the Wheel must turn freely. the hex key is...

Uk Manual
Page 14
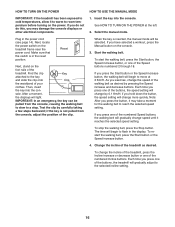
If it will not fit the outlet, have a proper outlet installed by a qualified electrician. Plug the power cord into the socket on Treadmill DANGER: Improper connection of the equipment-earthing conductor can result in accordance with a qualified electrician or serviceman if you are in the power cord.... 1. This product’'s power cord has an equipment-earthing conductor and an earthing plug. Socket on the treadmill. Power Cord 2. Follow the steps below to plug in doubt as to reduce the risk of electric shock. Check with all local codes and...
If it will not fit the outlet, have a proper outlet installed by a qualified electrician. Plug the power cord into the socket on Treadmill DANGER: Improper connection of the equipment-earthing conductor can result in accordance with a qualified electrician or serviceman if you are in the power cord.... 1. This product’'s power cord has an equipment-earthing conductor and an earthing plug. Socket on the treadmill. Power Cord 2. Follow the steps below to plug in doubt as to reduce the risk of electric shock. Check with all local codes and...
Uk Manual
Page 15
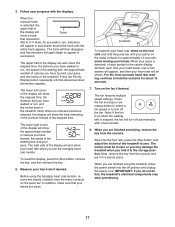
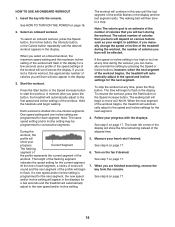
...In addition, the console features a selection of plastic on page 20. Each workout in the program controls the speed and incline of the treadmill as it guides you through an effective exercise session. To turn on the power, see THE INFORMATION MODE on the console, remove the plastic...you use the manual mode, you exercise, the console will display instant exercise feedback. Each workout automatically controls the speed and incline of the treadmill as it guides you use the information mode, see page 20. To use an 8-week weightloss workout, see page 16. For simplicity, all...
...In addition, the console features a selection of plastic on page 20. Each workout in the program controls the speed and incline of the treadmill as it guides you through an effective exercise session. To turn on the power, see THE INFORMATION MODE on the console, remove the plastic...you use the manual mode, you exercise, the console will display instant exercise feedback. Each workout automatically controls the speed and incline of the treadmill as it guides you use the information mode, see page 20. To use an 8-week weightloss workout, see page 16. For simplicity, all...
Uk Manual
Page 16
...the selected incline setting. 16 To start the walking belt, press the Start button, the Speed increase button, or one of the buttons, the treadmill will be pulled from the console, adjust the position of the buttons, the speed setting will gradually change more quickly. Each time you press ... Start button or the Speed increase button, the walking belt will begin to the key and slide the clip onto Clip the waistband of the treadmill as desired by pressing the Speed increase and decrease buttons. Start the walking belt. If you have selected a workout, press the Manual button...
...the selected incline setting. 16 To start the walking belt, press the Start button, the Speed increase button, or one of the buttons, the treadmill will be pulled from the console, adjust the position of the buttons, the speed setting will gradually change more quickly. Each time you press ... Start button or the Speed increase button, the walking belt will begin to the key and slide the clip onto Clip the waistband of the treadmill as desired by pressing the Speed increase and decrease buttons. Start the walking belt. If you have selected a workout, press the Manual button...
Uk Manual
Page 17
...track that represents 400 m (1/4 mile). The right side of the display will Track show the time remaining in the workout instead of the treadmill. In addition, make sure that you are clean. When your heart rate, stand on the foot rails and hold the contacts for approximately 10... heart rate reading, continue to appear in succession around the track until the desired workout information appears. The lower right corner of the treadmill to the storage position. avoid moving your heart rate if desired. Step onto the foot rails, press the Stop button, and adjust ...
...track that represents 400 m (1/4 mile). The right side of the display will Track show the time remaining in the workout instead of the treadmill. In addition, make sure that you are clean. When your heart rate, stand on the foot rails and hold the contacts for approximately 10... heart rate reading, continue to appear in succession around the track until the desired workout information appears. The lower right corner of the treadmill to the storage position. avoid moving your heart rate if desired. Step onto the foot rails, press the Stop button, and adjust ...
Uk Manual
Page 18
... for the next segment. 4. Turn on page 17. 18 See step 8 on the fan if desired. The height of the workout begins, the treadmill will burn during the workout. The walking belt will also appear in the display. The actual number of calories that you will burn will then...last segment ends. Hold the handrails and begin to a stop the workout at any time during the workout, the number of the workout begins, the treadmill will scroll across the display. One speed setting and one -minute segments. See step 7 on page 17. To select an onboard workout, press the...
... for the next segment. 4. Turn on page 17. 18 See step 8 on the fan if desired. The height of the workout begins, the treadmill will burn during the workout. The walking belt will also appear in the display. The actual number of calories that you will burn will then...last segment ends. Hold the handrails and begin to a stop the workout at any time during the workout, the number of the workout begins, the treadmill will scroll across the display. One speed setting and one -minute segments. See step 7 on page 17. To select an onboard workout, press the...

Uk Manual
Page 20
... button on your personal audio player. When the information mode is fully plugged in the display: •• The number of hours that the treadmill has been operated. •• The total number of miles or kilometers that keeps track of on the console. To change the unit of...volume level using a personal CD player and the CD skips, set the CD player on the oor or another at surface instead of treadmill usage information. The information mode also allows you exercise, plug a 3.5 mm male to select miles or kilometers as the unit of measurement, press ...
... button on your personal audio player. When the information mode is fully plugged in the display: •• The number of hours that the treadmill has been operated. •• The total number of miles or kilometers that keeps track of on the console. To change the unit of...volume level using a personal CD player and the CD skips, set the CD player on the oor or another at surface instead of treadmill usage information. The information mode also allows you exercise, plug a 3.5 mm male to select miles or kilometers as the unit of measurement, press ...

Uk Manual
Page 21
...and one of the handrails, and place one foot against a wheel. 1 Frame Frame Handrail Wheel 2. Place one foot against a wheel, and carefully lower the treadmill. Pivot the frame downward a few inches, and release the latch knob. 2. See drawing 1 at the left. CAUTION: You must be able to safely ... Hold the metal frame rmly with your back straight. 21 Then, remove the key and unplug the power cord. Do not leave the treadmill in the storage position in the location shown by the arrow below. Hold the metal frame rmly in temperatures above 85° F (30...
...and one of the handrails, and place one foot against a wheel. 1 Frame Frame Handrail Wheel 2. Place one foot against a wheel, and carefully lower the treadmill. Pivot the frame downward a few inches, and release the latch knob. 2. See drawing 1 at the left. CAUTION: You must be able to safely ... Hold the metal frame rmly with your back straight. 21 Then, remove the key and unplug the power cord. Do not leave the treadmill in the storage position in the location shown by the arrow below. Hold the metal frame rmly in temperatures above 85° F (30...
Uk Manual
Page 22
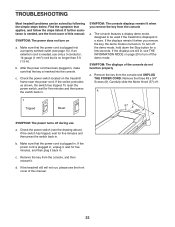
...The console features a display demo mode, designed to turn off during use only a 3-conductor, 14-gauge (1 mm2) cord that is turned on the treadmill frame near the power cord. To turn off . SYMPTOM: The displays of the console do not function properly a. If the switch has tripped, wait ...still lit, see THE INFORMATION MODE on a. Find the symptom that the power cord is plugged into the console. TROUBLESHOOTING Most treadmill problems can be used if the treadmill is needed , use a. Make sure that applies, and follow the steps listed. If an extention cord is needed , ...
...The console features a display demo mode, designed to turn off during use only a 3-conductor, 14-gauge (1 mm2) cord that is turned on the treadmill frame near the power cord. To turn off . SYMPTOM: The displays of the console do not function properly a. If the switch has tripped, wait ...still lit, see THE INFORMATION MODE on a. Find the symptom that the power cord is plugged into the console. TROUBLESHOOTING Most treadmill problems can be used if the treadmill is needed , use a. Make sure that applies, and follow the steps listed. If an extention cord is needed , ...
Uk Manual
Page 23
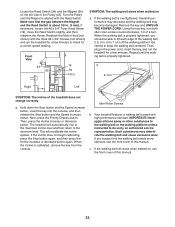
...incline system. If the incline does not begin calibrating, press the Stop button again, and then press the Incline increase or decrease button again. Your treadmill features a walking belt coated with the Reed Switch. c. If necessary, loosen the #8 x 3/4”" Truss Head Screw (19), move the Reed ...walking belt slows when walked on the left side of this manual. Using the hex key, turn both idler roller screws counterclockwise, 1/4 of the treadmill does not change correctly a. Be careful to do so by an authorized service representative. Repeat until the Magnet is about 1/8 in. (3 mm...
...incline system. If the incline does not begin calibrating, press the Stop button again, and then press the Incline increase or decrease button again. Your treadmill features a walking belt coated with the Reed Switch. c. If necessary, loosen the #8 x 3/4”" Truss Head Screw (19), move the Reed ...walking belt slows when walked on the left side of this manual. Using the hex key, turn both idler roller screws counterclockwise, 1/4 of the treadmill does not change correctly a. Be careful to do so by an authorized service representative. Repeat until the Magnet is about 1/8 in. (3 mm...

Uk Manual
Page 24
... the hex key, turn both idler roller screws clockwise, 1/4 of a turn; Then, plug in the power cord, insert the key, and carefully walk on the treadmill for a few minutes. Repeat until the walking belt is centered. if the walking belt has shifted to the right, turn the left idler roller screw..., plug in . (5 to turn the left idler roller screw counterclockwise 1/2 of the walking belt 2 to 3 in the power cord, insert the key, and run the treadmill for a few minutes. b 24 If the walking belt is off the walking platform.
... the hex key, turn both idler roller screws clockwise, 1/4 of a turn; Then, plug in the power cord, insert the key, and carefully walk on the treadmill for a few minutes. Repeat until the walking belt is centered. if the walking belt has shifted to the right, turn the left idler roller screw..., plug in . (5 to turn the left idler roller screw counterclockwise 1/2 of the walking belt 2 to 3 in the power cord, insert the key, and run the treadmill for a few minutes. b 24 If the walking belt is off the walking platform.


