
Uk Manual
Page 2
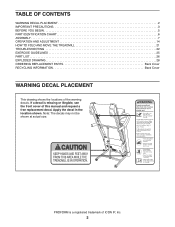
... IMPORTANT PRECAUTIONS 3 BEFORE YOU BEGIN 5 PART IDENTIFICATION CHART 6 ASSEMBLY 7 OPERATION AND ADJUSTMENT 14 HOW TO FOLD AND MOVE THE TREADMILL 21 TROUBLESHOOTING 22 EXERCISE GUIDELINES 25 PART LIST 26 EXPLODED DRAWING 28 ORDERING REPLACEMENT PARTS Back Cover RECYCLING INFORMATION Back Cover WARNING ...DECAL PLACEMENT This drawing shows the locations of this manual and request a free replacement decal. Note: The decals may not be shown at actual size. If a decal is a registered trademark of ICON IP, Inc. 2 PROFORM...
... IMPORTANT PRECAUTIONS 3 BEFORE YOU BEGIN 5 PART IDENTIFICATION CHART 6 ASSEMBLY 7 OPERATION AND ADJUSTMENT 14 HOW TO FOLD AND MOVE THE TREADMILL 21 TROUBLESHOOTING 22 EXERCISE GUIDELINES 25 PART LIST 26 EXPLODED DRAWING 28 ORDERING REPLACEMENT PARTS Back Cover RECYCLING INFORMATION Back Cover WARNING ...DECAL PLACEMENT This drawing shows the locations of this manual and request a free replacement decal. Note: The decals may not be shown at actual size. If a decal is a registered trademark of ICON IP, Inc. 2 PROFORM...
Uk Manual
Page 4
... and adjustment procedures described in this manual. Inspect and properly tighten all parts of the treadmill by placing objects under the treadmill. 24. Do not change the incline of the treadmill regularly. ing the treadmill, and before clean- Over exercising may result in the storage position. ... is properly assembled. (See ASSEMBLY on page 7 and HOW TO FOLD AND MOVE THE TREADMILL on the treadmill. Never remove the motor hood unless instructed to move the treadmill until it is holding the frame securely in serious injury or death. vice representative only. 27...
... and adjustment procedures described in this manual. Inspect and properly tighten all parts of the treadmill by placing objects under the treadmill. 24. Do not change the incline of the treadmill regularly. ing the treadmill, and before clean- Over exercising may result in the storage position. ... is properly assembled. (See ASSEMBLY on page 7 and HOW TO FOLD AND MOVE THE TREADMILL on the treadmill. Never remove the motor hood unless instructed to move the treadmill until it is holding the frame securely in serious injury or death. vice representative only. 27...

Uk Manual
Page 5
..., note the product model number and serial number before you use the treadmill. For your workouts at home more effective and enjoyable. To help us assist you for selecting the new PROFORM® 730 ZLT treadmill. If you have questions after reading this manual, please see the front...familiarize yourself with the parts that are labeled in . (86 cm) Weight: 180 lbs (82 kg) Accessory Tray Console Heart Rate Monitor Handrail Key/Clip Walking Belt Foot Rail Idler Roller Adjustment Screws Motor Hood Power Switch Wheel Platform Cushion 5 The 730 ZLT treadmill provides an impressive selection...
..., note the product model number and serial number before you use the treadmill. For your workouts at home more effective and enjoyable. To help us assist you for selecting the new PROFORM® 730 ZLT treadmill. If you have questions after reading this manual, please see the front...familiarize yourself with the parts that are labeled in . (86 cm) Weight: 180 lbs (82 kg) Accessory Tray Console Heart Rate Monitor Handrail Key/Clip Walking Belt Foot Rail Idler Roller Adjustment Screws Motor Hood Power Switch Wheel Platform Cushion 5 The 730 ZLT treadmill provides an impressive selection...
Uk Manual
Page 7
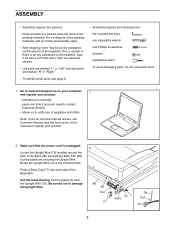
... tie securing the Upright Wire. If there is an oily substance on the treadmill, wipe it off with a soft cloth and a mild, non-abrasive cleaner. •• Left parts are marked “"L”" or “"Left”" and right parts are marked “"R”" or “"Right.”" •• To ... front cover of the packing materials until you nish all parts in a cleared area and remove the packing materials. Cut the plastic tie near the Upright Wire (70). Press a Base Cap (77) into each side of the treadmill. Go to www.iconsupport.eu on the exterior of the Base ...
... tie securing the Upright Wire. If there is an oily substance on the treadmill, wipe it off with a soft cloth and a mild, non-abrasive cleaner. •• Left parts are marked “"L”" or “"Left”" and right parts are marked “"R”" or “"Right.”" •• To ... front cover of the packing materials until you nish all parts in a cleared area and remove the packing materials. Cut the plastic tie near the Upright Wire (70). Press a Base Cap (77) into each side of the treadmill. Go to www.iconsupport.eu on the exterior of the Base ...

Uk Manual
Page 13
... assembly steps. Latch Knob Lower the Frame (49) (see pages 23 and 24). 13 To protect the oor or carpet, place a mat under the treadmill. Keep the included hex key in the positions 14 shown. 13. Attach the lower end of the Storage Latch (51) to the Base (80) with... Attach the upper end of plastic on page 21). 2 81 3 Large Barrel 90 80 104 3 2 81 15. Orient the Storage Latch (51) so that all parts are in a secure place; Do not overtighten the Nut; the hex key is used to the Frame (49) with two 3/8" x 2 1/2" Bolts (2) and two 3/8" Nuts (3). the...
... assembly steps. Latch Knob Lower the Frame (49) (see pages 23 and 24). 13 To protect the oor or carpet, place a mat under the treadmill. Keep the included hex key in the positions 14 shown. 13. Attach the lower end of the Storage Latch (51) to the Base (80) with... Attach the upper end of plastic on page 21). 2 81 3 Large Barrel 90 80 104 3 2 81 15. Orient the Storage Latch (51) so that all parts are in a secure place; Do not overtighten the Nut; the hex key is used to the Frame (49) with two 3/8" x 2 1/2" Bolts (2) and two 3/8" Nuts (3). the...


