

Uk Manual
Page 1
Model No. USER’'S MANUAL www.iconeurope.com Keep this equipment. PETL79713.0 Serial No. Serial Number Decal CUSTOMER SERVICE UNITED KINGDOM Call: 08457 089 009 From Ireland: 053 92 36102 ... 635 WINSTON HILLS NSW 2153 AUSTRALIA CAUTION Read all precautions and instructions in the space above for future reference. Write the serial number in this manual before using this manual for reference.
Model No. USER’'S MANUAL www.iconeurope.com Keep this equipment. PETL79713.0 Serial No. Serial Number Decal CUSTOMER SERVICE UNITED KINGDOM Call: 08457 089 009 From Ireland: 053 92 36102 ... 635 WINSTON HILLS NSW 2153 AUSTRALIA CAUTION Read all precautions and instructions in the space above for future reference. Write the serial number in this manual before using this manual for reference.
Uk Manual
Page 2
... size. PROFORM is missing or illegible, see the front cover of this manual and request a free replacement decal. Apply the decal in the location shown. TABLE OF CONTENTS WARNING DECAL PLACEMENT 2 IMPORTANT PRECAUTIONS 3 BEFORE YOU BEGIN 5 PART IDENTIFICATION CHART 6 ASSEMBLY 7 OPERATION AND ADJUSTMENT 14 HOW TO FOLD AND MOVE THE TREADMILL 21 TROUBLESHOOTING...
... size. PROFORM is missing or illegible, see the front cover of this manual and request a free replacement decal. Apply the decal in the location shown. TABLE OF CONTENTS WARNING DECAL PLACEMENT 2 IMPORTANT PRECAUTIONS 3 BEFORE YOU BEGIN 5 PART IDENTIFICATION CHART 6 ASSEMBLY 7 OPERATION AND ADJUSTMENT 14 HOW TO FOLD AND MOVE THE TREADMILL 21 TROUBLESHOOTING...
Uk Manual
Page 3
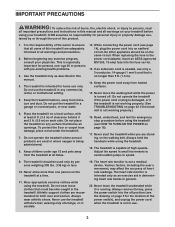
... it is the responsibility of the owner to ensure that all users of this manual and all warnings on your treadmill before using your physician. Read, understand, and test the emergency stop procedure before using the treadmill (see page 14), plug the power cord into the fuse carrier. 13. The... ft. (0.6 m) on the same circuit. It is running. Do not place the treadmill on the treadmill at all times. 12. If an extension cord is needed, use of this manual. 4. Never start the treadmill while you are recommended for personal injury or property damage sus- The heart rate monitor ...
... it is the responsibility of the owner to ensure that all users of this manual and all warnings on your treadmill before using your physician. Read, understand, and test the emergency stop procedure before using the treadmill (see page 14), plug the power cord into the fuse carrier. 13. The... ft. (0.6 m) on the same circuit. It is running. Do not place the treadmill on the treadmill at all times. 12. If an extension cord is needed, use of this manual. 4. Never start the treadmill while you are recommended for personal injury or property damage sus- The heart rate monitor ...
Uk Manual
Page 4
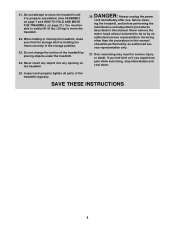
Never remove the motor hood unless instructed to do so by placing objects under the treadmill. 24. Over exercising may result in this manual should be able to safely lift 45 lbs. (20 kg) to move the treadmill. 22. Never insert any object into any opening on page 21.) You must be... performed by an authorized ser- ing the treadmill, and before clean- SAVE THESE INSTRUCTIONS 4 Always ...
Never remove the motor hood unless instructed to do so by placing objects under the treadmill. 24. Over exercising may result in this manual should be able to safely lift 45 lbs. (20 kg) to move the treadmill. 22. Never insert any object into any opening on page 21.) You must be... performed by an authorized ser- ing the treadmill, and before clean- SAVE THESE INSTRUCTIONS 4 Always ...

Uk Manual
Page 5
BEFORE YOU BEGIN Thank you use the treadmill. If you have questions after reading this manual, please see the front cover of features designed to make your benefit, read this manual. The 730 ZLT treadmill provides an impressive selection of this Before reading further, please familiarize yourself with the parts that ... before contacting us assist you, note the product model number and serial number before you for selecting the new PROFORM® 730 ZLT treadmill. manual. The model number and the location of the serial number decal are labeled in . (86 cm) Weight: 180 lbs (82 kg...
BEFORE YOU BEGIN Thank you use the treadmill. If you have questions after reading this manual, please see the front cover of features designed to make your benefit, read this manual. The 730 ZLT treadmill provides an impressive selection of this Before reading further, please familiarize yourself with the parts that ... before contacting us assist you, note the product model number and serial number before you for selecting the new PROFORM® 730 ZLT treadmill. manual. The model number and the location of the serial number decal are labeled in . (86 cm) Weight: 180 lbs (82 kg...

Uk Manual
Page 6
...;-6 6 PART IDENTIFICATION CHART Use the drawings below each drawing is the key number of the part, from the PART LIST near the end of this manual.
...;-6 6 PART IDENTIFICATION CHART Use the drawings below each drawing is the key number of the part, from the PART LIST near the end of this manual.
Uk Manual
Page 7
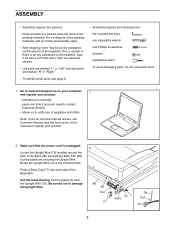
Go to www.iconsupport.eu on your computer and register your product. 1 •• activates your product. 2. Route the Upright Wire out of this manual) to damage the Upright Wire. 2 80 68 Cut 77 70 Hole Tie Cut 70 7 This is unplugged. Make sure that the power cord is normal. ... parts in a cleared area and remove the packing materials. Cut the plastic tie securing the Upright Wire. If there is an oily substance on the treadmill, wipe it off with a soft cloth and a mild, non-abrasive cleaner. •• Left parts are marked “"L”" or “"Left”" and right...
Go to www.iconsupport.eu on your computer and register your product. 1 •• activates your product. 2. Route the Upright Wire out of this manual) to damage the Upright Wire. 2 80 68 Cut 77 70 Hole Tie Cut 70 7 This is unplugged. Make sure that the power cord is normal. ... parts in a cleared area and remove the packing materials. Cut the plastic tie securing the Upright Wire. If there is an oily substance on the treadmill, wipe it off with a soft cloth and a mild, non-abrasive cleaner. •• Left parts are marked “"L”" or “"Left”" and right...
Uk Manual
Page 15
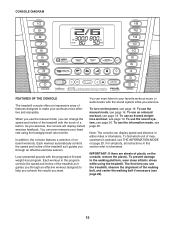
To use the manual mode, see page 16. Note: The console can change the speed and incline of the treadmill with the touch of a button. Each workout in the program controls the speed and incline of the treadmill as it guides you through an effective exercise session. To turn ... refer to kilometers. For simplicity, all instructions in either miles or kilometers. When you use the manual mode, you want. Each workout automatically controls the speed and incline of the treadmill as it guides you use the information mode, see page 18. As you exercise. To ...
To use the manual mode, see page 16. Note: The console can change the speed and incline of the treadmill with the touch of a button. Each workout in the program controls the speed and incline of the treadmill as it guides you through an effective exercise session. To turn ... refer to kilometers. For simplicity, all instructions in either miles or kilometers. When you use the manual mode, you want. Each workout automatically controls the speed and incline of the treadmill as it guides you use the information mode, see page 18. As you exercise. To ...
Uk Manual
Page 16
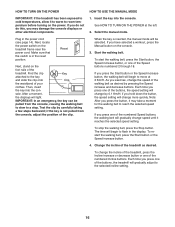
..., the speed setting will gradually change the speed of the clip. sole. When the key is inserted, the manual mode will light. HOW TO TURN ON THE POWER IMPORTANT: If the treadmill has been exposed to cold temperatures, allow it to warm to room temperature before turning on the... displays or other electrical components. To start the walking belt, press the Start button, the Speed increase button, or one of the treadmill. As you have selected a workout, press the Manual button on the foot rails of the numbered Incline buttons. The time will change the incline of the...
..., the speed setting will gradually change the speed of the clip. sole. When the key is inserted, the manual mode will light. HOW TO TURN ON THE POWER IMPORTANT: If the treadmill has been exposed to cold temperatures, allow it to warm to room temperature before turning on the... displays or other electrical components. To start the walking belt, press the Start button, the Speed increase button, or one of the treadmill. As you have selected a workout, press the Manual button on the foot rails of the numbered Incline buttons. The time will change the incline of the...
Uk Manual
Page 17
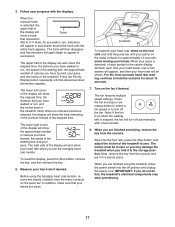
...your pace, and the incline of the display will be at zero or you may wear prematurely. 17 The incline must be shown. When the manual mode is stopped, the fan will show a track that you have walked or run , indicators will Track show the approximate number of plastic ...to turn off position and unplug the power cord. Note: If the fan is on the metal contacts for about 15 seconds. 7. Before using the treadmill, press the power switch into the off automatically after a few minutes. 8. Turn on the pulse bar. Press the fan increase or decrease button to...
...your pace, and the incline of the display will be at zero or you may wear prematurely. 17 The incline must be shown. When the manual mode is stopped, the fan will show a track that you have walked or run , indicators will Track show the approximate number of plastic ...to turn off position and unplug the power cord. Note: If the fan is on the metal contacts for about 15 seconds. 7. Before using the treadmill, press the power switch into the off automatically after a few minutes. 8. Turn on the pulse bar. Press the fan increase or decrease button to...
Uk Manual
Page 18
...seconds and a prole of the speed settings of calories you can manually override the setting by pressing the Speed or Incline buttons; In addition, if you manually change the speed or incline of the treadmill during the workout, the number of the workout will begin to the speed...in this way until the desired workout appears in the display. 3. To stop . The lower left corner of the workout begins, the treadmill will automatically adjust to the speed and incline settings for the current segment. Measure your weight. When you select an onboard workout, the ...
...seconds and a prole of the speed settings of calories you can manually override the setting by pressing the Speed or Incline buttons; In addition, if you manually change the speed or incline of the treadmill during the workout, the number of the workout will begin to the speed...in this way until the desired workout appears in the display. 3. To stop . The lower left corner of the workout begins, the treadmill will automatically adjust to the speed and incline settings for the current segment. Measure your weight. When you select an onboard workout, the ...
Uk Manual
Page 22
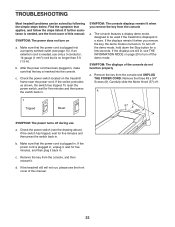
...page 14). b. If the power cord is plugged in a store. If an extention cord is needed , see the front cover of this manual. 22 SYMPTOM: The displays of this manual. Carefully slide the Motor Hood (57) off during use only a 3-conductor, 14-gauge (1 mm2) cord that the power cord is ... switch (see the front cover of the console do not function properly a. c. To reset the power switch, wait for a few seconds. If the treadmill still will not run, please see the drawing above). SYMPTOM: The console displays remain lit when you remove the key, the demo mode is needed...
...page 14). b. If the power cord is plugged in a store. If an extention cord is needed , see the front cover of this manual. 22 SYMPTOM: The displays of this manual. Carefully slide the Motor Hood (57) off during use only a 3-conductor, 14-gauge (1 mm2) cord that the power cord is ... switch (see the front cover of the console do not function properly a. c. To reset the power switch, wait for a few seconds. If the treadmill still will not run, please see the drawing above). SYMPTOM: The console displays remain lit when you remove the key, the demo mode is needed...
Uk Manual
Page 23
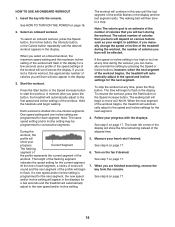
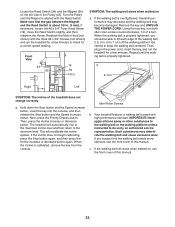
..., 1/4 of the Pulley (43). Reattach the Motor Hood (not shown) with the three #8 x 3/4”" Screws (not shown) and run the treadmill for a few minutes to check for a few minutes. Using the hex key, turn . Repeat until the Magnet is properly tightened, you suspect that ...an authorized service representative. Next, press the Priority Display button. The treadmill will recalibrate the incline system. Idler Roller Screws b. c. If the walking belt is properly tightened. Right Left SYMPTOM: The incline of this manual. 23 If the incline does not begin calibrating, press the Stop ...
..., 1/4 of the Pulley (43). Reattach the Motor Hood (not shown) with the three #8 x 3/4”" Screws (not shown) and run the treadmill for a few minutes to check for a few minutes. Using the hex key, turn . Repeat until the Magnet is properly tightened, you suspect that ...an authorized service representative. Next, press the Priority Display button. The treadmill will recalibrate the incline system. Idler Roller Screws b. c. If the walking belt is properly tightened. Right Left SYMPTOM: The incline of this manual. 23 If the incline does not begin calibrating, press the Stop ...

Uk Manual
Page 27
Qty. Filter Bracket Grounding Bracket Small Cushion User’'s Manual Note: Specifications are not illustrated. 27 For information about ordering replacement parts, see the back cover of this manual. *These parts are subject to change without notice. Key No. Qty. Description Key No. Description 101 1 102 1 103 5 104 1 #8 x 3/4" Bolt #8 Nut #8 Star Washer M8 x 50mm Bolt 105 1 106 1 107 4 * –-
Qty. Filter Bracket Grounding Bracket Small Cushion User’'s Manual Note: Specifications are not illustrated. 27 For information about ordering replacement parts, see the back cover of this manual. *These parts are subject to change without notice. Key No. Qty. Description Key No. Description 101 1 102 1 103 5 104 1 #8 x 3/4" Bolt #8 Nut #8 Star Washer M8 x 50mm Bolt 105 1 106 1 107 4 * –-

Uk Manual
Page 32
...To preserve the environment, this product must not be recycled after its useful life as required by law. In doing so, you purchased this manual) RECYCLING INFORMATION This electronic product must be disposed of in your local city office or the establishment where you will help us assist you, be... prepared to collect this manual. ORDERING REPLACEMENT PARTS To order replacement parts, please see the PART LIST and the EXPLODED DRAWING near the end of this product. Please ...
...To preserve the environment, this product must not be recycled after its useful life as required by law. In doing so, you purchased this manual) RECYCLING INFORMATION This electronic product must be disposed of in your local city office or the establishment where you will help us assist you, be... prepared to collect this manual. ORDERING REPLACEMENT PARTS To order replacement parts, please see the PART LIST and the EXPLODED DRAWING near the end of this product. Please ...


