
English Manual
Page 8
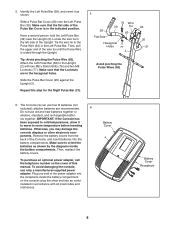
...Side 76 Wire 20 Tie 63 Hexagonal Holes 77 2 63 20 21 Avoid pinching the Pulse Wires (63) 6. To avoid damaging the console, use four D batteries (not included); Have a second person hold the Left Pulse Bar (39) near the Upright (2). Slide the Pulse Bar Cover (20) against the Upright (2). Make... the upper end of the wire tie until the Pulse Wire is in the left side of the power adapter into the receptacle inside the battery compartments. ponents. To purchase an optional power adapter, call the telephone number on the console; Slide a Pulse Bar Cover (20) onto the Left ...
...Side 76 Wire 20 Tie 63 Hexagonal Holes 77 2 63 20 21 Avoid pinching the Pulse Wires (63) 6. To avoid damaging the console, use four D batteries (not included); Have a second person hold the Left Pulse Bar (39) near the Upright (2). Slide the Pulse Bar Cover (20) against the Upright (2). Make... the upper end of the wire tie until the Pulse Wire is in the left side of the power adapter into the receptacle inside the battery compartments. ponents. To purchase an optional power adapter, call the telephone number on the console; Slide a Pulse Bar Cover (20) onto the Left ...
English Manual
Page 21
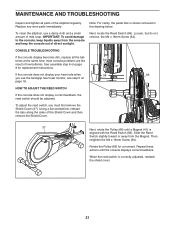
... does not display your heart rate when 58 66 you must first remove the Shield Cover (37). Replace any worn parts immediately. To clean the elliptical, use the handgrip heart rate monitor, see step 5 on page 8 for a moment. Next, locate the Reed Switch (58). To adjust the reed ...adjusted, reattach the shield cover. 21 See assembly step 6 on page 18. CONSOLE TROUBLESHOOTING If the console display becomes dim, replace all parts of low batteries. Repeat these actions until a Magnet (41) is shown removed in the drawing below. Loosen, but do not remove, the M4 x 16mm Screw (64...
... does not display your heart rate when 58 66 you must first remove the Shield Cover (37). Replace any worn parts immediately. To clean the elliptical, use the handgrip heart rate monitor, see step 5 on page 8 for a moment. Next, locate the Reed Switch (58). To adjust the reed ...adjusted, reattach the shield cover. 21 See assembly step 6 on page 18. CONSOLE TROUBLESHOOTING If the console display becomes dim, replace all parts of low batteries. Repeat these actions until a Magnet (41) is shown removed in the drawing below. Loosen, but do not remove, the M4 x 16mm Screw (64...

