
English Manual
Page 2
If a decal is a registered trademark of this manual and request a free replacement decal. Apply the decal in the location shown. PROFORM is missing or illegible, see the front cover of ICON IP, Inc. 2 Note: The decal(s) may not be shown at ... size. TABLE OF CONTENTS WARNING DECAL PLACEMENT 2 IMPORTANT PRECAUTIONS 3 BEFORE YOU BEGIN 4 PART IDENTIFICATION CHART 5 ASSEMBLY 6 HOW TO USE THE ELLIPTICAL 14 FCC INFORMATION 20 MAINTENANCE AND TROUBLESHOOTING 21 EXERCISE GUIDELINES 23 PART LIST 25 EXPLODED DRAWING 26 ORDERING REPLACEMENT PARTS Back Cover LIMITED WARRANTY Back...
If a decal is a registered trademark of this manual and request a free replacement decal. Apply the decal in the location shown. PROFORM is missing or illegible, see the front cover of ICON IP, Inc. 2 Note: The decal(s) may not be shown at ... size. TABLE OF CONTENTS WARNING DECAL PLACEMENT 2 IMPORTANT PRECAUTIONS 3 BEFORE YOU BEGIN 4 PART IDENTIFICATION CHART 5 ASSEMBLY 6 HOW TO USE THE ELLIPTICAL 14 FCC INFORMATION 20 MAINTENANCE AND TROUBLESHOOTING 21 EXERCISE GUIDELINES 23 PART LIST 25 EXPLODED DRAWING 26 ORDERING REPLACEMENT PARTS Back Cover LIMITED WARRANTY Back...
English Manual
Page 3
...for home use only. The heart rate monitor is intended for persons over age 35 or persons with at all times. 15. The elliptical does not have a freewheel; Keep your pedaling speed in a controlled way. 14. Inspect and properly tighten all parts regularly. Over exercising... may affect the accuracy of all precautions. 2. The elliptical is intended only as described in this manual. 9. Various factors may result in serious injury or death. the pedals will continue to ensure ...
...for home use only. The heart rate monitor is intended for persons over age 35 or persons with at all times. 15. The elliptical does not have a freewheel; Keep your pedaling speed in a controlled way. 14. Inspect and properly tighten all parts regularly. Over exercising... may affect the accuracy of all precautions. 2. The elliptical is intended only as described in this manual. 9. Various factors may result in serious injury or death. the pedals will continue to ensure ...
English Manual
Page 4
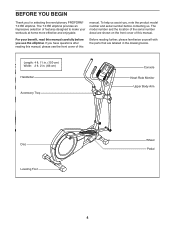
... an impressive selection of features designed to make your benefit, read this manual carefully before contacting us assist you for selecting the revolutionary PROFORM® 7.0 RE elliptical. The model number and the location of this manual. BEFORE YOU BEGIN Thank you , note the product model number and serial number before you have... Monitor Upper Body Arm Disc Leveling Foot Wheel Pedal 4 Length: 4 ft. 11 in. (150 cm) Width: 2 ft. 2 in the drawing below. If you use the elliptical. manual. For your workouts at home more effective and enjoyable. To help us .
... an impressive selection of features designed to make your benefit, read this manual carefully before contacting us assist you for selecting the revolutionary PROFORM® 7.0 RE elliptical. The model number and the location of this manual. BEFORE YOU BEGIN Thank you , note the product model number and serial number before you have... Monitor Upper Body Arm Disc Leveling Foot Wheel Pedal 4 Length: 4 ft. 11 in. (150 cm) Width: 2 ft. 2 in the drawing below. If you use the elliptical. manual. For your workouts at home more effective and enjoyable. To help us .
English Manual
Page 6
... right parts are marked “"R”" or “"Right.”" •• To identify small parts, see page 5. •• In addition to assemble the elliptical, call 1-800-445-2480. •• Assembly requires two persons. •• Place all parts in a cleared area and remove the packing materials.
... right parts are marked “"R”" or “"Right.”" •• To identify small parts, see page 5. •• In addition to assemble the elliptical, call 1-800-445-2480. •• Assembly requires two persons. •• Place all parts in a cleared area and remove the packing materials.

English Manual
Page 10
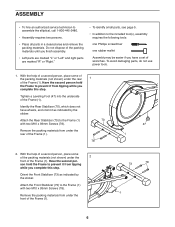
...). Then, tighten both M6 x 18mm Screws (80) in the Pivot Axle (31) at the same time. Repeat this step on the right side of the elliptical. 8 2 Grease 9 33 79 10. Finger tighten an M6 x 18mm Screw (80), a Pivot Cover (32), and an M6 x 18mm Washer (55) into the indicated end of... grease to the axle on the other side of the elliptical. 9. Attach the Right Upper Body Arm (9) with an M8 x 20mm Screw (79) and an M8 Washer (33).
...). Then, tighten both M6 x 18mm Screws (80) in the Pivot Axle (31) at the same time. Repeat this step on the right side of the elliptical. 8 2 Grease 9 33 79 10. Finger tighten an M6 x 18mm Screw (80), a Pivot Cover (32), and an M6 x 18mm Washer (55) into the indicated end of... grease to the axle on the other side of the elliptical. 9. Attach the Right Upper Body Arm (9) with an M8 x 20mm Screw (79) and an M8 Washer (33).

English Manual
Page 12
Identify the Front Pivot Covers (22). Attach a Front Pivot Cover (22) to the Right Upper Body Arm (9) with two M4 x 16mm Screws (64). 13. Repeat this step on the other side of the elliptical. 14 8 22 64 16 9 22 12 Orient the Front Upright Cover (16) as shown. 13 Attach the Front Upright Cover (16) around the Upright (2) by pressing it into the Rear Upright Cover (3). 2 3 14.
Identify the Front Pivot Covers (22). Attach a Front Pivot Cover (22) to the Right Upper Body Arm (9) with two M4 x 16mm Screws (64). 13. Repeat this step on the other side of the elliptical. 14 8 22 64 16 9 22 12 Orient the Front Upright Cover (16) as shown. 13 Attach the Front Upright Cover (16) around the Upright (2) by pressing it into the Rear Upright Cover (3). 2 3 14.

English Manual
Page 13
... 49 75 17. Note: Extra parts may be included. Repeat this step on the other side of the elliptical are properly tightened. Identify the Rear Pivot Covers (19). 15 Attach a Rear Pivot Cover 19) around the Right Upper Body Arm (9) by pressing it as ... hole and the two outer holes to the Right Pedal Arm (49) with three M10 x 35mm Screws (75). Make sure that all parts of the elliptical. 9 19 22 19 16. To protect the floor or carpet from damage, place a mat under the...
... 49 75 17. Note: Extra parts may be included. Repeat this step on the other side of the elliptical are properly tightened. Identify the Rear Pivot Covers (19). 15 Attach a Rear Pivot Cover 19) around the Right Upper Body Arm (9) by pressing it as ... hole and the two outer holes to the Right Pedal Arm (49) with three M10 x 35mm Screws (75). Make sure that all parts of the elliptical. 9 19 22 19 16. To protect the floor or carpet from damage, place a mat under the...

English Manual
Page 14
...your foot here 14 Pull on the upright and have a second person lift the rear stabilizer until the rocking motion is eliminated. If the elliptical rocks slightly on the wheels. Upright Leveling Feet Leveling Foot Lift here Place your floor during use, turn the leveling foot beneath the center of... the frame or turn one of the elliptical, moving it to the desired location, and then lower it requires two persons. HOW TO USE THE ELLIPTICAL HOW TO MOVE THE ELLIPTICAL HOW TO LEVEL THE ELLIPTICAL Due to the size and weight of the wheels.
...your foot here 14 Pull on the upright and have a second person lift the rear stabilizer until the rocking motion is eliminated. If the elliptical rocks slightly on the wheels. Upright Leveling Feet Leveling Foot Lift here Place your floor during use, turn the leveling foot beneath the center of... the frame or turn one of the elliptical, moving it to the desired location, and then lower it requires two persons. HOW TO USE THE ELLIPTICAL HOW TO MOVE THE ELLIPTICAL HOW TO LEVEL THE ELLIPTICAL Due to the size and weight of the wheels.

English Manual
Page 15
..., step off the higher pedal first. the pedals will continue to move until the pedals come to move with a continuous motion. To dismount the elliptical, wait until the flywheel stops. Push the pedals until they begin to a complete stop. however, for variety, you move the pedal discs in ...either direction. Upper Body Arms Handlebars Pedals 15 HOW TO EXERCISE ON THE ELLIPTICAL To mount the elliptical, hold the handlebars or the upper body arms and step onto the pedal that is recommended that you can turn the pedal discs...
..., step off the higher pedal first. the pedals will continue to move until the pedals come to move with a continuous motion. To dismount the elliptical, wait until the flywheel stops. Push the pedals until they begin to a complete stop. however, for variety, you move the pedal discs in ...either direction. Upper Body Arms Handlebars Pedals 15 HOW TO EXERCISE ON THE ELLIPTICAL To mount the elliptical, hold the handlebars or the upper body arms and step onto the pedal that is recommended that you can turn the pedal discs...
English Manual
Page 21
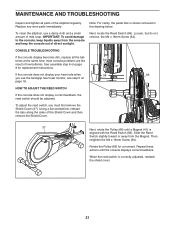
... the handgrip heart rate monitor, see step 5 on page 8 for a moment. CONSOLE TROUBLESHOOTING If the console display becomes dim, replace all parts of the elliptical regularly. To adjust the reed switch, you use a damp cloth and a small amount of low batteries. Repeat these actions until a Magnet (41) is shown removed ...
... the handgrip heart rate monitor, see step 5 on page 8 for a moment. CONSOLE TROUBLESHOOTING If the console display becomes dim, replace all parts of the elliptical regularly. To adjust the reed switch, you use a damp cloth and a small amount of low batteries. Repeat these actions until a Magnet (41) is shown removed ...


