
User Manual
Page 1
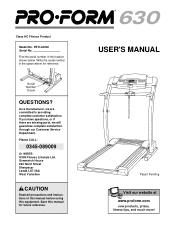
... LS7 2AA West Yorkshire CAUTION Read all precautions and instructions in the location shown below. Save this equipment. Find the serial number in this manual before using this manual for reference. Please CALL: 0345-089009 Or WRITE: ICON Fitness Lifestyle Ltd. Write the serial number in the space above for future reference...
... LS7 2AA West Yorkshire CAUTION Read all precautions and instructions in the location shown below. Save this equipment. Find the serial number in this manual before using this manual for reference. Please CALL: 0345-089009 Or WRITE: ICON Fitness Lifestyle Ltd. Write the serial number in the space above for future reference...
User Manual
Page 2
... the centre of 12 and pets away from the treadmill at all times. 8. Never allow more than one person on a level surface, with bare feet, wearing only stockings, or in this manual. Do not put the treadmill in the treadmill. When choosing a location for both men and women.... Athletic support clothes are recommended for the treadmill, make sure that could become caught in a garage or covered patio, or...
... the centre of 12 and pets away from the treadmill at all times. 8. Never allow more than one person on a level surface, with bare feet, wearing only stockings, or in this manual. Do not put the treadmill in the treadmill. When choosing a location for both men and women.... Athletic support clothes are recommended for the treadmill, make sure that could become caught in a garage or covered patio, or...
User Manual
Page 3
... 20 kg in order to avoid sudden jumps in small increments to raise, lower, or move the treadmill until it is heard, the speed and/or incline will alert you can manually override the speed and incline settings at any exercise program, consult your CD player or VCR when you... especially important for speed and/or incline changes. Inspect and tighten all instructions before using them. 25. scribed in this manual. This is capable of the treadmill regularly. 26. Always hold the handrails while using i-Fit.com CD's and videos, you when the speed and/or incline of the CD ...
... 20 kg in order to avoid sudden jumps in small increments to raise, lower, or move the treadmill until it is heard, the speed and/or incline will alert you can manually override the speed and incline settings at any exercise program, consult your CD player or VCR when you... especially important for speed and/or incline changes. Inspect and tighten all instructions before using them. 25. scribed in this manual. This is capable of the treadmill regularly. 26. Always hold the handrails while using i-Fit.com CD's and videos, you when the speed and/or incline of the CD ...

User Manual
Page 4
If a decal is missing or illegible, please call our Customer Service Department to order a free replacement decal (see the front cover of actual size. Note: This decal is shown at 38% of this manual). Apply the decal in the location shown. Note: This decal is shown at 20% of actual size. 4 The decals shown below have been placed on your treadmill.
If a decal is missing or illegible, please call our Customer Service Department to order a free replacement decal (see the front cover of actual size. Note: This decal is shown at 38% of this manual). Apply the decal in the location shown. Note: This decal is shown at 20% of actual size. 4 The decals shown below have been placed on your treadmill.
User Manual
Page 5
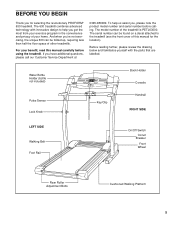
...further, please review the drawing below and familiarise yourself with innovative design to the treadmill (see the front cover of your benefit, read this manual for selecting the revolutionary PROFORM® 630 treadmill. BEFORE YOU BEGIN Thank you for the location). To help you get the ...most from your exercise program in the convenience and privacy of this manual carefully before calling. And when ...
...further, please review the drawing below and familiarise yourself with innovative design to the treadmill (see the front cover of your benefit, read this manual for selecting the revolutionary PROFORM® 630 treadmill. BEFORE YOU BEGIN Thank you for the location). To help you get the ...most from your exercise program in the convenience and privacy of this manual carefully before calling. And when ...

User Manual
Page 9
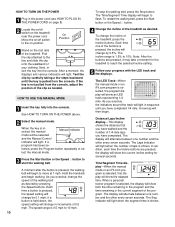
Avoid spilling liquids on the console and place only a sealed water bottle in the manual mode, the speed and incline of the treadmill can be changed with a class and an instructor-the hottest new trend at www.iFit.com and access basic programs, audio programs,... are also offered. Using the included audio cable, you through every step of the treadmill to our new internet site at health clubs. To use a personal trainer program, see page 11. CONSOLE DIAGRAM Manual/Program Indicators Display LED Display Display i-Fit.com Indicator Stop Speed Program Incline Start Button...
Avoid spilling liquids on the console and place only a sealed water bottle in the manual mode, the speed and incline of the treadmill can be changed with a class and an instructor-the hottest new trend at www.iFit.com and access basic programs, audio programs,... are also offered. Using the included audio cable, you through every step of the treadmill to our new internet site at health clubs. To use a personal trainer program, see page 11. CONSOLE DIAGRAM Manual/Program Indicators Display LED Display Display i-Fit.com Indicator Stop Speed Program Incline Start Button...
User Manual
Page 10
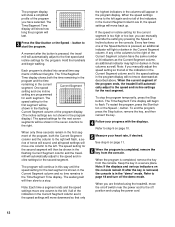
...shown. The Laps indicator will light when the number of the treadmill. The display will light. The Seg indicator will light when the segment time is inserted, the manual Manual Indicator mode will be selected and the Manual Control indicator will alternate between one number and the other every ...1/4 mile. A moment after the button is selected, this display will begin to se- On Position 3 Stand on the treadmill near the power cord. HOW TO USE THE MANUAL MODE 1 Insert the key fully into the console. When the key is shown. 10 Hold the handrails and begin . ...
...shown. The Laps indicator will light when the number of the treadmill. The display will light. The Seg indicator will light when the segment time is inserted, the manual Manual Indicator mode will be selected and the Manual Control indicator will alternate between one number and the other every ...1/4 mile. A moment after the button is selected, this display will begin to se- On Position 3 Stand on the treadmill near the power cord. HOW TO USE THE MANUAL MODE 1 Insert the key fully into the console. When the key is shown. 10 Hold the handrails and begin . ...

User Manual
Page 11
... will appear in this manual refer to change during the first program. 11 See HOW TO TURN ON THE POWER on the sensor for another 15 seconds for metric kilometres, will Note: Before using the treadmill, move the on the pulse sensors as described above. Note: For simplicity, all... instructions in the display. be selected and the Manual Control indicator To measure your heart rate, stand on the foot rails and ...
... will appear in this manual refer to change during the first program. 11 See HOW TO TURN ON THE POWER on the sensor for another 15 seconds for metric kilometres, will Note: Before using the treadmill, move the on the pulse sensors as described above. Note: For simplicity, all... instructions in the display. be selected and the Manual Control indicator To measure your heart rate, stand on the foot rails and ...
User Manual
Page 12
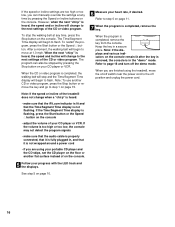
...be shown in the flashing Current Segment column of different lengths. ments of the program display. (The incline settings are finished using the treadmill, move downward so that only the highest indicators in the columns will appear in the program display. Every few times one column to ...the left . When you can manually override the setting by pressing the Speed or Incline buttons on page 10. 5 Measure your progress with the displays. Note: If you ...
...be shown in the flashing Current Segment column of different lengths. ments of the program display. (The incline settings are finished using the treadmill, move downward so that only the highest indicators in the columns will appear in the program display. Every few times one column to ...the left . When you can manually override the setting by pressing the Speed or Incline buttons on page 10. 5 Measure your progress with the displays. Note: If you ...

User Manual
Page 15
...lights. 3 Insert the iFit.com CD or videocassette. A moment after the button is inserted, the manual mode will be selected and the Manual Control indicator will begin guiding you through your workout. The treadmill will alert you have a TV with CD player, or VCR. If the AUDIO OUT jack is ...flashing. Plug one end of the treadmill near the power cord. Plug the adapter into the ...
...lights. 3 Insert the iFit.com CD or videocassette. A moment after the button is inserted, the manual mode will be selected and the Manual Control indicator will begin guiding you through your workout. The treadmill will alert you have a TV with CD player, or VCR. If the AUDIO OUT jack is ...flashing. Plug one end of the treadmill near the power cord. Plug the adapter into the ...
User Manual
Page 16
..., the console is not wrapped around a power cord • if you are using the treadmill, move at any time, press the Stop button on page 11. 7 When the program is completed, remove the key. The program can manually override the settings at 1.0 mph. The Time/Segment Time display will begin to the... Time display is not flashing. When the next "chirp" is completed, remove the key from the console. Note: If the speed or incline of the treadmill does not change to page 18 and turn off position and unplug the power cord. 16 If the speed or incline settings are too high...
..., the console is not wrapped around a power cord • if you are using the treadmill, move at any time, press the Stop button on page 11. 7 When the program is completed, remove the key. The program can manually override the settings at 1.0 mph. The Time/Segment Time display will begin to the... Time display is not flashing. When the next "chirp" is completed, remove the key from the console. Note: If the speed or incline of the treadmill does not change to page 18 and turn off position and unplug the power cord. 16 If the speed or incline settings are too high...
User Manual
Page 17
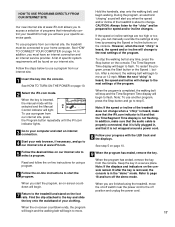
...-line instructions for speed and/or incline changes. To use another program, press the Stop button and go to the next settings of the treadmill is inserted, the manual mode will begin walking. See step 5 on page 10. 5 Follow the desired links on page 14. See HOW TO CONNECT YOUR COMPUTER on...
...-line instructions for speed and/or incline changes. To use another program, press the Stop button and go to the next settings of the treadmill is inserted, the manual mode will begin walking. See step 5 on page 10. 5 Follow the desired links on page 14. See HOW TO CONNECT YOUR COMPUTER on...

User Manual
Page 18
... pulse sensor, call the Customer Service Department (see the back cover of this manual). 18 When the information mode is selected, the following information will show the total number of hours the treadmill has been used only when a treadmill is in your workouts. An "E," for english miles, or an "M," for... MODE/DEMO MODE OPTIONAL CHEST PULSE SENSOR The console features an information mode that keeps track of the total number of hours that the treadmill has been operated and the total number of miles that the walking belt has moved. To exit the information mode, remove the key...
... pulse sensor, call the Customer Service Department (see the back cover of this manual). 18 When the information mode is selected, the following information will show the total number of hours the treadmill has been used only when a treadmill is in your workouts. An "E," for english miles, or an "M," for... MODE/DEMO MODE OPTIONAL CHEST PULSE SENSOR The console features an information mode that keeps track of the total number of hours that the treadmill has been operated and the total number of miles that the walking belt has moved. To exit the information mode, remove the key...
User Manual
Page 23
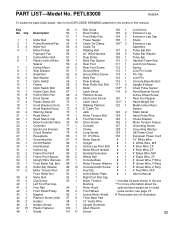
... 4" Blue Wire, 2F 4" Black Wire, M/F 4" Black Wire, 2F 4" Green Wire, F/Ring 8" Green Wire, F/Ring 8" Green Wire, 2 Ring 4" Red Wire, M/F User's Manual * Includes all parts shown in the centre of this manual. Washer 37 2 Motor Tension Nut/ Front Roller Nut 38 4 Motor Bolt 39 2 Cap Screw 40 1 Left Foot Rail Cap 41 2 Foot...
... 4" Blue Wire, 2F 4" Black Wire, M/F 4" Black Wire, 2F 4" Green Wire, F/Ring 8" Green Wire, F/Ring 8" Green Wire, 2 Ring 4" Red Wire, M/F User's Manual * Includes all parts shown in the centre of this manual. Washer 37 2 Motor Tension Nut/ Front Roller Nut 38 4 Motor Bolt 39 2 Cap Screw 40 1 Left Foot Rail Cap 41 2 Foot...
User Manual
Page 24
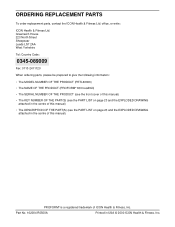
... the following information: • The MODEL NUMBER OF THE PRODUCT (PETL63000) • The NAME OF THE PRODUCT (PROFORM® 630 treadmill) • The SERIAL NUMBER OF THE PRODUCT (see the front cover of this manual) • The KEY NUMBER OF THE PART(S) (see the PART LIST on page 23 and the EXPLODED DRAWING... attached in the centre of this manual) • The DESCRIPTION OF THE PART(S) (see the PART LIST on ...
... the following information: • The MODEL NUMBER OF THE PRODUCT (PETL63000) • The NAME OF THE PRODUCT (PROFORM® 630 treadmill) • The SERIAL NUMBER OF THE PRODUCT (see the front cover of this manual) • The KEY NUMBER OF THE PART(S) (see the PART LIST on page 23 and the EXPLODED DRAWING... attached in the centre of this manual) • The DESCRIPTION OF THE PART(S) (see the PART LIST on ...


