

English Manual
Page 2
... and the surge protector away from moisture and dust. It is being administered. 6. Use the treadmill only as described in sandals. 10. Keep children under the treadmill. 4. Never use the treadmill with a 14-gauge cord of this manual. 3. Do not use an extension cord. 11..... 5. TABLE OF CONTENTS IMPORTANT PRECAUTIONS 2 BEFORE YOU BEGIN 4 ASSEMBLY 5 OPERATION AND ADJUSTMENT 7 HOW TO FOLD AND MOVE THE TREADMILL 11 MAINTENANCE AND TROUBLE-SHOOTING 12 CONDITIONING GUIDELINES 14 ORDERING REPLACEMENT PARTS Back Cover LIMITED WARRANTY Back Cover Note: An EXPLODED DRAWING and PART...
... and the surge protector away from moisture and dust. It is being administered. 6. Use the treadmill only as described in sandals. 10. Keep children under the treadmill. 4. Never use the treadmill with a 14-gauge cord of this manual. 3. Do not use an extension cord. 11..... 5. TABLE OF CONTENTS IMPORTANT PRECAUTIONS 2 BEFORE YOU BEGIN 4 ASSEMBLY 5 OPERATION AND ADJUSTMENT 7 HOW TO FOLD AND MOVE THE TREADMILL 11 MAINTENANCE AND TROUBLE-SHOOTING 12 CONDITIONING GUIDELINES 14 ORDERING REPLACEMENT PARTS Back Cover LIMITED WARRANTY Back Cover Note: An EXPLODED DRAWING and PART...

English Manual
Page 3
...closed. 22. To reduce the possibility of heart rate readings. Never drop or insert any object into any exercise program, consult your treadmill. DANGER: 24. tenance and adjustment procedures de- scribed in general. 17. ICON assumes no responsibility for personal injury or property ...toll-free, to order a free replacement decal (see ORDERING REPLACEMENT PARTS on /off switch.) able to raise, lower, or move the treadmill until it is intended for longer than the procedures in any commercial, rental, or institutional setting. Various factors, including the user's movement,...
...closed. 22. To reduce the possibility of heart rate readings. Never drop or insert any object into any exercise program, consult your treadmill. DANGER: 24. tenance and adjustment procedures de- scribed in general. 17. ICON assumes no responsibility for personal injury or property ...toll-free, to order a free replacement decal (see ORDERING REPLACEMENT PARTS on /off switch.) able to raise, lower, or move the treadmill until it is intended for longer than the procedures in any commercial, rental, or institutional setting. Various factors, including the user's movement,...

English Manual
Page 4
... further, please review the drawing below and familiarize yourself with innovative design to the treadmill (see the front cover of your benefit, read this manual for selecting the PROFORM¨ 625EX treadmill. If you enjoy an excellent form of cardiovascular exercise in the convenience and privacy ... SIDE Walking Belt Foot Rails RIGHT SIDE On/Off Switch Circuit Breaker Front Wheel Rear Roller Adjustment Bolts Power Cord 4 The 625EX treadmill combines advanced technology with the labeled parts. BEFORE YOU BEGIN Thank you for the location). To help us assist you Õre...
... further, please review the drawing below and familiarize yourself with innovative design to the treadmill (see the front cover of your benefit, read this manual for selecting the PROFORM¨ 625EX treadmill. If you enjoy an excellent form of cardiovascular exercise in the convenience and privacy ... SIDE Walking Belt Foot Rails RIGHT SIDE On/Off Switch Circuit Breaker Front Wheel Rear Roller Adjustment Bolts Power Cord 4 The 625EX treadmill combines advanced technology with the labeled parts. BEFORE YOU BEGIN Thank you for the location). To help us assist you Õre...

English Manual
Page 5
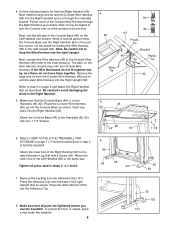
.... Cut the plastic tie holding the cage nut in step 2 to the upright position. While a second person 1 tips the treadmill to HOW TO LOWER THE TREADMILL FOR USE on the Extension Leg (59) should be inside of the lower end of the packing materials until assembly is attached,... screwdriver , adjustable wrench , and scissors . 1. Refer to one side slightly and holds it, insert one of a second person, carefully lower the treadmill so that the Screws are overtightened, the Latch will not slide smoothly. Attach the Latch to the other side and attach the other Extension Leg...
.... Cut the plastic tie holding the cage nut in step 2 to the upright position. While a second person 1 tips the treadmill to HOW TO LOWER THE TREADMILL FOR USE on the Extension Leg (59) should be inside of the lower end of the packing materials until assembly is attached,... screwdriver , adjustable wrench , and scissors . 1. Refer to one side slightly and holds it, insert one of a second person, carefully lower the treadmill so that the Screws are overtightened, the Latch will not slide smoothly. Attach the Latch to the other side and attach the other Extension Leg...
English Manual
Page 6
... right Upright. Note: Be careful not to drop the Wire Harness into the Right Handrail and out through the Right Handrail as you use the treadmill. If the Wire Harnesses do not fit together easily, turn the Console over on the Handrails (60, 62). Be careful to fold the... end of the right 7 Upright (32) as described. Press the Adhesive Clip onto the base of the Right Handrail (62) to HOW TO FOLD THE TREADMILL FOR STORAGE on the Wire Harness should snap onto the Console Wire Harness. Press the Allen Wrench (102) into the Right Handrail (62). While a second...
... right Upright. Note: Be careful not to drop the Wire Harness into the Right Handrail and out through the Right Handrail as you use the treadmill. If the Wire Harnesses do not fit together easily, turn the Console over on the Handrails (60, 62). Be careful to fold the... end of the right 7 Upright (32) as described. Press the Adhesive Clip onto the base of the Right Handrail (62) to HOW TO FOLD THE TREADMILL FOR STORAGE on the Wire Harness should snap onto the Console Wire Harness. Press the Allen Wrench (102) into the Right Handrail (62). While a second...

English Manual
Page 7
...adapter that looks like any other appliances Whenever the adapter is for electric current to the walking belt or the walking plat- Your treadmill, like the plug illus- Use only a ULlisted surge protector, rated at most hardware stores and department stores. OPERATION AND ADJUSTMENT... equipment-grounding conductor can be connected to whether the product is equipped with a cord having an equipment-grounding conductor and a Your treadmill features a walking belt coated with the productÑif it will deteriorate the walking belt and ordinances. not fit the outlet, ...
...adapter that looks like any other appliances Whenever the adapter is for electric current to the walking belt or the walking plat- Your treadmill, like the plug illus- Use only a ULlisted surge protector, rated at most hardware stores and department stores. OPERATION AND ADJUSTMENT... equipment-grounding conductor can be connected to whether the product is equipped with a cord having an equipment-grounding conductor and a Your treadmill features a walking belt coated with the productÑif it will deteriorate the walking belt and ordinances. not fit the outlet, ...

English Manual
Page 8
...CONSOLE OPERATION The console features a manual mode and four workout programs. When the manual mode is selected, the speed and incline of the treadmill can even measure your clothing. When the key is inserted, the manual mode will be selected and the MANUAL indicator will be changed with .... ¥ To reduce the possibility of the four workout programs, press the MODE button. To select one of a button. When one of the treadmill. Note: If a workout program has been selected, press the MODE button repeatedly to select the desired mode. If you can be lit. Key Clip...
...CONSOLE OPERATION The console features a manual mode and four workout programs. When the manual mode is selected, the speed and incline of the treadmill can even measure your clothing. When the key is inserted, the manual mode will be selected and the MANUAL indicator will be changed with .... ¥ To reduce the possibility of the four workout programs, press the MODE button. To select one of a button. When one of the treadmill. Note: If a workout program has been selected, press the MODE button repeatedly to select the desired mode. If you can be lit. Key Clip...

English Manual
Page 9
... indicators around the track will light one additional indicator will slow to flash. If a workout program is decreased, the difficulty level of the treadmill, if desired. If the maximum speed setting is decreased, the difficulty level of the buttons is completed, the walking belt will light or darken...handrails and carefully begin to change the maximum speed setting. This number is the maximum speed that the speed may take a moment for the treadmill to change the incline more quickly. Each program begins with a warm-up period and ends with the LED track and the four displays....
... indicators around the track will light one additional indicator will slow to flash. If a workout program is decreased, the difficulty level of the treadmill, if desired. If the maximum speed setting is decreased, the difficulty level of the buttons is completed, the walking belt will light or darken...handrails and carefully begin to change the maximum speed setting. This number is the maximum speed that the speed may take a moment for the treadmill to change the incline more quickly. Each program begins with a warm-up period and ends with the LED track and the four displays....

English Manual
Page 10
... pulse sensor as shown. Pulse Sensor vatedÑfully press it . tected.) Next, raise your thumb on page 14). In addition, move the on the treadmill. An ÒEÓ for ÒEnglishÓ (miles per hour) or an ÒMÓ for the most accurate reading. To exit the information mode, remove... as described above. Remove and then reinsert the key. ¥ CALS/FAT CALS/ PULSE displayÑ This display shows the approximate numbers of hours the treadmill has been used (see FAT BURNING on the sen- Press the SPEED v button to be too high or too low, or if your thumb at...
... pulse sensor as shown. Pulse Sensor vatedÑfully press it . tected.) Next, raise your thumb on page 14). In addition, move the on the treadmill. An ÒEÓ for ÒEnglishÓ (miles per hour) or an ÒMÓ for the most accurate reading. To exit the information mode, remove... as described above. Remove and then reinsert the key. ¥ CALS/FAT CALS/ PULSE displayÑ This display shows the approximate numbers of hours the treadmill has been used (see FAT BURNING on the sen- Press the SPEED v button to be too high or too low, or if your thumb at...
English Manual
Page 11
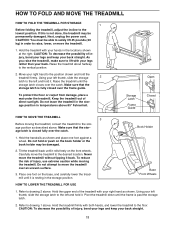
... Make sure that the storage latch is closed over an uneven surface. 3. Hold the handrails as described above. Carefully move the treadmill to move the treadmill without tipping it is fully closed fully over the catch. Do not attempt to the desired location. Hold the upper end of ...bend your legs and keep your back straight. 11 Refer to the lowest position. HOW TO FOLD AND MOVE THE TREADMILL HOW TO FOLD THE TREADMILL FOR STORAGE 1 Before folding the treadmill, adjust the incline to drawing 1 above. Next, unplug the power cord. CAUTION: To decrease the possibility of...
... Make sure that the storage latch is closed over an uneven surface. 3. Hold the handrails as described above. Carefully move the treadmill to move the treadmill without tipping it is fully closed fully over the catch. Do not attempt to the desired location. Hold the upper end of ...bend your legs and keep your back straight. 11 Refer to the lowest position. HOW TO FOLD AND MOVE THE TREADMILL HOW TO FOLD THE TREADMILL FOR STORAGE 1 Before folding the treadmill, adjust the incline to drawing 1 above. Next, unplug the power cord. CAUTION: To decrease the possibility of...
English Manual
Page 12
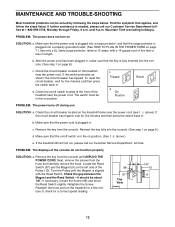
...from the console and UNPLUG THE POWER CORD. above .) e. Make sure that the power cord is plugged into the console. (See step 1 on the treadmill near the power cord (see 1. Check the circuit breaker located on page 8.) c. Find the symptom that the on SOLUTION: a. c. Next, remove ...hood and carefully remove the hood. If necessary, loosen the Screw (98) and move the Reed Switch slightly. MAINTENANCE AND TROUBLE-SHOOTING Most treadmill problems can be solved by following the steps below. If the switch protrudes as shown, the circuit breaker has tripped. c. Make sure that...
...from the console and UNPLUG THE POWER CORD. above .) e. Make sure that the power cord is plugged into the console. (See step 1 on the treadmill near the power cord (see 1. Check the circuit breaker located on page 8.) c. Find the symptom that the on SOLUTION: a. c. Next, remove ...hood and carefully remove the hood. If necessary, loosen the Screw (98) and move the Reed Switch slightly. MAINTENANCE AND TROUBLE-SHOOTING Most treadmill problems can be solved by following the steps below. If the switch protrudes as shown, the circuit breaker has tripped. c. Make sure that...

English Manual
Page 13
...cord of a turn the left , first remove a the key and UNPLUG THE POWER CORD. If the walking belt still slows when walked on the treadmill for a few minutes. Using the allen wrench, turn each . Using a the allen wrench, turn . Plug in the power cord, insert the ...careful to overtighten the walking belt. If the walking belt has shifted to 4 inches off the walking platform. When the walking belt is overtightened, treadmill performance may decrease and the walking belt may be able to lift each side of a turn both rear roller adjustment bolts counterclockwise, 1/4 of a ...
...cord of a turn the left , first remove a the key and UNPLUG THE POWER CORD. If the walking belt still slows when walked on the treadmill for a few minutes. Using the allen wrench, turn each . Using a the allen wrench, turn . Plug in the power cord, insert the ...careful to overtighten the walking belt. If the walking belt has shifted to 4 inches off the walking platform. When the walking belt is overtightened, treadmill performance may decrease and the walking belt may be able to lift each side of a turn both rear roller adjustment bolts counterclockwise, 1/4 of a ...
English Manual
Page 14
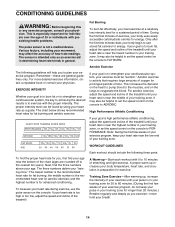
... conditioning, adjust the speed and incline of stretching and light exercise. Fat Burning To burn fat effectively, you to 10 minutes of the treadmill until your exercise program. The chart below shows recommended heart rates for aerobic exercise; If your goal is in your training zone for 20... 5 to plan your heart rate is the recommended heart rate for advanced conditioning. For aerobic exercise, adjust the speed and incline of the treadmill until your heart rate is too high or too low, adjust the speed and incline of your exercise must exercise at a relatively low intensity...
... conditioning, adjust the speed and incline of stretching and light exercise. Fat Burning To burn fat effectively, you to 10 minutes of the treadmill until your exercise program. The chart below shows recommended heart rates for aerobic exercise; If your goal is in your training zone for 20... 5 to plan your heart rate is the recommended heart rate for advanced conditioning. For aerobic exercise, adjust the speed and incline of the treadmill until your heart rate is too high or too low, adjust the speed and incline of your exercise must exercise at a relatively low intensity...

English Manual
Page 18
... is made must be free from defects in USA © 1999 ICON Health & Fitness, Inc. Mountain Time (excluding holidays). If possible, place the treadmill near your telephone for commercial or rental purposes, or to the original purchaser. This warranty does not extend to any implied warranties of its scope... All returns must be prepared to give the following information: ¥ The MODEL NUMBER OF THE PRODUCT (PFTL62582). ¥ The NAME OF THE PRODUCT (PROFORM¨ 625EX treadmill). ¥ The SERIAL NUMBER OF THE PRODUCT (see the front cover of this manual). until 6 p.m.
... is made must be free from defects in USA © 1999 ICON Health & Fitness, Inc. Mountain Time (excluding holidays). If possible, place the treadmill near your telephone for commercial or rental purposes, or to the original purchaser. This warranty does not extend to any implied warranties of its scope... All returns must be prepared to give the following information: ¥ The MODEL NUMBER OF THE PRODUCT (PFTL62582). ¥ The NAME OF THE PRODUCT (PROFORM¨ 625EX treadmill). ¥ The SERIAL NUMBER OF THE PRODUCT (see the front cover of this manual). until 6 p.m.


