
English Manual
Page 2
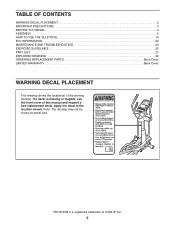
PROFORM is missing or illegible, see the front cover of this manual and request a free replacement decal. TABLE OF CONTENTS WARNING DECAL PLACEMENT 2 IMPORTANT PRECAUTIONS 3 BEFORE YOU BEGIN 4 ASSEMBLY 5 HOW TO USE THE ELLIPTICAL 14 FCC INFORMATION 22 MAINTENANCE AND TROUBLESHOOTING 23 EXERCISE GUIDELINES 25 PART LIST 27 EXPLODED DRAWING 29 ORDERING REPLACEMENT PARTS...
PROFORM is missing or illegible, see the front cover of this manual and request a free replacement decal. TABLE OF CONTENTS WARNING DECAL PLACEMENT 2 IMPORTANT PRECAUTIONS 3 BEFORE YOU BEGIN 4 ASSEMBLY 5 HOW TO USE THE ELLIPTICAL 14 FCC INFORMATION 22 MAINTENANCE AND TROUBLESHOOTING 23 EXERCISE GUIDELINES 25 PART LIST 27 EXPLODED DRAWING 29 ORDERING REPLACEMENT PARTS...

English Manual
Page 5
... PART LIST near the end of the elliptical in a cleared area and remove the packing materials. and a rubber As you assemble the elliptical, use the drawings below each drawing is completed. The number in the hardware kit, check to assemble the elliptical, call 1-800-445-2480. Note: ...If a part is the quantity needed for assembly. Assembly requires two persons. M6 Washer (112)-8 M8 Split Washer (103)-14 M8 Washer (95)-6 Wave Washer ...
... PART LIST near the end of the elliptical in a cleared area and remove the packing materials. and a rubber As you assemble the elliptical, use the drawings below each drawing is completed. The number in the hardware kit, check to assemble the elliptical, call 1-800-445-2480. Note: ...If a part is the quantity needed for assembly. Assembly requires two persons. M6 Washer (112)-8 M8 Split Washer (103)-14 M8 Washer (95)-6 Wave Washer ...

English Manual
Page 6
... page 5 before you begin. Welded 3 Tubes 100 1 6 Orient the Rear Stabilizer (4) as shown. 1 4 Attach the Rear Stabilizer (4) to the floor. 100 Handle 2 67 2. To make assembly easier, read the information on the Rear Stabilizer (4), press the Latch Button (67), and lower the Rear Stabilizer and the Folding Frame (2) to the Folding...
... page 5 before you begin. Welded 3 Tubes 100 1 6 Orient the Rear Stabilizer (4) as shown. 1 4 Attach the Rear Stabilizer (4) to the floor. 100 Handle 2 67 2. To make assembly easier, read the information on the Rear Stabilizer (4), press the Latch Button (67), and lower the Rear Stabilizer and the Folding Frame (2) to the Folding...

English Manual
Page 8
...) and two M6 Washers (112) into each side of the included grease to the Upright Axle (48) and to the Left Pedal Arm (not shown) assembly in the same way. 6 14 104 12 112 111 112 62 8 Identify the Right Pedal (14), the Right Pedal Pad (104), and the Right Pedal...
...) and two M6 Washers (112) into each side of the included grease to the Upright Axle (48) and to the Left Pedal Arm (not shown) assembly in the same way. 6 14 104 12 112 111 112 62 8 Identify the Right Pedal (14), the Right Pedal Pad (104), and the Right Pedal...

English Manual
Page 13
Make sure that all parts of the elliptical are properly tightened. Plug the Power Adapter (138) into the Rear Upright Cover (25). 24 25 5 16. Note: Some hardware may be left over after assembly is completed. Orient the Front Upright Cover (24) as shown. 15 Attach the Front Upright Cover (24) around ...the Upright (5) by pressing the tabs on page 14. 138 135 17. To protect the floor or carpet from damage, place a mat under the elliptical. 13 To plug ...
Make sure that all parts of the elliptical are properly tightened. Plug the Power Adapter (138) into the Rear Upright Cover (25). 24 25 5 16. Note: Some hardware may be left over after assembly is completed. Orient the Front Upright Cover (24) as shown. 15 Attach the Front Upright Cover (24) around ...the Upright (5) by pressing the tabs on page 14. 138 135 17. To protect the floor or carpet from damage, place a mat under the elliptical. 13 To plug ...
English Manual
Page 28
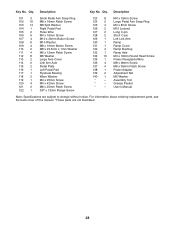
... Ramp Bushing Ramp Axle M4 x 16mm Round Head Screw Power Receptacle/Wire M8 x 38mm Screw M8 x 35mm Patch Screw Power Adapter Adjustment Nut M5 Washer Assembly Tool Grease Packet Userʼs Manual Note: Specifications are not illustrated. 28 For information about ordering replacement parts, see the back cover of this manual...
... Ramp Bushing Ramp Axle M4 x 16mm Round Head Screw Power Receptacle/Wire M8 x 38mm Screw M8 x 35mm Patch Screw Power Adapter Adjustment Nut M5 Washer Assembly Tool Grease Packet Userʼs Manual Note: Specifications are not illustrated. 28 For information about ordering replacement parts, see the back cover of this manual...


