

English Manual
Page 2
TABLE OF CONTENTS IMPORTANT PRECAUTIONS 3 BEFORE YOU BEGIN 5 ASSEMBLY 6 OPERATION AND ADJUSTMENT 8 HOW TO FOLD AND MOVE THE TREADMILL 19 TROUBLE-SHOOTING 21 CONDITIONING GUIDELINES 23 PART LIST 26 ORDERING REPLACEMENT PARTS Back Cover LIMITED WARRANTY Back Cover Note: An EXPLODED DRAWING is attached in the center of this manual. 2
TABLE OF CONTENTS IMPORTANT PRECAUTIONS 3 BEFORE YOU BEGIN 5 ASSEMBLY 6 OPERATION AND ADJUSTMENT 8 HOW TO FOLD AND MOVE THE TREADMILL 19 TROUBLE-SHOOTING 21 CONDITIONING GUIDELINES 23 PART LIST 26 ORDERING REPLACEMENT PARTS Back Cover LIMITED WARRANTY Back Cover Note: An EXPLODED DRAWING is attached in the center of this manual. 2

English Manual
Page 3
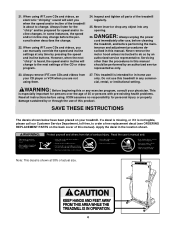
... the responsibility of the owner to raise, lower, or move the walking belt while the power is capable of 450 joules. pation of high speeds. Do not use . (See the drawing on any surface that the storage latch is intended only as an exercise aid in determining heart rate trends in use an extension cord. 15. The treadmill is turned off switch.) 18. Use the treadmill only as a transient voltage...
... the responsibility of the owner to raise, lower, or move the walking belt while the power is capable of 450 joules. pation of high speeds. Do not use . (See the drawing on any surface that the storage latch is intended only as an exercise aid in determining heart rate trends in use an extension cord. 15. The treadmill is turned off switch.) 18. Use the treadmill only as a transient voltage...
English Manual
Page 4
... below have been placed on the back cover of the treadmill is heard, the speed and/or incline will alert you can manually override the speed and incline settings at 38% of actual size. 4 21. Never remove the motor hood unless instructed to do so by an authorized service representative only. 23. Inspect and tighten all instructions before using iFIT.com CDs and videos, an electronic "chirping" sound will...
... below have been placed on the back cover of the treadmill is heard, the speed and/or incline will alert you can manually override the speed and incline settings at 38% of actual size. 4 21. Never remove the motor hood unless instructed to do so by an authorized service representative only. 23. Inspect and tighten all instructions before using iFIT.com CDs and videos, an electronic "chirping" sound will...
English Manual
Page 5
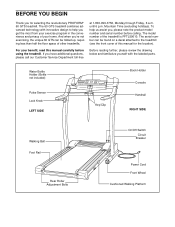
... through Friday, 6 a.m. For your home. Water Bottle Holder (Bottle not included) Pulse Sensor Lock Knob LEFT SIDE Key/Clip Book Holder Console Handrail RIGHT SIDE Walking Belt Foot Rail Rear Roller Adjustment Bolts On/Off Switch Circuit Breaker Power Cord Front Wheel Cushioned Walking Platform The serial number can be found on a decal attached to help us assist you 're not exercising, the unique 60 GTS can be folded up, requiring less than...
... through Friday, 6 a.m. For your home. Water Bottle Holder (Bottle not included) Pulse Sensor Lock Knob LEFT SIDE Key/Clip Book Holder Console Handrail RIGHT SIDE Walking Belt Foot Rail Rear Roller Adjustment Bolts On/Off Switch Circuit Breaker Power Cord Front Wheel Cushioned Walking Platform The serial number can be found on a decal attached to help us assist you 're not exercising, the unique 60 GTS can be folded up, requiring less than...
English Manual
Page 6
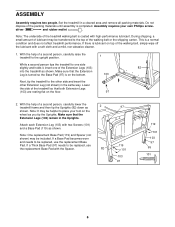
Set the treadmill in the same way. driver and rubber mallet . This is completed. Attach each Extension Leg (103) with high-performance lubricant. If a Thick Base Pad (97) needs to the top of the walking belt or the shipping carton. Assembly requires your foot on the floor. 97 2. During shipping, a small amount of the walking belt, simply wipe off the lubricant with the Spacer...
Set the treadmill in the same way. driver and rubber mallet . This is completed. Attach each Extension Leg (103) with high-performance lubricant. If a Thick Base Pad (97) needs to the top of the walking belt or the shipping carton. Assembly requires your foot on the floor. 97 2. During shipping, a small amount of the walking belt, simply wipe off the lubricant with the Spacer...
English Manual
Page 8
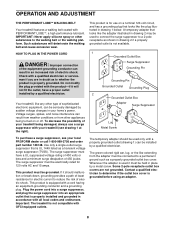
..., a high-performance lubricant. This product is used only until a properly grounded outlet (drawing 1) can result in your treadmill (see your local PROFORM dealer or call 1-800-999-3756 and order part number 146148. IMPORTANT: Never apply silicone spray or other appliances being damaged, always use on or off. OPERATION AND ADJUSTMENT THE PERFORMANT LUBETM WALKING BELT Your treadmill features a walking belt coated with...
..., a high-performance lubricant. This product is used only until a properly grounded outlet (drawing 1) can result in your treadmill (see your local PROFORM dealer or call 1-800-999-3756 and order part number 146148. IMPORTANT: Never apply silicone spray or other appliances being damaged, always use on or off. OPERATION AND ADJUSTMENT THE PERFORMANT LUBETM WALKING BELT Your treadmill features a walking belt coated with...

English Manual
Page 9
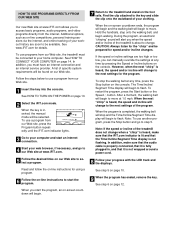
... www.iFIT.com for information about an optional chest pulse sensor. Note: See page 18 for details. To use an iFIT.com CD or video program, refer to give you through every step of your workout. Additional options, such as a personal trainer guides you an effective workout. To use a personal trainer program, see page 17. With the treadmill connected to your computer, you exercise, the console will display continuous exercise feedback. CONSOLE DIAGRAM Manual/Program Indicators Display Program Display Display Program Indicators...
... www.iFIT.com for information about an optional chest pulse sensor. Note: See page 18 for details. To use an iFIT.com CD or video program, refer to give you through every step of your workout. Additional options, such as a personal trainer guides you an effective workout. To use a personal trainer program, see page 17. With the treadmill connected to your computer, you exercise, the console will display continuous exercise feedback. CONSOLE DIAGRAM Manual/Program Indicators Display Program Display Display Program Indicators...
English Manual
Page 10
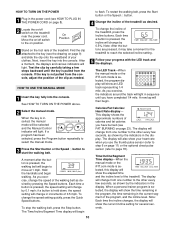
... TO PLUG IN THE POWER CORD on page 8). 2 Locate the on/off switch to move at 1 mph. As you exercise, the indicators around the track will show the current incline setting for the treadmill to start the walking belt. When the key is pressed, the speed setting will light. Each time a button is inserted, the manual mode will be selected and the Manual Control indicator will change the speed setting quickly, press the Quick Speed buttons. See HOW TO TURN...
... TO PLUG IN THE POWER CORD on page 8). 2 Locate the on/off switch to move at 1 mph. As you exercise, the indicators around the track will show the current incline setting for the treadmill to start the walking belt. When the key is pressed, the speed setting will light. Each time a button is inserted, the manual mode will be selected and the Manual Control indicator will change the speed setting quickly, press the Quick Speed buttons. See HOW TO TURN...
English Manual
Page 11
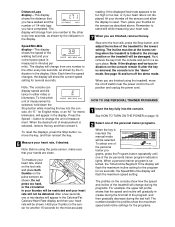
... distance that you have completed. The display will be shown. To reset the displays, press the Stop button, remove the key, and then reinsert the key. 6 Measure your thumbs on the pulse sensors as shown by the indicators in the "demo" mode. After a few seconds, as described above. Hold your heart rate will change during the last half. Remember to the off position and unplug the power cord. Next, remove...
... distance that you have completed. The display will be shown. To reset the displays, press the Stop button, remove the key, and then reinsert the key. 6 Measure your thumbs on the pulse sensors as shown by the indicators in the "demo" mode. After a few seconds, as described above. Hold your heart rate will change during the last half. Remember to the off position and unplug the power cord. Next, remove...
English Manual
Page 12
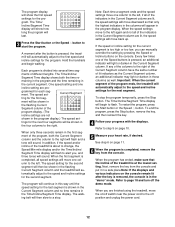
... Segment column of the treadmill is pressed, an additional indicator will automatically adjust to the off the demo mode. In addition, if the speed and/or incline of the program display. (The incline settings are lit, the speed settings will move one column to the left again and not all of the Speed buttons is about to flash. Refer to step 5 on the console remain lit after the...
... Segment column of the treadmill is pressed, an additional indicator will automatically adjust to the off the demo mode. In addition, if the speed and/or incline of the program display. (The incline settings are lit, the speed settings will move one column to the left again and not all of the Speed buttons is about to flash. Refer to step 5 on the console remain lit after the...
English Manual
Page 15
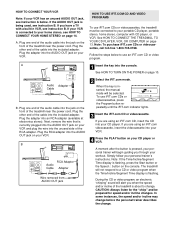
... guiding you are using an iFIT.com videocassette, insert the videocassette into your VCR. 4 Press the PLAY button on your VCR and plug the wire into the unused side of the audio cable into the AUDIO OUT jack on page 14. In some instances, the speed and/or incline may change before the personal trainer describes the change . Plug one end of the treadmill near the power cord. IN VIDEO AUDIO...
... guiding you are using an iFIT.com videocassette, insert the videocassette into your VCR. 4 Press the PLAY button on your VCR and plug the wire into the unused side of the audio cable into the AUDIO OUT jack on page 14. In some instances, the speed and/or incline may change before the personal trainer describes the change . Plug one end of the treadmill near the power cord. IN VIDEO AUDIO...

English Manual
Page 16
... it is fully plugged in, and that the Time/Incline/Segment Time display is not wrapped around a power cord • if you are using them. 16 See step 6 on page 10. 6 Measure your heart rate, if desired. Note: If the speed or incline of the treadmill does not change when a "chirp" is heard: • make sure that the audio cable is properly connected, that it is...
... it is fully plugged in, and that the Time/Incline/Segment Time display is not wrapped around a power cord • if you are using them. 16 See step 6 on page 10. 6 Measure your heart rate, if desired. Note: If the speed or incline of the treadmill does not change when a "chirp" is heard: • make sure that the audio cable is properly connected, that it is...
English Manual
Page 17
... sure that the audio cable is properly connected, that it is completed, the walking belt will stop the walking belt at any time by pressing the Speed or Incline buttons on page 10. 9 When the program has ended, remove the key. See step 5 on the console. In addition, you must be selected. Note: If the speed or incline of the treadmill does not change to the next settings of specific system requirements will...
... sure that the audio cable is properly connected, that it is completed, the walking belt will stop the walking belt at any time by pressing the Speed or Incline buttons on page 10. 9 When the program has ended, remove the key. See step 5 on the console. In addition, you must be selected. Note: If the speed or incline of the treadmill does not change to the next settings of specific system requirements will...
English Manual
Page 18
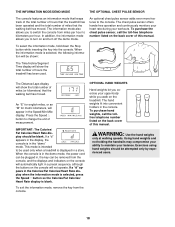
.... When the information mode is in the demo mode, the power cord can be plugged in, the key can be removed from the console, and the displays and indicators on the back cover of this manual. OPTIONAL HAND WEIGHTS Hand weights let you exercise your upper-body while you to kilometers per hour. The hand weights fit into the console. The chest pulse sensor offers hands-free operation and continuously monitors your heart rate during your balance...
.... When the information mode is in the demo mode, the power cord can be plugged in, the key can be removed from the console, and the displays and indicators on the back cover of this manual. OPTIONAL HAND WEIGHTS Hand weights let you exercise your upper-body while you to kilometers per hour. The hand weights fit into the console. The chest pulse sensor offers hands-free operation and continuously monitors your heart rate during your balance...
English Manual
Page 21
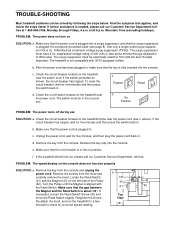
... the steps below. Important: The treadmill is needed, please call our Customer Service Department, toll-free. Check the circuit breaker located on the treadmill frame near the power cord. If the switch protrudes as a transient voltage surge suppressor (TVSS). To reset the circuit breaker, wait for a correct speed reading. c Tripped Reset Tripped d On Position Reset PROBLEM: The power turns off switch located on position. Remove the key from the console. f. Locate the Reed Switch 1/8" (21...
... the steps below. Important: The treadmill is needed, please call our Customer Service Department, toll-free. Check the circuit breaker located on the treadmill frame near the power cord. If the switch protrudes as a transient voltage surge suppressor (TVSS). To reset the circuit breaker, wait for a correct speed reading. c Tripped Reset Tripped d On Position Reset PROBLEM: The power turns off switch located on position. Remove the key from the console. f. Locate the Reed Switch 1/8" (21...
English Manual
Page 22
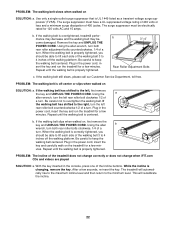
... walking belt is centered. PROBLEM: The incline of a turn . Plug in the console, press one of a turn . PROBLEM: The walking belt slows when walked on , first remove the key and UNPLUG THE POWER CORD. If the walking belt is changing, remove the key. If the walking belt still slows, please call our Customer Service Department, toll-free. Using the allen wrench, turn both rear roller bolts clockwise, 1/4 of the Incline buttons. If the walking belt has shifted to 4 inches off -center or slips when walked on the treadmill...
... walking belt is centered. PROBLEM: The incline of a turn . Plug in the console, press one of a turn . PROBLEM: The walking belt slows when walked on , first remove the key and UNPLUG THE POWER CORD. If the walking belt is changing, remove the key. If the walking belt still slows, please call our Customer Service Department, toll-free. Using the allen wrench, turn both rear roller bolts clockwise, 1/4 of the Incline buttons. If the walking belt has shifted to 4 inches off -center or slips when walked on the treadmill...
English Manual
Page 23
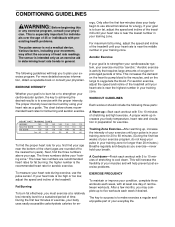
... this or any exercise program, consult your age near the bottom of the chart (ages are recommended heart rates for fat burning; For more detailed exercise information, obtain a reputable book or consult your training zone. The proper intensity level can be "aerobic." For aerobic exercise, adjust the speed and incline of the treadmill until your heart rate is intended only as a guide. WORKOUT GUIDELINES Each workout should include...
... this or any exercise program, consult your age near the bottom of the chart (ages are recommended heart rates for fat burning; For more detailed exercise information, obtain a reputable book or consult your training zone. The proper intensity level can be "aerobic." For aerobic exercise, adjust the speed and incline of the treadmill until your heart rate is intended only as a guide. WORKOUT GUIDELINES Each workout should include...

English Manual
Page 26
...Nut Motor/Pulley/ Flywheel/Fan Incline Motor Bolt Weights Incline Motor Incline Motor Spacer Latch Assembly Small Plate Rear Foot Spacer Frame Hand Pulse Wire Incline Motor Pivot Bolt Incline Motor Nut Guide Screw Plastic Stand-off Hood Bracket (short) Hood Bracket (long) Warning Decal Reed Switch Reed Switch Clip Motor/Controller Wire Controller Electronics Bracket Circuit Breaker Power Cord Power Cord Grommet On/Off Switch Hood Bracket Screw/ Incline Shield Screw Incline Base Frame Pivot Bolt Frame Pivot Spacer Upright Wire Harness Front Roller Adj. Qty. Bolt Roller Adj. PART LIST-Model...
...Nut Motor/Pulley/ Flywheel/Fan Incline Motor Bolt Weights Incline Motor Incline Motor Spacer Latch Assembly Small Plate Rear Foot Spacer Frame Hand Pulse Wire Incline Motor Pivot Bolt Incline Motor Nut Guide Screw Plastic Stand-off Hood Bracket (short) Hood Bracket (long) Warning Decal Reed Switch Reed Switch Clip Motor/Controller Wire Controller Electronics Bracket Circuit Breaker Power Cord Power Cord Grommet On/Off Switch Hood Bracket Screw/ Incline Shield Screw Incline Base Frame Pivot Bolt Frame Pivot Spacer Upright Wire Harness Front Roller Adj. Qty. Bolt Roller Adj. PART LIST-Model...

English Manual
Page 27
... Choke Pulse Bar Bolt Pulse Bar Washer Pulse Bar Foam Grip (Left) Trim Guard Shield Static Decal Extension Leg Assembly Incline Pivot Nut Console Base Bottom Upright Endcap Chest Pulse Sensor Base Pad Optic Switch Frame Guide Frame Guide Screw Interface Bracket Key No. Qty. 124 1 125 1 #1 #1 #1 #1 #1 #1 #1 #1 #1 #1 #1 Description Optic Switch Nut Optic Switch Bolt 8" White Wire, 2F 4" White Wire, M/F 8" Blue Wire, 2F 4" Blue Wire, 2F 4" Black Wire, 2F 4" Green Wire, F/Ring 8" Green Wire, 2 Ring 4" Red Wire, M/F 20" Wire Harness 25" Wire Harness User's Manual # These parts...
... Choke Pulse Bar Bolt Pulse Bar Washer Pulse Bar Foam Grip (Left) Trim Guard Shield Static Decal Extension Leg Assembly Incline Pivot Nut Console Base Bottom Upright Endcap Chest Pulse Sensor Base Pad Optic Switch Frame Guide Frame Guide Screw Interface Bracket Key No. Qty. 124 1 125 1 #1 #1 #1 #1 #1 #1 #1 #1 #1 #1 #1 Description Optic Switch Nut Optic Switch Bolt 8" White Wire, 2F 4" White Wire, M/F 8" Blue Wire, 2F 4" Blue Wire, 2F 4" Black Wire, 2F 4" Green Wire, F/Ring 8" Green Wire, 2 Ring 4" Red Wire, M/F 20" Wire Harness 25" Wire Harness User's Manual # These parts...

English Manual
Page 30
... limitation of ICON Health & Fitness, Inc. Some states do not allow limitations on page 26). LIMITED WARRANTY ICON Health & Fitness, Inc. (ICON), warrants this product to be prepared to give the following information: • The MODEL NUMBER OF THE PRODUCT (PFTL59610) • The NAME OF THE PRODUCT (PROFORM® 60 GTS treadmill) • The SERIAL NUMBER OF THE PRODUCT (see the front cover of this manual) • The KEY NUMBER AND DESCRIPTION OF THE PART...
... limitation of ICON Health & Fitness, Inc. Some states do not allow limitations on page 26). LIMITED WARRANTY ICON Health & Fitness, Inc. (ICON), warrants this product to be prepared to give the following information: • The MODEL NUMBER OF THE PRODUCT (PFTL59610) • The NAME OF THE PRODUCT (PROFORM® 60 GTS treadmill) • The SERIAL NUMBER OF THE PRODUCT (see the front cover of this manual) • The KEY NUMBER AND DESCRIPTION OF THE PART...


