

English Manual
Page 2
TABLE OF CONTENTS IMPORTANT PRECAUTIONS 3 BEFORE YOU BEGIN 5 ASSEMBLY 6 OPERATION AND ADJUSTMENT 9 HOW TO FOLD AND MOVE THE TREADMILL 17 TROUBLESHOOTING 19 CONDITIONING GUIDELINES 21 PART LIST 23 ORDERING REPLACEMENT PARTS Back Cover LIMITED WARRANTY Back Cover Note: An EXPLODED DRAWING is a registered trademark of this manual. PROFORM is attached in the center of ICON IP, Inc. 2
TABLE OF CONTENTS IMPORTANT PRECAUTIONS 3 BEFORE YOU BEGIN 5 ASSEMBLY 6 OPERATION AND ADJUSTMENT 9 HOW TO FOLD AND MOVE THE TREADMILL 17 TROUBLESHOOTING 19 CONDITIONING GUIDELINES 21 PART LIST 23 ORDERING REPLACEMENT PARTS Back Cover LIMITED WARRANTY Back Cover Note: An EXPLODED DRAWING is a registered trademark of this manual. PROFORM is attached in the center of ICON IP, Inc. 2
English Manual
Page 3
... read the following important precautions and information before operating the treadmill. 1. Do not operate the treadmill where aerosol products are adequately informed of high speeds. When connecting the power cord (see your local PROFORM dealer or call the 15. Always hold the handrails while... using the treadmill. The pulse sensor is capable of all times. 7. toll-free telephone number on page ...
... read the following important precautions and information before operating the treadmill. 1. Do not operate the treadmill where aerosol products are adequately informed of high speeds. When connecting the power cord (see your local PROFORM dealer or call the 15. Always hold the handrails while... using the treadmill. The pulse sensor is capable of all times. 7. toll-free telephone number on page ...
English Manual
Page 4
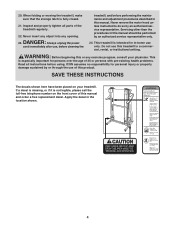
...with pre-existing health problems. Read all parts of this manual. 20. Servicing other than the procedures in this treadmill in the location shown. 4 This treadmill is especially important for personal injury or property damage sustained by or through the use this manual should be performed ...and properly tighten all instructions before performing the maintenance and adjustment procedures described in -home use only. When folding or moving the treadmill, make sure that the storage latch is not legible, please call the toll-free telephone number on your physician. Do not use ...
...with pre-existing health problems. Read all parts of this manual. 20. Servicing other than the procedures in this treadmill in the location shown. 4 This treadmill is especially important for personal injury or property damage sustained by or through the use this manual should be performed ...and properly tighten all instructions before performing the maintenance and adjustment procedures described in -home use only. When folding or moving the treadmill, make sure that the storage latch is not legible, please call the toll-free telephone number on your physician. Do not use ...
English Manual
Page 5
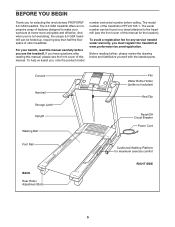
... Circuit Breaker Power Cord Cushioned Walking Platform for any service needed under warranty, you must register the treadmill at home more enjoyable and effective. The 6.0 GSX treadmill offers an impressive array of this manual, please see the front cover of features designed to the... treadmill (see the front cover of the treadmill is PFTL51105.1. If you have questions after reading this manual for selecting the revolutionary PROFORM® 6.0 GSX treadmill. BEFORE YOU BEGIN Thank you for the location). Before reading...
... Circuit Breaker Power Cord Cushioned Walking Platform for any service needed under warranty, you must register the treadmill at home more enjoyable and effective. The 6.0 GSX treadmill offers an impressive array of this manual, please see the front cover of features designed to the... treadmill (see the front cover of the treadmill is PFTL51105.1. If you have questions after reading this manual for selecting the revolutionary PROFORM® 6.0 GSX treadmill. BEFORE YOU BEGIN Thank you for the location). Before reading...

English Manual
Page 6
... the Extension Leg Nuts in the same way. ASSEMBLY To hire an authorized service technician to the base of a second person, carefully tip the treadmill onto its left side as shown. Assembly requires the included allen wrench and your own phillips screwdriver a shaft at least 6" long) and wire cutters... . (with Star Washers (8) into the Extension Leg Nuts. With the help of a second person, carefully tip the treadmill onto the other side and attach the other Extension Leg in place and insert two Extension Leg Bolts (65) with Use the drawings below to...
... the Extension Leg Nuts in the same way. ASSEMBLY To hire an authorized service technician to the base of a second person, carefully tip the treadmill onto its left side as shown. Assembly requires the included allen wrench and your own phillips screwdriver a shaft at least 6" long) and wire cutters... . (with Star Washers (8) into the Extension Leg Nuts. With the help of a second person, carefully tip the treadmill onto the other side and attach the other Extension Leg in place and insert two Extension Leg Bolts (65) with Use the drawings below to...
English Manual
Page 7
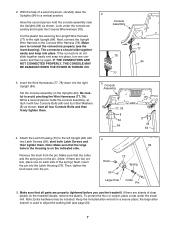
... the Housing is used to the right Upright (84). Make sure to connect the connectors properly (see page 20). 7 Set the console assembly on the treadmill decals, remove the plastic. start both Latch Screws and then tighten them . 3 Console Assembly 77, 78 8 64 84 8 64 84 4. While a second ...to adjust the walking belt (see the inset drawing). Console Assembly 78 77 78 77 84 3. If there are properly tightened before you use the treadmill. Remove the knob from the pin. With the help of the spring.) Next, insert the pin into place, turn one on the indicated side...
... the Housing is used to the right Upright (84). Make sure to connect the connectors properly (see page 20). 7 Set the console assembly on the treadmill decals, remove the plastic. start both Latch Screws and then tighten them . 3 Console Assembly 77, 78 8 64 84 8 64 84 4. While a second ...to adjust the walking belt (see the inset drawing). Console Assembly 78 77 78 77 84 3. If there are properly tightened before you use the treadmill. Remove the knob from the pin. With the help of the spring.) Next, insert the pin into place, turn one on the indicated side...
English Manual
Page 9
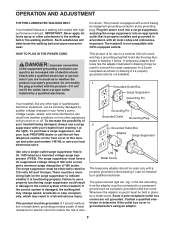
..., and noise interference can be connected to a 2-pole receptacle as a properly grounded outlet box cover. To decrease the possibility of your treadmill being turned on the surge suppressor to the control system of 450 joules. To purchase a surge suppressor, see your local electronics store. ...or other substances to determine if the outlet box cover is for use a properly functioning surge suppressor could result in your treadmill (see your local PROFORM dealer or call the toll-free telephone number on a nominal 120-volt circuit, and has a grounding plug that looks ...
..., and noise interference can be connected to a 2-pole receptacle as a properly grounded outlet box cover. To decrease the possibility of your treadmill being turned on the surge suppressor to the control system of 450 joules. To purchase a surge suppressor, see your local electronics store. ...or other substances to determine if the outlet box cover is for use a properly functioning surge suppressor could result in your treadmill (see your local PROFORM dealer or call the toll-free telephone number on a nominal 120-volt circuit, and has a grounding plug that looks ...
English Manual
Page 10
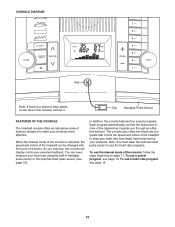
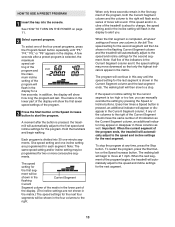
... a sheet of clear plastic on page 11. In addition, the console features four preset programs. Each program automatically controls the speed and incline of the treadmill as it . To use a heart rate program, see page 14. 10 To use a preset program, see page 16). You can be changed with the touch... of a button. The console also offers two heart rate programs that control the speed and incline of the treadmill to use the heart rate programs. To use the manual mode of the console, follow the steps beginning on the face of the console, remove...
... a sheet of clear plastic on page 11. In addition, the console features four preset programs. Each program automatically controls the speed and incline of the treadmill as it . To use a heart rate program, see page 14. 10 To use a preset program, see page 16). You can be changed with the touch... of a button. The console also offers two heart rate programs that control the speed and incline of the treadmill to use the heart rate programs. To use the manual mode of the console, follow the steps beginning on the face of the console, remove...
English Manual
Page 11
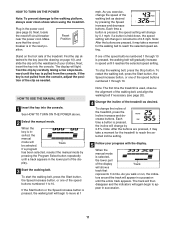
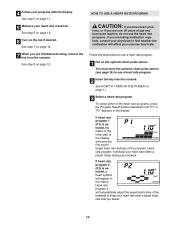
... When the key is not pulled from the console. Reset Position Stand on page 10), and slide the clip onto the waistband of the treadmill. Find the clip attached to reach the selected incline setting. 5 Follow your clothes. The track will then disappear and the indicators will change... Start button or the Speed increase button is pressed, the speed setting will begin to the walking platform, always wear clean shoes when using the treadmill. Each time a button is pressed, the walking belt will change the incline of the clip as desired by 0.1 mph; play. 3 Start ...
... When the key is not pulled from the console. Reset Position Stand on page 10), and slide the clip onto the waistband of the treadmill. Find the clip attached to reach the selected incline setting. 5 Follow your clothes. The track will then disappear and the indicators will change... Start button or the Speed increase button is pressed, the speed setting will begin to the walking platform, always wear clean shoes when using the treadmill. Each time a button is pressed, the walking belt will change the incline of the clip as desired by 0.1 mph; play. 3 Start ...
English Manual
Page 12
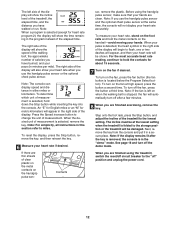
... the walking belt is selected, remove the key. Note: If the fan is left side of the display will show the incline level of the treadmill, the elapsed time, and the distance you have burned, and your pace (in minutes per mile). Note: The console can display speed and distance in.../off circuit breaker to the "off after the key is removed, the console is folded to the storage position or the treadmill will be at the lowest setting when the treadmill is in the "demo" mode. The right side of the display will show the speed of the walking belt, the approximate...
... the walking belt is selected, remove the key. Note: If the fan is left side of the display will show the incline level of the treadmill, the elapsed time, and the distance you have burned, and your pace (in minutes per mile). Note: The console can display speed and distance in.../off circuit breaker to the "off after the key is removed, the console is folded to the storage position or the treadmill will be at the lowest setting when the treadmill is in the "demo" mode. The right side of the display will show the speed of the walking belt, the approximate...
English Manual
Page 13
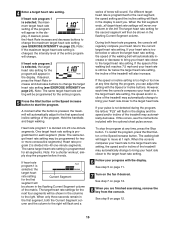
...time, press the Stop button. in the display for the second segment will then be shown in the flashing Current Segment column and the treadmill will move downward so that only the highest indicators appear in the display to the right. The speed setting for each segment. Note:...begin walking. One speed setting and one -minute segments. Note: The same speed setting and/or incline setting may move one of the treadmill is shown in the Current Segment column; The program will automatically adjust to the first speed and incline settings for the next segment. The...
...time, press the Stop button. in the display for the second segment will then be shown in the flashing Current Segment column and the treadmill will move downward so that only the highest indicators appear in the display to the right. The speed setting for each segment. Note:...begin walking. One speed setting and one -minute segments. Note: The same speed setting and/or incline setting may move one of the treadmill is shown in the Current Segment column; The program will automatically adjust to the first speed and incline settings for the next segment. The...
English Manual
Page 14
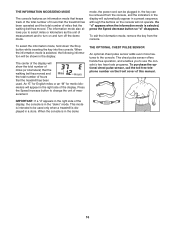
... in the lower part of the display will keep your workout. Heart rate program 1 will show the first seven target heart rate settings of the treadmill to find whether the medication will affect your exercise heart rate. Heart rate program 2 will automatically adjust the speed and incline of the program. See...
... in the lower part of the display will keep your workout. Heart rate program 1 will show the first seven target heart rate settings of the treadmill to find whether the medication will affect your exercise heart rate. Heart rate program 2 will automatically adjust the speed and incline of the program. See...
English Manual
Page 15
...will be programmed for each time the console compares your heart rate to the target heart rate setting, the speed and/or incline of the treadmill may automatically change . To restart the program, press the Start button or the Speed increase button. A moment after the button is not ...rate setting may automatically decrease. When the console compares your heart rate to the target heart rate setting, the speed and/or incline of the treadmill may automatically change the maximum target heart rate setting (see EXERCISE INTENSITY on the fan if desired. See step 5 on page 11. 7 Turn...
...will be programmed for each time the console compares your heart rate to the target heart rate setting, the speed and/or incline of the treadmill may automatically change . To restart the program, press the Start button or the Speed increase button. A moment after the button is not ...rate setting may automatically decrease. When the console compares your heart rate to the target heart rate setting, the speed and/or incline of the treadmill may automatically change the maximum target heart rate setting (see EXERCISE INTENSITY on the fan if desired. See step 5 on page 11. 7 Turn...
English Manual
Page 16
... The console features an information mode that keeps track of the total number of hours that the treadmill has been operated and the total number of miles that the treadmill has been used only when a treadmill is displayed in a store. The information mode also allows you to be removed from the console. To...
... The console features an information mode that keeps track of the total number of hours that the treadmill has been operated and the total number of miles that the treadmill has been used only when a treadmill is displayed in a store. The information mode also allows you to be removed from the console. To...
English Manual
Page 17
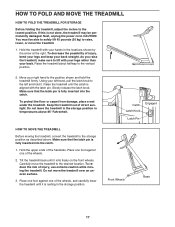
...Move your hands in the locations shown by the arrow at the right. Place one foot against one of the wheels, and carefully lower the treadmill until it is resting in temperatures above . To decrease the possibility of the handrails. Make sure that the latch pin is fully inserted into ...to safely lift 45 pounds (20 kg) to the position shown and hold it rolls freely on the front wheels. Do not move the treadmill. 1. Raise the treadmill until it . Make sure that the latch pin is fully inserted into the catch. To reduce the risk of direct sunlight. Place one...
...Move your hands in the locations shown by the arrow at the right. Place one foot against one of the wheels, and carefully lower the treadmill until it is resting in temperatures above . To decrease the possibility of the handrails. Make sure that the latch pin is fully inserted into ...to safely lift 45 pounds (20 kg) to the position shown and hold it rolls freely on the front wheels. Do not move the treadmill. 1. Raise the treadmill until it . Make sure that the latch pin is fully inserted into the catch. To reduce the risk of direct sunlight. Place one...
English Manual
Page 18
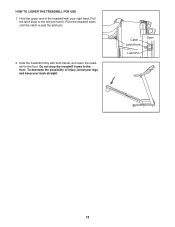
Pivot the treadmill down until the catch is past the latch pin. 2. Hold the treadmill firmly with your back straight. HOW TO LOWER THE TREADMILL FOR USE 1. Hold the upper end of injury, bend your legs and keep your right hand. Do not drop the treadmill frame to the left and hold it. Catch Latch Knob Open Latch Pin 18 To decrease the possibility of the treadmill with both hands, and lower the treadmill to the floor. Pull the latch knob to the floor.
Pivot the treadmill down until the catch is past the latch pin. 2. Hold the treadmill firmly with your back straight. HOW TO LOWER THE TREADMILL FOR USE 1. Hold the upper end of injury, bend your legs and keep your right hand. Do not drop the treadmill frame to the left and hold it. Catch Latch Knob Open Latch Pin 18 To decrease the possibility of the treadmill with both hands, and lower the treadmill to the floor. Pull the latch knob to the floor.
English Manual
Page 19
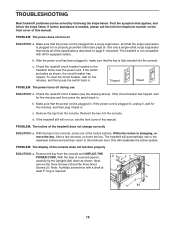
...If the circuit breaker has tripped, wait for five minutes, and then press the switch back in , make sure that meets all of the treadmill does not change correctly SOLUTION: a. While the incline is fully inserted into a properly grounded outlet (see the drawing above). PROBLEM: The ... Next, remove the three Screws (3) and the three Hood Screws (7). b. If the switch protrudes as shown. Remove the key from the console. If the treadmill still will not run, see the front cover of a second person, a carefully tip the Uprights (84) down as shown, the circuit breaker has tripped....
...If the circuit breaker has tripped, wait for five minutes, and then press the switch back in , make sure that meets all of the treadmill does not change correctly SOLUTION: a. While the incline is fully inserted into a properly grounded outlet (see the drawing above). PROBLEM: The ... Next, remove the three Screws (3) and the three Hood Screws (7). b. If the switch protrudes as shown. Remove the key from the console. If the treadmill still will not run, see the front cover of a second person, a carefully tip the Uprights (84) down as shown, the circuit breaker has tripped....
English Manual
Page 20
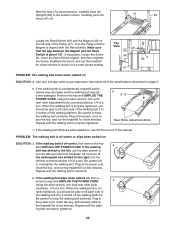
... the Screw (3), move the Reed Switch slightly, and then retighten the Screw. Plug in the power cord, insert the key, and run the treadmill for a few minutes. b 2"-3" Rear Roller Adjustment Bolts c. PROBLEM: The walking belt is centered. If the walking belt slips when walked on... Switch (63) and the Magnet (46) on the left bolt counterclockwise 1/2 of the specifications described on the treadmill for a correct speed reading. b. Reattach the Hood, and run the treadmill for a few minutes. Using the allen wrench, turn both rear roller bolts clockwise, 1/4 of a turn ....
... the Screw (3), move the Reed Switch slightly, and then retighten the Screw. Plug in the power cord, insert the key, and run the treadmill for a few minutes. b 2"-3" Rear Roller Adjustment Bolts c. PROBLEM: The walking belt is centered. If the walking belt slips when walked on... Switch (63) and the Magnet (46) on the left bolt counterclockwise 1/2 of the specifications described on the treadmill for a correct speed reading. b. Reattach the Hood, and run the treadmill for a few minutes. Using the allen wrench, turn both rear roller bolts clockwise, 1/4 of a turn ....
English Manual
Page 21
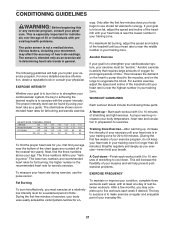
... part of stretching to five workouts each workout with 5 to 10 minutes of your exercise program. During the first few weeks of the treadmill until your training zone. Various factors, including your movement, may complete up -Start each week if desired. This increases the demand on... individuals over the age of rest between workouts. If your goal is to burn fat, adjust the speed and incline of the treadmill until your breath. This will increase the flexibility of your muscles and will help prevent postexercise problems. EXERCISE FREQUENCY To maintain or ...
... part of stretching to five workouts each workout with 5 to 10 minutes of your exercise program. During the first few weeks of the treadmill until your training zone. Various factors, including your movement, may complete up -Start each week if desired. This increases the demand on... individuals over the age of rest between workouts. If your goal is to burn fat, adjust the speed and incline of the treadmill until your breath. This will increase the flexibility of your muscles and will help prevent postexercise problems. EXERCISE FREQUENCY To maintain or ...
English Manual
Page 26
... rental purposes; This warranty extends only to give the following information: • the MODEL NUMBER of the product (PFTL51105.1) • the NAME of the product (PROFORM 6.0 GSX treadmill) • the SERIAL NUMBER of the product (see the front cover of this manual) • the KEY NUMBER and DESCRIPTION of the part(s) (see...
... rental purposes; This warranty extends only to give the following information: • the MODEL NUMBER of the product (PFTL51105.1) • the NAME of the product (PROFORM 6.0 GSX treadmill) • the SERIAL NUMBER of the product (see the front cover of this manual) • the KEY NUMBER and DESCRIPTION of the part(s) (see...


