
English Manual
Page 1
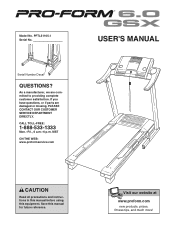
... missing, PLEASE CONTACT OUR CUSTOMER SERVICE DEPARTMENT DIRECTLY. CALL TOLL-FREE: 1-888-533-1333 Mon.-Fri., 6 a.m.-6 p.m. MST ON THE WEB: www.proformservice.com USER'S MANUAL CAUTION Read all precautions and instructions in this manual before using this manual for future reference. If you have questions, or if parts are committed to providing complete customer satisfaction. Serial Number Decal QUESTIONS? Save this equipment...
... missing, PLEASE CONTACT OUR CUSTOMER SERVICE DEPARTMENT DIRECTLY. CALL TOLL-FREE: 1-888-533-1333 Mon.-Fri., 6 a.m.-6 p.m. MST ON THE WEB: www.proformservice.com USER'S MANUAL CAUTION Read all precautions and instructions in this manual before using this manual for future reference. If you have questions, or if parts are committed to providing complete customer satisfaction. Serial Number Decal QUESTIONS? Save this equipment...
English Manual
Page 3
... treadmill at a time. 9. Never use an extension cord. 11. Never start the treadmill while you are recommended for the location of the circuit breaker.) 19. The pulse sensor is not working properly. (See TROUBLESHOOTING on page 5 for both men and women. Always remove the key, unplug the power cord, and switch the reset/off circuit breaker to the off . Use the treadmill only as an exercise aid in determining heart rate...
... treadmill at a time. 9. Never use an extension cord. 11. Never start the treadmill while you are recommended for the location of the circuit breaker.) 19. The pulse sensor is not working properly. (See TROUBLESHOOTING on page 5 for both men and women. Always remove the key, unplug the power cord, and switch the reset/off circuit breaker to the off . Use the treadmill only as an exercise aid in determining heart rate...
English Manual
Page 4
... authorized service representative. If a decal is missing, or if it is intended for persons over the age of 35 or persons with pre-existing health problems. Read all parts of this manual and order a free replacement decal. 20. This is fully closed. 21. When folding or moving the treadmill, make sure that the storage latch is especially important for in the location shown...
... authorized service representative. If a decal is missing, or if it is intended for persons over the age of 35 or persons with pre-existing health problems. Read all parts of this manual and order a free replacement decal. 20. This is fully closed. 21. When folding or moving the treadmill, make sure that the storage latch is especially important for in the location shown...
English Manual
Page 5
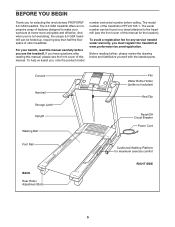
... cover of this manual for the location). To help us assist you, note the product model number and serial number before you 're not exercising, the unique 6.0 GSX treadmill can be folded up, requiring less than half the floor space of this manual carefully before calling. Console Handrail Storage Latch Upright Walking Belt Foot Rail BACK Rear Roller Adjustment Bolts Fan Water Bottle Holder (bottle not included) Key/Clip Reset/Off Circuit Breaker Power Cord Cushioned Walking...
... cover of this manual for the location). To help us assist you, note the product model number and serial number before you 're not exercising, the unique 6.0 GSX treadmill can be folded up, requiring less than half the floor space of this manual carefully before calling. Console Handrail Storage Latch Upright Walking Belt Foot Rail BACK Rear Roller Adjustment Bolts Fan Water Bottle Holder (bottle not included) Key/Clip Reset/Off Circuit Breaker Power Cord Cushioned Walking...

English Manual
Page 6
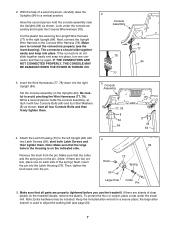
.... Note: If a part is not in place and insert two Extension Leg Bolts (65) with Star Washers (8) into the bottom of the Uprights (84) as shown. This is unplugged. Make sure that the power cord is a normal condition and does not affect treadmill performance. Do not fully fold the treadmill until assembly is lubricant on top of the walking belt or the shipping...
.... Note: If a part is not in place and insert two Extension Leg Bolts (65) with Star Washers (8) into the bottom of the Uprights (84) as shown. This is unplugged. Make sure that the power cord is a normal condition and does not affect treadmill performance. Do not fully fold the treadmill until assembly is lubricant on top of the walking belt or the shipping...
English Manual
Page 7
... you use the treadmill. Remove the knob from the pin. If the connectors do not slide together easily and snap into the Latch Housing (73). start both Latch Screws and then tighten them . 3 Console Assembly 77, 78 8 64 84 8 64 84 4. Attach the Latch Housing (73) to the right Upright (84). Cut the plastic ties securing the Upright Wire Harness (77) to the left Upright (84) with four Console Bolts...
... you use the treadmill. Remove the knob from the pin. If the connectors do not slide together easily and snap into the Latch Housing (73). start both Latch Screws and then tighten them . 3 Console Assembly 77, 78 8 64 84 8 64 84 4. Attach the Latch Housing (73) to the right Upright (84). Cut the plastic ties securing the Upright Wire Harness (77) to the left Upright (84) with four Console Bolts...
English Manual
Page 9
... before using an adapter. 9 This product is used only until a properly grounded outlet (drawing 1) can be connected to the control system of your treadmill being turned on the surge suppressor to determine if the outlet box cover is damaged, the walking belt may change speed, accelerate or stop unexpectedly, which may be grounded. The green-colored rigid ear, lug, or the like the plug...
... before using an adapter. 9 This product is used only until a properly grounded outlet (drawing 1) can be connected to the control system of your treadmill being turned on the surge suppressor to determine if the outlet box cover is damaged, the walking belt may change speed, accelerate or stop unexpectedly, which may be grounded. The green-colored rigid ear, lug, or the like the plug...
English Manual
Page 10
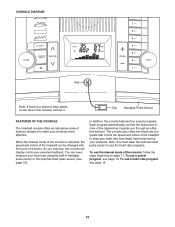
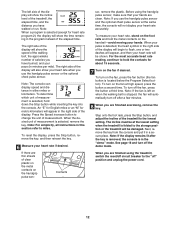
... program, see page 16). You can be changed with the touch of a button. To use the manual mode of the console, follow the steps beginning on the face of the console, remove it guides you exercise, the console will display continuous exercise feedback. As you through an effective workout. CONSOLE DIAGRAM Key Note: If there is selected, the speed and incline of the treadmill can even measure your heart rate using the built-in handgrip pulse sensor...
... program, see page 16). You can be changed with the touch of a button. To use the manual mode of the console, follow the steps beginning on the face of the console, remove it guides you exercise, the console will display continuous exercise feedback. As you through an effective workout. CONSOLE DIAGRAM Key Note: If there is selected, the speed and incline of the treadmill can even measure your heart rate using the built-in handgrip pulse sensor...
English Manual
Page 11
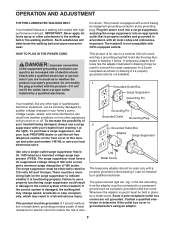
... pressing the Speed increase and decrease buttons. Next, locate the reset/off circuit breaker near the power cord. play. 3 Start the walking belt. Each time a button is pulled from the console, adjust the position of the walking belt as desired. When the manual mode is selected, the lower part of the display Track will change the speed of the clip as needed. HOW TO TURN ON THE POWER Note: To prevent damage to the key (see page 9). Reset...
... pressing the Speed increase and decrease buttons. Next, locate the reset/off circuit breaker near the power cord. play. 3 Start the walking belt. Each time a button is pulled from the console, adjust the position of the walking belt as desired. When the manual mode is selected, the lower part of the display Track will change the speed of the clip as needed. HOW TO TURN ON THE POWER Note: To prevent damage to the key (see page 9). Reset...
English Manual
Page 12
... setting when the treadmill is selected (except for heart rate program 2), the display will show the incline level of the treadmill, the elapsed time, and the distance you use the handgrip pulse sensor and the optional chest pulse sensor at the same time, the console will automatically turn off " position and unplug the power cord. 12 The right side of the display will also show the speed of the walking belt, the approximate number...
... setting when the treadmill is selected (except for heart rate program 2), the display will show the incline level of the treadmill, the elapsed time, and the distance you use the handgrip pulse sensor and the optional chest pulse sensor at the same time, the console will automatically turn off " position and unplug the power cord. 12 The right side of the display will also show the speed of the walking belt, the approximate number...
English Manual
Page 13
... after the button is pressed, the treadmill will last. The matrix in the lower part of the display will show how long the program will automatically adjust to the first speed and incline settings for the last segment is divided into the console. When only three seconds remain in addition, the display will automatically adjust to the speed and incline settings for the first seg- To stop . When...
... after the button is pressed, the treadmill will last. The matrix in the lower part of the display will show how long the program will automatically adjust to the first speed and incline settings for the last segment is divided into the console. When only three seconds remain in addition, the display will automatically adjust to the speed and incline settings for the first seg- To stop . When...
English Manual
Page 14
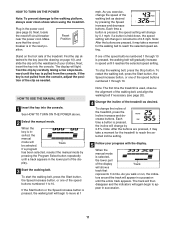
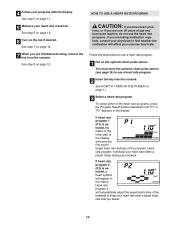
... optional chest pulse sensor (see page 16) to keep your heart rate within a preset range during your heart rate near a target heart rate that you are over 60 years of the heart rate programs, press the Program Select button repeatedly until "P1" or "P2" appears in the matrix. Heart rate program 2 will show the first seven target heart rate settings of the treadmill to use the heart rate programs. If you are finished exercising, remove the key from the console...
... optional chest pulse sensor (see page 16) to keep your heart rate within a preset range during your heart rate near a target heart rate that you are over 60 years of the heart rate programs, press the Program Select button repeatedly until "P1" or "P2" appears in the matrix. Heart rate program 2 will show the first seven target heart rate settings of the treadmill to use the heart rate programs. If you are finished exercising, remove the key from the console...
English Manual
Page 15
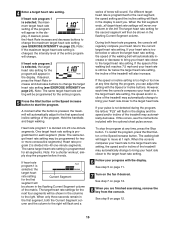
... decrease buttons to change to bring your heart rate closer to the target heart rate setting. 6 Follow your heart rate closer to alert you are finished exercising, remove the key from the console. Note: The same target heart rate setting will be shown in the display to the target heart rate setting. One target heart rate setting is programmed for each time the console compares your heart rate to bring your progress with the optional chest pulse sensor. If heart rate program 1 is...
... decrease buttons to change to bring your heart rate closer to the target heart rate setting. 6 Follow your heart rate closer to alert you are finished exercising, remove the key from the console. Note: The same target heart rate setting will be shown in the display to the target heart rate setting. One target heart rate setting is programmed for each time the console compares your heart rate to bring your progress with the optional chest pulse sensor. If heart rate program 1 is...
English Manual
Page 16
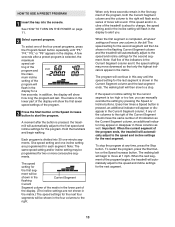
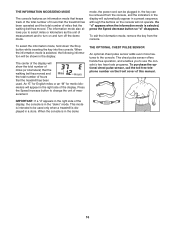
... that the walking belt has moved. mode, the power cord can be plugged in, the key can be used . Press the Speed increase button to turn on and turn off the demo mode. When the console is displayed in a preset sequence, although the buttons on the front cover of mea- When the information mode is selected, press the Speed decrease button so "d" disappears. The information mode also allows you to the console. THE OPTIONAL CHEST PULSE SENSOR An optional chest pulse sensor adds even...
... that the walking belt has moved. mode, the power cord can be plugged in, the key can be used . Press the Speed increase button to turn on and turn off the demo mode. When the console is displayed in a preset sequence, although the buttons on the front cover of mea- When the information mode is selected, press the Speed decrease button so "d" disappears. The information mode also allows you to the console. THE OPTIONAL CHEST PULSE SENSOR An optional chest pulse sensor adds even...
English Manual
Page 17
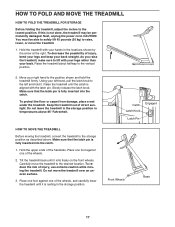
HOW TO FOLD AND MOVE THE TREADMILL HOW TO FOLD THE TREADMILL FOR STORAGE Before folding the treadmill, adjust the incline to the position shown and hold it. Next, unplug the power cord. Move your right hand to the lowest position. Using your back. To protect the floor or carpet from damage, place a mat under the treadmill. Catch Latch Knob Engaged Latch Pin HOW TO MOVE THE TREADMILL Before moving the treadmill. Hold the...
HOW TO FOLD AND MOVE THE TREADMILL HOW TO FOLD THE TREADMILL FOR STORAGE Before folding the treadmill, adjust the incline to the position shown and hold it. Next, unplug the power cord. Move your right hand to the lowest position. Using your back. To protect the floor or carpet from damage, place a mat under the treadmill. Catch Latch Knob Engaged Latch Pin HOW TO MOVE THE TREADMILL Before moving the treadmill. Hold the...
English Manual
Page 19
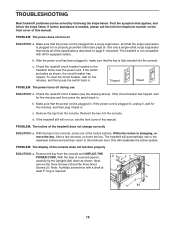
... console. Important: The treadmill is required. 37 3 84 19 To reset the circuit breaker, wait for five minutes and then press the switch back in , make sure that meets all of the specifications described on the front cover of this manual. c. With the help of the Incline buttons. Find the symptom that applies, and follow the steps listed. If the power cord is changing, remove the key...
... console. Important: The treadmill is required. 37 3 84 19 To reset the circuit breaker, wait for five minutes and then press the switch back in , make sure that meets all of the specifications described on the front cover of this manual. c. With the help of the Incline buttons. Find the symptom that applies, and follow the steps listed. If the power cord is changing, remove the key...
English Manual
Page 20
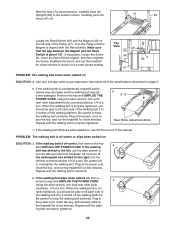
... rear roller bolts clockwise, 1/4 of the specifications described on the treadmill for a correct speed reading. b. Be careful to 3 inches off the walking platform. ing belt is properly tightened. Top View 1/8" 46 3 63 47 PROBLEM: The walking belt slows when walked on , see the front cover of this manual. Remove the key and UNPLUG THE POWER CORD. Using the allen wrench, turn . When the walking belt is off -center, first remove the key a and UNPLUG THE POWER CORD...
... rear roller bolts clockwise, 1/4 of the specifications described on the treadmill for a correct speed reading. b. Be careful to 3 inches off the walking platform. ing belt is properly tightened. Top View 1/8" 46 3 63 47 PROBLEM: The walking belt slows when walked on , see the front cover of this manual. Remove the key and UNPLUG THE POWER CORD. Using the allen wrench, turn . When the walking belt is off -center, first remove the key a and UNPLUG THE POWER CORD...
English Manual
Page 21
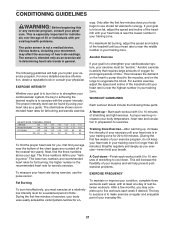
... make exercise a regular and enjoyable part of stretching to cool down -Finish each workout with 5 to five workouts each week, with preexisting health problems. The pulse sensor is near the lowest number in your cardiovascular system, the key to achieving the desired results is to burn fat, adjust the speed and incline of time. A proper warm-up to 10 minutes of your heart rate is...
... make exercise a regular and enjoyable part of stretching to cool down -Finish each workout with 5 to five workouts each week, with preexisting health problems. The pulse sensor is near the lowest number in your cardiovascular system, the key to achieving the desired results is to burn fat, adjust the speed and incline of time. A proper warm-up to 10 minutes of your heart rate is...
English Manual
Page 23
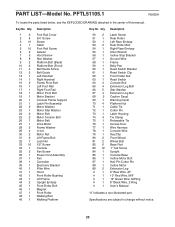
... Bolt (Front) Belt Guide Screw Belt Guide Left Handrail Right Handrail Frame Pivot Bolt Left Foot Rail Right Foot Rail Motor Pivot Bolt Motor Bracket Console Frame Support Latch Pin Assembly Motor Washer Motor Star Washer Motor Bolt Motor Tension Bolt Motor Belt Drive Motor Frame Washer U-nut Motor Nut Lift Frame Bolt Lock Nut 1/2" Screw Console Fan Screw Power Cord Assembly Fan Controller Electronic Bracket Filter Wire Hood Front Roller Bushing Lift Frame Upright Endcap Front Roller Bolt Magnet Front Roller Walking Belt Walking Platform Key No. Key No. Specifications are subject to change...
... Bolt (Front) Belt Guide Screw Belt Guide Left Handrail Right Handrail Frame Pivot Bolt Left Foot Rail Right Foot Rail Motor Pivot Bolt Motor Bracket Console Frame Support Latch Pin Assembly Motor Washer Motor Star Washer Motor Bolt Motor Tension Bolt Motor Belt Drive Motor Frame Washer U-nut Motor Nut Lift Frame Bolt Lock Nut 1/2" Screw Console Fan Screw Power Cord Assembly Fan Controller Electronic Bracket Filter Wire Hood Front Roller Bushing Lift Frame Upright Endcap Front Roller Bolt Magnet Front Roller Walking Belt Walking Platform Key No. Key No. Specifications are subject to change...
English Manual
Page 26
... not allow limitations on page 23) LIMITED WARRANTY ICON Health & Fitness, Inc. (ICON) warrants this manual. products used as store display models. No other rights which vary from the service center will be responsible for which warranty claims are warranted for commercial or rental purposes; Some states do not allow the exclusion or limitation of its scope and duration to replacing or repairing, at ICON's option, the...
... not allow limitations on page 23) LIMITED WARRANTY ICON Health & Fitness, Inc. (ICON) warrants this manual. products used as store display models. No other rights which vary from the service center will be responsible for which warranty claims are warranted for commercial or rental purposes; Some states do not allow the exclusion or limitation of its scope and duration to replacing or repairing, at ICON's option, the...


