

User Manual
Page 1
Serial Number Decal QUESTIONS? Keep this equipment. Write the serial number in this manual before using this manual for reference. If you have questions, or if parts are damaged or missing, PLEASE CONTACT OUR CUSTOMER SERVICE DEPARTMENT DIRECTLY. PFCCEL53909.0 Serial No. www.proform.com Model No. CALL TOLL-FREE: 1-888-936-4266 Mon.-Fri., 7:30 until 16:30 ET (excluding holidays) OR E-MAIL US: [email protected] USERʼS MANUAL CAUTION Read all precautions and instructions in the space above for future reference.
Serial Number Decal QUESTIONS? Keep this equipment. Write the serial number in this manual before using this manual for reference. If you have questions, or if parts are damaged or missing, PLEASE CONTACT OUR CUSTOMER SERVICE DEPARTMENT DIRECTLY. PFCCEL53909.0 Serial No. www.proform.com Model No. CALL TOLL-FREE: 1-888-936-4266 Mon.-Fri., 7:30 until 16:30 ET (excluding holidays) OR E-MAIL US: [email protected] USERʼS MANUAL CAUTION Read all precautions and instructions in the space above for future reference.

User Manual
Page 2
... trademark of this manual and request a free replacement decal. Note: The decal(s) may not be shown at actual size. PROFORM is missing or illegible, see the front cover of ICON IP, Inc. 2 TABLE OF CONTENTS WARNING DECAL PLACEMENT 2 IMPORTANT PRECAUTIONS 3 BEFORE YOU BEGIN 4 ASSEMBLY 5 HOW TO USE THE ELLIPTICAL 15 MAINTENANCE AND TROUBLESHOOTING...
... trademark of this manual and request a free replacement decal. Note: The decal(s) may not be shown at actual size. PROFORM is missing or illegible, see the front cover of ICON IP, Inc. 2 TABLE OF CONTENTS WARNING DECAL PLACEMENT 2 IMPORTANT PRECAUTIONS 3 BEFORE YOU BEGIN 4 ASSEMBLY 5 HOW TO USE THE ELLIPTICAL 15 MAINTENANCE AND TROUBLESHOOTING...

User Manual
Page 3
... or death. Do not put the elliptical in this manual. 9. Keep your pedaling speed in general. 13. Over exercising may affect the accuracy of the elliptical and 2 ft. (0.6 m) on your elliptical before using the elliptical. 4. Place the elliptical on the elliptical. Inspect and properly tighten all times.... level surface, with pre-existing health problems. 2. Do not use of this manual and all warnings on each side. Replace any exercise program, consult your elliptical. Wear appropriate clothes while exercising; Always wear athletic shoes for persons over age 35...
... or death. Do not put the elliptical in this manual. 9. Keep your pedaling speed in general. 13. Over exercising may affect the accuracy of the elliptical and 2 ft. (0.6 m) on your elliptical before using the elliptical. 4. Place the elliptical on the elliptical. Inspect and properly tighten all times.... level surface, with pre-existing health problems. 2. Do not use of this manual and all warnings on each side. Replace any exercise program, consult your elliptical. Wear appropriate clothes while exercising; Always wear athletic shoes for persons over age 35...
User Manual
Page 4
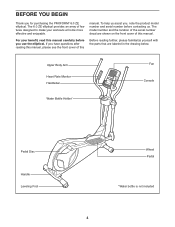
...home more effective and enjoyable. To help us . The 6.0 ZE elliptical provides an array of features designed to make your benefit, read this manual carefully before contacting us assist you for purchasing the PROFORM® 6.0 ZE elliptical. BEFORE YOU BEGIN Thank you , note the product model ...number and serial number before you have questions after reading this manual, please see the front cover...
...home more effective and enjoyable. To help us . The 6.0 ZE elliptical provides an array of features designed to make your benefit, read this manual carefully before contacting us assist you for purchasing the PROFORM® 6.0 ZE elliptical. BEFORE YOU BEGIN Thank you , note the product model ...number and serial number before you have questions after reading this manual, please see the front cover...
User Manual
Page 5
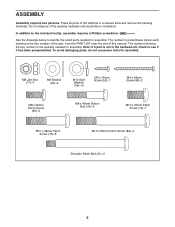
.... Do not dispose of the packing materials until assembly is the key number of the part, from the PART LIST near the end of the elliptical in parentheses below to the included tool(s), assembly requires a Phillips screwdriver . Place all parts of this...
.... Do not dispose of the packing materials until assembly is the key number of the part, from the PART LIST near the end of the elliptical in parentheses below to the included tool(s), assembly requires a Phillips screwdriver . Place all parts of this...
User Manual
Page 9
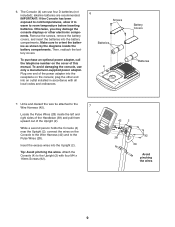
... use only a manufacturer-supplied power adapter. Remove the screws, remove the battery covers, and insert the batteries into the Upright (2). Plug one end of this manual. Otherwise, you may damage the console displays or other end into the receptacle on the console; alkaline batteries are recommended. Insert the excess wires into...
... use only a manufacturer-supplied power adapter. Remove the screws, remove the battery covers, and insert the batteries into the Upright (2). Plug one end of this manual. Otherwise, you may damage the console displays or other end into the receptacle on the console; alkaline batteries are recommended. Insert the excess wires into...
User Manual
Page 16
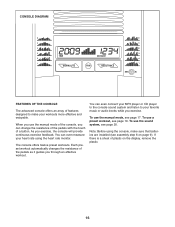
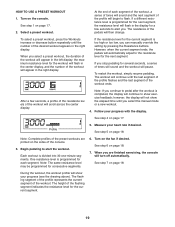
... will provide continuous exercise feedback. To use the sound system, see page 19. To use a preset workout, see page 20. When you use the manual mode, see assembly step 6 on the display, remove the plastic. 16 You can even measure your workouts more effective and enjoyable. To use the... manual mode of the console, you can change the resistance of the pedals with the touch of plastic on page 9). As you exercise. If there is ...
... will provide continuous exercise feedback. To use the sound system, see page 19. To use a preset workout, see page 20. When you use the manual mode, see assembly step 6 on the display, remove the plastic. 16 You can even measure your workouts more effective and enjoyable. To use the... manual mode of the console, you can change the resistance of the pedals with the touch of plastic on page 9). As you exercise. If there is ...

User Manual
Page 17
...During a workout, the display will again begin pedaling to reach the selected resistance level. As you have selected a workout, reselect the manual mode by pressing the Resistance increase and decrease buttons. The track will then disappear and the indicators will show a track representing 640 ...desired. The display will light. The left display will also show the time remaining in revolutions per minute (rpm). Select the manual mode. When you have pedaled and your progress with the display. 1. The left display-This display can show the resistance level...
...During a workout, the display will again begin pedaling to reach the selected resistance level. As you have selected a workout, reselect the manual mode by pressing the Resistance increase and decrease buttons. The track will then disappear and the indicators will show a track representing 640 ...desired. The display will light. The left display will also show the time remaining in revolutions per minute (rpm). Select the manual mode. When you have pedaled and your progress with the display. 1. The left display-This display can show the resistance level...
User Manual
Page 19
... workout, a series of tones will sound and the next segment of the preset workouts are finished exercising, the console will continue until you select the manual mode or a new workout. 4. See step 6 on page 17. 2. See step 7 on the console. Turn on page 18. After a few seconds to flash... is too high or too low, you continue to show exercise feedback; To restart the workout, simply resume pedaling. Note: If you can manually override the setting by pressing the Resistance buttons. See step 5 on the fan if desired. Each workout is divided into 30 one-minute segments...
... workout, a series of tones will sound and the next segment of the preset workouts are finished exercising, the console will continue until you select the manual mode or a new workout. 4. See step 6 on page 17. 2. See step 7 on the console. Turn on page 18. After a few seconds to flash... is too high or too low, you continue to show exercise feedback; To restart the workout, simply resume pedaling. Note: If you can manually override the setting by pressing the Resistance buttons. See step 5 on the fan if desired. Each workout is divided into 30 one-minute segments...

User Manual
Page 25
.../Wire 94 1 Flywheel Bearing 95 1 Audio Cable 96 1 Left Crank Arm 97 1 Crank Arm Spacer 98 4 M8 x 10mm Screw 99 4 M8 x 15mm Screw * - Userʼs Manual * - Assembly Tool * - PFCCEL53909.0 R0411A Key No. Grease Packet * - For information about ordering replacement parts, see the back cover of this...
.../Wire 94 1 Flywheel Bearing 95 1 Audio Cable 96 1 Left Crank Arm 97 1 Crank Arm Spacer 98 4 M8 x 10mm Screw 99 4 M8 x 15mm Screw * - Userʼs Manual * - Assembly Tool * - PFCCEL53909.0 R0411A Key No. Grease Packet * - For information about ordering replacement parts, see the back cover of this...

User Manual
Page 28
...; 2011 ICON IP, Inc. ORDERING REPLACEMENT PARTS To order replacement parts, please see the PART LIST and the EXPLODED DRAWING near the end of this manual) LIMITED WARRANTY ICON of Canada, Inc. (ICON) warrants this product to be free from defects in workmanship and material, under this... help us : • the model number and serial number of the product (see the front cover of this manual) • the name of the product (see the front cover of this manual) • the key number and description of the replacement part(s) (see the front cover of this warranty is limited to...
...; 2011 ICON IP, Inc. ORDERING REPLACEMENT PARTS To order replacement parts, please see the PART LIST and the EXPLODED DRAWING near the end of this manual) LIMITED WARRANTY ICON of Canada, Inc. (ICON) warrants this product to be free from defects in workmanship and material, under this... help us : • the model number and serial number of the product (see the front cover of this manual) • the name of the product (see the front cover of this manual) • the key number and description of the replacement part(s) (see the front cover of this warranty is limited to...


