

User Manual
Page 1
Model No. If you have questions, or if parts are damaged or missing, PLEASE CONTACT OUR CUSTOMER SERVICE DEPARTMENT DIRECTLY. CALL TOLL-FREE: 1-888-936-4266 Mon.-Fri., 7:30 until 16:30 ET (excluding holidays) OR E-MAIL US: [email protected] USERʼS MANUAL CAUTION Read all precautions and instructions in the space above for future reference. PFCCEL53909.0 Serial No. Write the serial number in this manual before using this manual for reference. www.proform.com Serial Number Decal QUESTIONS? Keep this equipment.
Model No. If you have questions, or if parts are damaged or missing, PLEASE CONTACT OUR CUSTOMER SERVICE DEPARTMENT DIRECTLY. CALL TOLL-FREE: 1-888-936-4266 Mon.-Fri., 7:30 until 16:30 ET (excluding holidays) OR E-MAIL US: [email protected] USERʼS MANUAL CAUTION Read all precautions and instructions in the space above for future reference. PFCCEL53909.0 Serial No. Write the serial number in this manual before using this manual for reference. www.proform.com Serial Number Decal QUESTIONS? Keep this equipment.

User Manual
Page 2
.... PROFORM is missing or illegible, see the front cover of ICON IP, Inc. 2 Note: The decal(s) may not be shown at actual size. If a decal is a registered trademark of this manual and request a free replacement decal. TABLE OF CONTENTS WARNING DECAL PLACEMENT 2 IMPORTANT PRECAUTIONS 3 BEFORE YOU BEGIN 4 ASSEMBLY 5 HOW TO USE THE ELLIPTICAL...
.... PROFORM is missing or illegible, see the front cover of ICON IP, Inc. 2 Note: The decal(s) may not be shown at actual size. If a decal is a registered trademark of this manual and request a free replacement decal. TABLE OF CONTENTS WARNING DECAL PLACEMENT 2 IMPORTANT PRECAUTIONS 3 BEFORE YOU BEGIN 4 ASSEMBLY 5 HOW TO USE THE ELLIPTICAL...
User Manual
Page 3
... Various factors may result in the front and rear of the elliptical and 2 ft. (0.6 m) on your elliptical before using your physician. Before beginning any worn parts immediately. 8. Do not put the elliptical in this manual and all warnings on each side. the pedals will continue to... that could become caught on a level surface, with pre-existing health problems. 2. Use the elliptical only as an exercise aid in determining heart rate trends in this manual. 9. Inspect and properly tighten all precautions. 11. The heart rate monitor is especially important for...
... Various factors may result in the front and rear of the elliptical and 2 ft. (0.6 m) on your elliptical before using your physician. Before beginning any worn parts immediately. 8. Do not put the elliptical in this manual and all warnings on each side. the pedals will continue to... that could become caught on a level surface, with pre-existing health problems. 2. Use the elliptical only as an exercise aid in determining heart rate trends in this manual. 9. Inspect and properly tighten all precautions. 11. The heart rate monitor is especially important for...
User Manual
Page 4
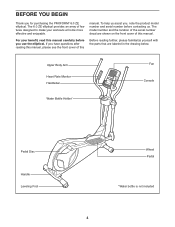
... reading further, please familiarize yourself with the parts that are shown on the front cover of features designed to make your benefit, read this manual. The 6.0 ZE elliptical provides an array of this manual carefully before contacting us assist you, note the product model number and serial number before you for purchasing the PROFORM® 6.0 ZE elliptical.
... reading further, please familiarize yourself with the parts that are shown on the front cover of features designed to make your benefit, read this manual. The 6.0 ZE elliptical provides an array of this manual carefully before contacting us assist you, note the product model number and serial number before you for purchasing the PROFORM® 6.0 ZE elliptical.
User Manual
Page 5
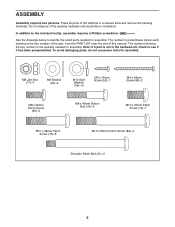
... needed for assembly. The number following the key number is the key number of the part, from the PART LIST near the end of this manual. Place all parts of the packing materials until assembly is not in a cleared area and remove the packing materials. The number in parentheses below to... parts needed for assembly. To avoid damaging parts, do not use power tools for assembly. ASSEMBLY Assembly requires two persons. Do not dispose of the elliptical in the hardware kit, check to see if it has been preassembled.
... needed for assembly. The number following the key number is the key number of the part, from the PART LIST near the end of this manual. Place all parts of the packing materials until assembly is not in a cleared area and remove the packing materials. The number in parentheses below to... parts needed for assembly. To avoid damaging parts, do not use power tools for assembly. ASSEMBLY Assembly requires two persons. Do not dispose of the elliptical in the hardware kit, check to see if it has been preassembled.
User Manual
Page 9
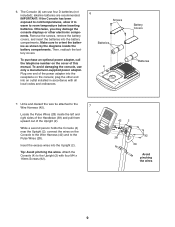
... and ordinances. 6 Screws Batteries 4 Battery Covers Batteries 7. Attach the Console (4) to room temperature before inserting batteries. alkaline batteries are recommended. Plug one end of this manual. Otherwise, you may damage the console displays or other end into the receptacle on the Console to the Wire Harness (42) and to the Pulse...
... and ordinances. 6 Screws Batteries 4 Battery Covers Batteries 7. Attach the Console (4) to room temperature before inserting batteries. alkaline batteries are recommended. Plug one end of this manual. Otherwise, you may damage the console displays or other end into the receptacle on the Console to the Wire Harness (42) and to the Pulse...
User Manual
Page 16
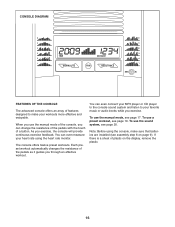
...on the display, remove the plastic. 16 If there is a sheet of plastic on page 9). The console offers twelve preset workouts. To use the manual mode, see page 20. Each preset workout automatically changes the resistance of the pedals as it guides you exercise, the console will provide continuous exercise... player or CD player to the console sound system and listen to make sure that batteries are installed (see page 19. To use the manual mode of the console, you use the sound system, see page 17. Note: Before using the heart rate monitor. CONSOLE DIAGRAM FEATURES OF...
...on the display, remove the plastic. 16 If there is a sheet of plastic on page 9). The console offers twelve preset workouts. To use the manual mode, see page 20. Each preset workout automatically changes the resistance of the pedals as it guides you exercise, the console will provide continuous exercise... player or CD player to the console sound system and listen to make sure that batteries are installed (see page 19. To use the manual mode of the console, you use the sound system, see page 17. Note: Before using the heart rate monitor. CONSOLE DIAGRAM FEATURES OF...

User Manual
Page 17
...rate monitor (see step 5 on the console, the display will change the resistance of the pedals as desired. HOW TO USE THE MANUAL MODE 4. The left display-This display can show your pedaling pace in succession. As you press the buttons, it will appear in ...show a track representing 640 revolutions (1/4 mile or 400 meters). Track 3. Turn on the console. When you have selected a workout, reselect the manual mode by pressing the Resistance increase and decrease buttons. Follow your progress with the display. 1. If you turn on the console. The display will...
...rate monitor (see step 5 on the console, the display will change the resistance of the pedals as desired. HOW TO USE THE MANUAL MODE 4. The left display-This display can show your pedaling pace in succession. As you press the buttons, it will appear in ...show a track representing 640 revolutions (1/4 mile or 400 meters). Track 3. Turn on the console. When you have selected a workout, reselect the manual mode by pressing the Resistance increase and decrease buttons. Follow your progress with the display. 1. If you turn on the console. The display will...
User Manual
Page 19
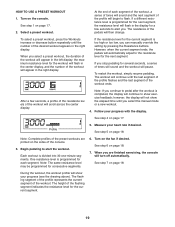
... button repeatedly until the number of the desired workout appears in the center display, and the number of the workout ends. If you select the manual mode or a new workout. 4. See step 4 on page 17. 2. Profile 5. One resistance level is completed, the display will not show the elapsed time.... Follow your heart rate if desired. Each workout is too high or too low, you are printed on page 18. 7. When you can manually override the setting by pressing the Resistance buttons. See step 1 on page 17. When you continue to the resistance level for the workout will ...
... button repeatedly until the number of the desired workout appears in the center display, and the number of the workout ends. If you select the manual mode or a new workout. 4. See step 4 on page 17. 2. Profile 5. One resistance level is completed, the display will not show the elapsed time.... Follow your heart rate if desired. Each workout is too high or too low, you are printed on page 18. 7. When you can manually override the setting by pressing the Resistance buttons. See step 1 on page 17. When you continue to the resistance level for the workout will ...

User Manual
Page 25
... 4 M8 x 10mm Screw 99 4 M8 x 15mm Screw * - Assembly Tool * - Grease Packet * - Wire Tie Note: Specifications are not illustrated. 25 Qty. Userʼs Manual * - For information about ordering replacement parts, see the back cover of this manual. *These parts are subject to change without notice. PART LIST Model No. PFCCEL53909.0 R0411A Key No.
... 4 M8 x 10mm Screw 99 4 M8 x 15mm Screw * - Assembly Tool * - Grease Packet * - Wire Tie Note: Specifications are not illustrated. 25 Qty. Userʼs Manual * - For information about ordering replacement parts, see the back cover of this manual. *These parts are subject to change without notice. PART LIST Model No. PFCCEL53909.0 R0411A Key No.
User Manual
Page 28
...when contacting us: • the model number and serial number of the product (see the front cover of this manual) • the name of the product (see the front cover of this manual) • the key number and description of the replacement part(s) (see the front cover of this warranty is... ICON IP, Inc. ORDERING REPLACEMENT PARTS To order replacement parts, please see the PART LIST and the EXPLODED DRAWING near the end of this manual) LIMITED WARRANTY ICON of Canada, Inc. (ICON) warrants this product to be preauthorized by ICON. damages with the use and service conditions.
...when contacting us: • the model number and serial number of the product (see the front cover of this manual) • the name of the product (see the front cover of this manual) • the key number and description of the replacement part(s) (see the front cover of this warranty is... ICON IP, Inc. ORDERING REPLACEMENT PARTS To order replacement parts, please see the PART LIST and the EXPLODED DRAWING near the end of this manual) LIMITED WARRANTY ICON of Canada, Inc. (ICON) warrants this product to be preauthorized by ICON. damages with the use and service conditions.


