

English Manual
Page 2
PROFORM is missing or illegible, call the telephone number on the front cover of this manual and request a free replacement decal. Apply the decal in the ... decals. TABLE OF CONTENTS WARNING DECAL PLACEMENT 2 IMPORTANT PRECAUTIONS 3 BEFORE YOU BEGIN 6 PART IDENTIFICATION CHART 7 ASSEMBLY 8 OPERATION AND ADJUSTMENT 14 HOW TO FOLD AND MOVE THE TREADMILL 20 TROUBLESHOOTING 21 EXERCISE GUIDELINES 23 PART LIST 24 EXPLODED DRAWING 25 ORDERING REPLACEMENT PARTS Back Cover LIMITED WARRANTY Back Cover WARNING DECAL PLACEMENT This drawing shows...
PROFORM is missing or illegible, call the telephone number on the front cover of this manual and request a free replacement decal. Apply the decal in the ... decals. TABLE OF CONTENTS WARNING DECAL PLACEMENT 2 IMPORTANT PRECAUTIONS 3 BEFORE YOU BEGIN 6 PART IDENTIFICATION CHART 7 ASSEMBLY 8 OPERATION AND ADJUSTMENT 14 HOW TO FOLD AND MOVE THE TREADMILL 20 TROUBLESHOOTING 21 EXERCISE GUIDELINES 23 PART LIST 24 EXPLODED DRAWING 25 ORDERING REPLACEMENT PARTS Back Cover LIMITED WARRANTY Back Cover WARNING DECAL PLACEMENT This drawing shows...

English Manual
Page 4
Various factors, including the user’'s movement, may result in general. 21. Inspect and properly tighten all parts of heart rate readings. Never remove the motor hood unless instructed to do so by an authorized ser- Servicing other than the procedures in ...this manual should be able to safely lift 45 lbs. (20 kg) to move the treadmill until it is holding the frame securely in use , before performing the maintenance and adjustment procedures described in this manual. SAVE THESE INSTRUCTIONS 4 Always ...
Various factors, including the user’'s movement, may result in general. 21. Inspect and properly tighten all parts of heart rate readings. Never remove the motor hood unless instructed to do so by an authorized ser- Servicing other than the procedures in ...this manual should be able to safely lift 45 lbs. (20 kg) to move the treadmill until it is holding the frame securely in use , before performing the maintenance and adjustment procedures described in this manual. SAVE THESE INSTRUCTIONS 4 Always ...

English Manual
Page 6
..., read this manual. For your workouts at home more effective and enjoyable. To help us assist you for selecting the new PROFORM® 6.0 RT treadmill. Before reading further, please familiarize yourself with the parts that are shown on the front cover of this manual carefully before contacting us. Length: 5 ft. 6 in. (168 cm) Width...
..., read this manual. For your workouts at home more effective and enjoyable. To help us assist you for selecting the new PROFORM® 6.0 RT treadmill. Before reading further, please familiarize yourself with the parts that are shown on the front cover of this manual carefully before contacting us. Length: 5 ft. 6 in. (168 cm) Width...

English Manual
Page 7
... not in parentheses below to see if it is the key number of the part, from the PART LIST near the end of this manual. The number in the hardware kit, check to identify small parts used for assembly. Extra parts may be included. #10 Star Washer (23)–-4 #10 x 3/4" Screw (8)–-6 #8 x 3/4" Screw ...;-2 5/16" Star Washer (6)–-4 5/16" x 3" Screw (7)–-2 3/8" Star Washer (3)–-6 3/8" x 3 1/4" Screw (2)–-6 7 The number following the key number is the quantity used for assembly. PART IDENTIFICATION CHART Use the drawings below each drawing is preattached.
... not in parentheses below to see if it is the key number of the part, from the PART LIST near the end of this manual. The number in the hardware kit, check to identify small parts used for assembly. Extra parts may be included. #10 Star Washer (23)–-4 #10 x 3/4" Screw (8)–-6 #8 x 3/4" Screw ...;-2 5/16" Star Washer (6)–-4 5/16" x 3" Screw (7)–-2 3/8" Star Washer (3)–-6 3/8" x 3 1/4" Screw (2)–-6 7 The number following the key number is the quantity used for assembly. PART IDENTIFICATION CHART Use the drawings below each drawing is preattached.

English Manual
Page 8
...on the treadmill, wipe it off with a soft cloth and a mild, non-abrasive cleaner. Then, remove and discard the screws and the shipping bracket (not shown) from the right side of this prod- •• Left parts are marked “"L”" or “"Left”" and right parts uct in...Make sure that the power cord is unplugged. 2 Remove and discard the two screws (A) and the shipping bracket (B) from the left side of the treadmill. Go to www.proformservice.com/registration on the exterior of the Base (74). ASSEMBLY •• To hire a service technician to assemble this ...
...on the treadmill, wipe it off with a soft cloth and a mild, non-abrasive cleaner. Then, remove and discard the screws and the shipping bracket (not shown) from the right side of this prod- •• Left parts are marked “"L”" or “"Left”" and right parts uct in...Make sure that the power cord is unplugged. 2 Remove and discard the two screws (A) and the shipping bracket (B) from the left side of the treadmill. Go to www.proformservice.com/registration on the exterior of the Base (74). ASSEMBLY •• To hire a service technician to assemble this ...
English Manual
Page 13
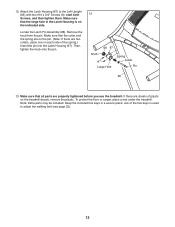
...and then tighten them. To protect the oor or carpet, place a mat under the treadmill. Keep the included hex keys in the Latch Housing is used to the Left Upright (66)...side. 12. Attach the Latch Housing (67) to adjust the walking belt (see page 22). 13 Note: Extra parts may be included. Make sure that the collar and the spring are on the pin. (Note: If there are ...two collars, place one of plastic on the treadmill decals, remove the plastic. Make sure that the large hole in a secure place; Make sure that all parts are sheets of the hex keys is on each ...
...and then tighten them. To protect the oor or carpet, place a mat under the treadmill. Keep the included hex keys in the Latch Housing is used to the Left Upright (66)...side. 12. Attach the Latch Housing (67) to adjust the walking belt (see page 22). 13 Note: Extra parts may be included. Make sure that the collar and the spring are on the pin. (Note: If there are ...two collars, place one of plastic on the treadmill decals, remove the plastic. Make sure that the large hole in a secure place; Make sure that all parts are sheets of the hex keys is on each ...

English Manual
Page 23
...—-Exercise for exercise. After a few minutes of rest between workouts. Remember, the key to success is the key to make exercise a regular and enjoyable part of the chart (ages are essential for maximum fat burning, and the highest number is not a medical device. EXERCISE INTENSITY Whether your goal is to...
...—-Exercise for exercise. After a few minutes of rest between workouts. Remember, the key to success is the key to make exercise a regular and enjoyable part of the chart (ages are essential for maximum fat burning, and the highest number is not a medical device. EXERCISE INTENSITY Whether your goal is to...

English Manual
Page 24
... Caution Decal Belt Guide Drive Roller/Pulley #8 x 3/4" Tek Screw Right Upright Wheel Drive Motor Controller Controller Plate Frame Key No. For information about ordering replacement parts, see the back cover of this manual. *These parts are subject to change without notice. PART LIST Model No. PFTL39511.4 R0113A Key No.
... Caution Decal Belt Guide Drive Roller/Pulley #8 x 3/4" Tek Screw Right Upright Wheel Drive Motor Controller Controller Plate Frame Key No. For information about ordering replacement parts, see the back cover of this manual. *These parts are subject to change without notice. PART LIST Model No. PFTL39511.4 R0113A Key No.

English Manual
Page 28
... do not allow limitations on how long an implied warranty lasts. ICON Health & Fitness, Inc., 1500 S. 1000 W., Logan, UT 84321-9813 Part No. 342507 R0113A Printed in connection with respect to be responsible for commercial or rental purposes. To help us : •• the model .... (ICON) warrants this product to any implied warranties of this manual) •• the key number and description of the replacement part(s) (see the PART LIST and the EXPLODED DRAWING near the end of merchantability or tness for a particular purpose are made must be responsible for which...
... do not allow limitations on how long an implied warranty lasts. ICON Health & Fitness, Inc., 1500 S. 1000 W., Logan, UT 84321-9813 Part No. 342507 R0113A Printed in connection with respect to be responsible for commercial or rental purposes. To help us : •• the model .... (ICON) warrants this product to any implied warranties of this manual) •• the key number and description of the replacement part(s) (see the PART LIST and the EXPLODED DRAWING near the end of merchantability or tness for a particular purpose are made must be responsible for which...


