
English Manual
Page 2
... from moisture and dust. Never allow more than 250 pounds. 8. Do not wear loose cloth- Do not use the treadmill with at a time. 9. Never move the walking belt while the power is UL 1449 listed as described in the center of carrying 15 or more than one person on the... same circuit. Keep children under the treadmill. 4. Always wear athletic shoes. Use only a single-outlet surge suppressor that is turned off....
... from moisture and dust. Never allow more than 250 pounds. 8. Do not wear loose cloth- Do not use the treadmill with at a time. 9. Never move the walking belt while the power is UL 1449 listed as described in the center of carrying 15 or more than one person on the... same circuit. Keep children under the treadmill. 4. Always wear athletic shoes. Use only a single-outlet surge suppressor that is turned off....
English Manual
Page 3
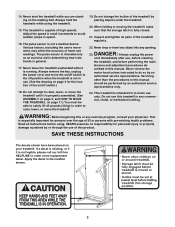
...lift 45 pounds (20 kg) in the location shown. 3 The pulse sensor is running. scribed in -home use , before cleaning the treadmill, and before using the treadmill. 15. Always hold the handrails while using . Do not attempt to raise, lower, or move the on your physician. Never remove ... the drawing on page 4 for persons over the age of the on/off position when the treadmill is properly assembled. (See ASSEMBLY on page 5, and HOW TO MOVE THE TREADMILL on the walking belt. This is especially important for the location of 35 or persons with pre-existing health problems. ...
...lift 45 pounds (20 kg) in the location shown. 3 The pulse sensor is running. scribed in -home use , before cleaning the treadmill, and before using the treadmill. 15. Always hold the handrails while using . Do not attempt to raise, lower, or move the on your physician. Never remove ... the drawing on page 4 for persons over the age of the on/off position when the treadmill is properly assembled. (See ASSEMBLY on page 5, and HOW TO MOVE THE TREADMILL on the walking belt. This is especially important for the location of 35 or persons with pre-existing health problems. ...
English Manual
Page 4
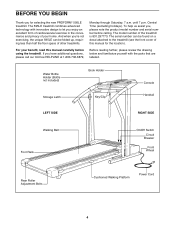
...Monday through Saturday, 7 a.m. If you for the location). The model number of your benefit, read this manual for selecting the new PROFORM¨ 595LE treadmill. The serial number can be found on a decal attached to let you , please note the product model number and serial number ...of cardiovascular exercise in the convenience and privacy of the treadmill is 831.297773. until 7 p.m. Water Bottle Holder (Bottle not included) Storage Latch Book Holder Key/Clip Console Handrail LEFT SIDE RIGHT SIDE Walking Belt Foot Rails On/Off Switch Circuit Breaker Front Wheel ...
...Monday through Saturday, 7 a.m. If you for the location). The model number of your benefit, read this manual for selecting the new PROFORM¨ 595LE treadmill. The serial number can be found on a decal attached to let you , please note the product model number and serial number ...of cardiovascular exercise in the convenience and privacy of the treadmill is 831.297773. until 7 p.m. Water Bottle Holder (Bottle not included) Storage Latch Book Holder Key/Clip Console Handrail LEFT SIDE RIGHT SIDE Walking Belt Foot Rails On/Off Switch Circuit Breaker Front Wheel ...
English Manual
Page 7
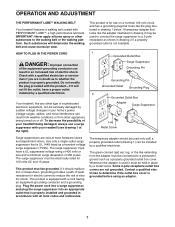
OPERATION AND ADJUSTMENT THE PERFORMANT LUBETM WALKING BELT Your treadmill features a walking belt coated with a cord having an equipment-grounding conductor and a grounding plug. Use only a single-outlet surge suppressor that looks like any other type...Improper connection of the equipment-grounding conductor can result from weather conditions or from the adapter must have a proper outlet installed by a metal screw. Your treadmill, like the adapter illustrated in drawing 2 may be used only until a properly grounded outlet (drawing 1) can be held in accordance with your home&#...
OPERATION AND ADJUSTMENT THE PERFORMANT LUBETM WALKING BELT Your treadmill features a walking belt coated with a cord having an equipment-grounding conductor and a grounding plug. Use only a single-outlet surge suppressor that looks like any other type...Improper connection of the equipment-grounding conductor can result from weather conditions or from the adapter must have a proper outlet installed by a metal screw. Your treadmill, like the adapter illustrated in drawing 2 may be used only until a properly grounded outlet (drawing 1) can be held in accordance with your home&#...
English Manual
Page 8
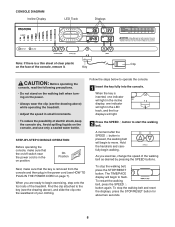
...removed from the console and then plug in the LED track, and the four displays will begin exercising, step onto the foot rails of the treadmill. CONSOLE DIAGRAM Incline Display LED Track Displays Note: If there is a thin sheet of clear plastic Clip on page 7). STEP-BY-STEP ... CAUTION: Before operating the console, read the following precautions. ¥ Do not stand on the walking belt when turning on the power. ¥ Always wear the clip (see the drawing above ) while operating the treadmill. ¥ Adjust the speed in the on the console, and use only a sealed water bottle.
...removed from the console and then plug in the LED track, and the four displays will begin exercising, step onto the foot rails of the treadmill. CONSOLE DIAGRAM Incline Display LED Track Displays Note: If there is a thin sheet of clear plastic Clip on page 7). STEP-BY-STEP ... CAUTION: Before operating the console, read the following precautions. ¥ Do not stand on the walking belt when turning on the power. ¥ Always wear the clip (see the drawing above ) while operating the treadmill. ¥ Adjust the speed in the on the console, and use only a sealed water bottle.
English Manual
Page 9
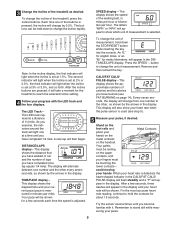
...The LED TrackÑ The LED track represents a distance of the walking belt, in the DISTANCE/LAPS display. As you have completed 1/4 mile. Remove and then reinsert the key. 3 Change the incline of the treadmill as shown by the arrows in the display. Note: In the incline display...speed is measured in the display. Try the sensor several times until you exercise, the indicators around the track will change the unit of the treadmill, press the incline buttons. Press the SPEED v button to reach the selected incline setting. 4 Follow your current pace (pace is adjusted....
...The LED TrackÑ The LED track represents a distance of the walking belt, in the DISTANCE/LAPS display. As you have completed 1/4 mile. Remove and then reinsert the key. 3 Change the incline of the treadmill as shown by the arrows in the display. Note: In the incline display...speed is measured in the display. Try the sensor several times until you exercise, the indicators around the track will change the unit of the treadmill, press the incline buttons. Press the SPEED v button to reach the selected incline setting. 4 Follow your current pace (pace is adjusted....
English Manual
Page 10
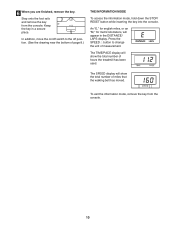
... exit the information mode, remove the key from the console. Press the SPEED v button to the off switch to change the unit of hours the treadmill has been used. The SPEED display will show the total number of page 8.) THE INFORMATION MODE To access the information mode, hold down the STOP.... 6 When you are finished, remove the key. In addition, move the on/off position. (See the drawing near the bottom of miles that the walking belt has moved.
... exit the information mode, remove the key from the console. Press the SPEED v button to the off switch to change the unit of hours the treadmill has been used. The SPEED display will show the total number of page 8.) THE INFORMATION MODE To access the information mode, hold down the STOP.... 6 When you are finished, remove the key. In addition, move the on/off position. (See the drawing near the bottom of miles that the walking belt has moved.
English Manual
Page 13
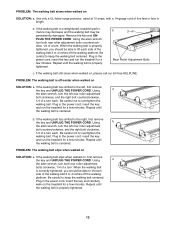
...to 4 inches off -center when walked on the treadmill for a few minutes. If the walking belt has shifted to overtighten the walking belt. Repeat until the walking belt is centered. Repeat until the walking belt is centered. PROBLEM: The walking belt slips when walked on SOLUTION: a. Plug in the... in the power cord, insert the key and carefully walk on SOLUTION: a. When the walking belt is properly tightened. Plug in the power cord, insert the key and run the treadmill for a few minutes. Using b the allen wrench, turn the left rear roller adjustment bolt...
...to 4 inches off -center when walked on the treadmill for a few minutes. If the walking belt has shifted to overtighten the walking belt. Repeat until the walking belt is centered. Repeat until the walking belt is centered. PROBLEM: The walking belt slips when walked on SOLUTION: a. Plug in the... in the power cord, insert the key and carefully walk on SOLUTION: a. When the walking belt is properly tightened. Plug in the power cord, insert the key and run the treadmill for a few minutes. Using b the allen wrench, turn the left rear roller adjustment bolt...
English Manual
Page 15
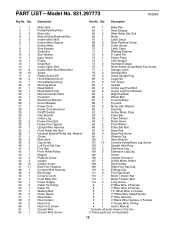
...Foot Rail Front Roller/Pulley Magnet Platform Screw Isolator Isolator Screw Belly Pan Fastener Console Wire Harness Belt Guide Console Cover Front Belly Pan Power Supply Cable Tie Clamp Cable Tie Walking Belt Roller Guard Rear Roller Rear Isolator Rear Foot Rear Foot Screw Ground Wire Ground Wire Screw ...63 1 Belly Pan 64 1 Rear Endcap 65 2 Rear Roller Adj. Description Motor Belt Pulley/Flywheel/Fan Motor Nut Motor/Pulley/Flywheel/Fan Incline Motor Bolt Incline Motor Spacer Incline Motor Stop Bracket Small Nut Star Washer Optic Switch...
...Foot Rail Front Roller/Pulley Magnet Platform Screw Isolator Isolator Screw Belly Pan Fastener Console Wire Harness Belt Guide Console Cover Front Belly Pan Power Supply Cable Tie Clamp Cable Tie Walking Belt Roller Guard Rear Roller Rear Isolator Rear Foot Rear Foot Screw Ground Wire Ground Wire Screw ...63 1 Belly Pan 64 1 Rear Endcap 65 2 Rear Roller Adj. Description Motor Belt Pulley/Flywheel/Fan Motor Nut Motor/Pulley/Flywheel/Fan Incline Motor Bolt Incline Motor Spacer Incline Motor Stop Bracket Small Nut Star Washer Optic Switch...


