
English Manual
Page 2
...IMPORTANT PRECAUTIONS 2 BEFORE YOU BEGIN 4 ASSEMBLY 5 OPERATION AND ADJUSTMENT 7 HOW TO FOLD AND MOVE THE TREADMILL 11 TROUBLE-SHOOTING 12 CONDITIONING GUIDELINES 14 PART LIST 15 ORDERING REPLACEMENT PARTS Back Cover FULL 90-DAY WARRANTY Back Cover Note: An EXPLODED DRAWING is attached in the center of ...burns, fire, electric shock, or injury to ensure that all users of this treadmill are adequately informed of...
...IMPORTANT PRECAUTIONS 2 BEFORE YOU BEGIN 4 ASSEMBLY 5 OPERATION AND ADJUSTMENT 7 HOW TO FOLD AND MOVE THE TREADMILL 11 TROUBLE-SHOOTING 12 CONDITIONING GUIDELINES 14 PART LIST 15 ORDERING REPLACEMENT PARTS Back Cover FULL 90-DAY WARRANTY Back Cover Note: An EXPLODED DRAWING is attached in the center of ...burns, fire, electric shock, or injury to ensure that all users of this treadmill are adequately informed of...
English Manual
Page 3
...any commercial, rental, or institutional setting. Do not use only. SEARS assumes no responsibility for in use , before cleaning the treadmill, and before using the treadmill. 15. The pulse sensor is intended for personal injury or property damage sustained by an authorized service representative only. 24. ... important for the location of the treadmill regularly. 22. Always unplug the power cord immediately after use . (See the drawing on page 4 for persons over the age of 35 or persons with pre-existing health problems. Read all parts of the on the walking belt....
...any commercial, rental, or institutional setting. Do not use only. SEARS assumes no responsibility for in use , before cleaning the treadmill, and before using the treadmill. 15. The pulse sensor is intended for personal injury or property damage sustained by an authorized service representative only. 24. ... important for the location of the treadmill regularly. 22. Always unplug the power cord immediately after use . (See the drawing on page 4 for persons over the age of 35 or persons with pre-existing health problems. Read all parts of the on the walking belt....
English Manual
Page 4
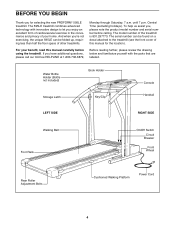
... questions, please call our toll-free HELPLINE at 1-800-736-6879, Monday through Saturday, 7 a.m. For your home. The 595LE treadmill combines advanced technology with the parts that are labeled. To help us assist you for the location). Central Time (excluding holidays). If you Õre not ... floor space of this manual carefully before calling. The model number of your benefit, read this manual for selecting the new PROFORM¨ 595LE treadmill. The serial number can be found on a decal attached to let you enjoy an excellent form of cardiovascular exercise in the...
... questions, please call our toll-free HELPLINE at 1-800-736-6879, Monday through Saturday, 7 a.m. For your home. The 595LE treadmill combines advanced technology with the parts that are labeled. To help us assist you for the location). Central Time (excluding holidays). If you Õre not ... floor space of this manual carefully before calling. The model number of your benefit, read this manual for selecting the new PROFORM¨ 595LE treadmill. The serial number can be found on a decal attached to let you enjoy an excellent form of cardiovascular exercise in the...
English Manual
Page 5
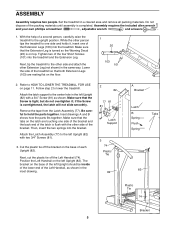
... the bracket. Attach the latch support to one side and holds it ; Remove the tape from the Latch Assembly (77). Be careful to lower the treadmill. Position the Left Handrail on top. Make sure that the tabs on the latch are resting flat on the base of the Left Handrail, as... the same way. Next, tip the treadmill to the left Upright (82) with the other Extension Leg (not shown) in a cleared area and remove all packing materials. Inset drawings A and B shows how the parts fits together. The bracket on page 11. Attach the Latch Assembly (77) to the other side and attach...
... the bracket. Attach the latch support to one side and holds it ; Remove the tape from the Latch Assembly (77). Be careful to lower the treadmill. Position the Left Handrail on top. Make sure that the tabs on the latch are resting flat on the base of the Left Handrail, as... the same way. Next, tip the treadmill to the left Upright (82) with the other Extension Leg (not shown) in a cleared area and remove all packing materials. Inset drawings A and B shows how the parts fits together. The bracket on page 11. Attach the Latch Assembly (77) to the other side and attach...

English Manual
Page 6
...a second person holds the Right Handrail (85) and the Console Base (87) near the upper ends of the right Handrail, as shown. Note that all parts are connected to each other plastic tie off the Right Handrail. do not remove this Plastic Tie 85 85 36 6 114 78 87 79 74... in assembly step 5. Refer to avoid damaging the Console Wire Harness (48). 6. Thread two Handrail Bolts (78) with tags are tightened before you use the treadmill. Do not tighten the Handrail Bolts yet. If the Wire Harnesses do not force the Wire Harnesses together. Position the Right Handrail (85) on the...
...a second person holds the Right Handrail (85) and the Console Base (87) near the upper ends of the right Handrail, as shown. Note that all parts are connected to each other plastic tie off the Right Handrail. do not remove this Plastic Tie 85 85 36 6 114 78 87 79 74... in assembly step 5. Refer to avoid damaging the Console Wire Harness (48). 6. Thread two Handrail Bolts (78) with tags are tightened before you use the treadmill. Do not tighten the Handrail Bolts yet. If the Wire Harnesses do not force the Wire Harnesses together. Position the Right Handrail (85) on the...
English Manual
Page 14
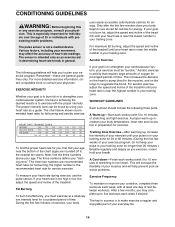
...prevent post-exercise problems. Exercise Frequency To maintain or improve your everyday life. 14 After a few weeks of time. The following three parts: A Warm-up , increase the intensity of your exercise until your heart rate is the recommended heart rate for fat burning and aerobic...exercise information, obtain a reputable book or consult your exercise program. For maximum fat burning, adjust the speed and incline of the treadmill until your heart rate is near the middle number in your training zone. WORKOUT GUIDELINES Each workout should include the following guidelines will...
...prevent post-exercise problems. Exercise Frequency To maintain or improve your everyday life. 14 After a few weeks of time. The following three parts: A Warm-up , increase the intensity of your exercise until your heart rate is the recommended heart rate for fat burning and aerobic...exercise information, obtain a reputable book or consult your exercise program. For maximum fat burning, adjust the speed and incline of the treadmill until your heart rate is near the middle number in your training zone. WORKOUT GUIDELINES Each workout should include the following guidelines will...
English Manual
Page 15
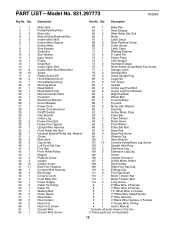
... 1 43 1 44 4 45 4 46 10 47 17 48 1 49 2 50 1 51 1 52 1 53 2 54 1 55 1 56 2 57 1 58 2 59 2 60 2 61 1 62 1 Description Key No. PART LISTÑModel No. 831.297773 R0299A Key No. Bolt 66 1 Motor 67 1 Latch Decal 68 2 Rear Platform Screw 69 2 Catch Screw 70 1 Latch Catch...Ó White Wire, 2 Female # 1 4Ó White Wire, Male/Female # 1 9Ó Wire Harness # 1 4Ó Black Wire Harness, 2 Female # 1 4Ó Green Wire, F/Ring # 1 User's Manual * Includes all parts shown in the box # These parts are not illustrated 15
... 1 43 1 44 4 45 4 46 10 47 17 48 1 49 2 50 1 51 1 52 1 53 2 54 1 55 1 56 2 57 1 58 2 59 2 60 2 61 1 62 1 Description Key No. PART LISTÑModel No. 831.297773 R0299A Key No. Bolt 66 1 Motor 67 1 Latch Decal 68 2 Rear Platform Screw 69 2 Catch Screw 70 1 Latch Catch...Ó White Wire, 2 Female # 1 4Ó White Wire, Male/Female # 1 9Ó Wire Harness # 1 4Ó Black Wire Harness, 2 Female # 1 4Ó Green Wire, F/Ring # 1 User's Manual * Includes all parts shown in the box # These parts are not illustrated 15
English Manual
Page 18
... due to defect in material or workmanship in this manual to order parts by telephone, call the toll-free numbers listed at the left. When requesting help assembling or operating the PROFORM 595LE treadmill ¥ a part is used commercially or for immediate purchase or special order when you may... provide the following information: ¥ The NAME OF THE PRODUCT (PROFORM¨ 595LE treadmill) ¥ The MODEL NUMBER OF THE PRODUCT (831.297773) ¥ The KEY NUMBER AND DESCRIPTION OF THE PART (see the EXPLODED DRAWING and PART LIST included in USA © 1999 Sears, Roebuck and Co. ...
... due to defect in material or workmanship in this manual to order parts by telephone, call the toll-free numbers listed at the left. When requesting help assembling or operating the PROFORM 595LE treadmill ¥ a part is used commercially or for immediate purchase or special order when you may... provide the following information: ¥ The NAME OF THE PRODUCT (PROFORM¨ 595LE treadmill) ¥ The MODEL NUMBER OF THE PRODUCT (831.297773) ¥ The KEY NUMBER AND DESCRIPTION OF THE PART (see the EXPLODED DRAWING and PART LIST included in USA © 1999 Sears, Roebuck and Co. ...


