
Uk Manual
Page 2
TABLE OF CONTENTS IMPORTANT PRECAUTIONS 3 BEFORE YOU BEGIN 4 ASSEMBLY 5 HOW TO USE THE ELLIPTICAL EXERCISER 9 MAINTENANCE AND TROUBLESHOOTING 20 CONDITIONING GUIDELINES 21 PART LIST 22 EXPLODED DRAWING 23 ORDERING REPLACEMENT PARTS Back Cover PROFORM is a registered trademark of ICON IP, Inc. 2
TABLE OF CONTENTS IMPORTANT PRECAUTIONS 3 BEFORE YOU BEGIN 4 ASSEMBLY 5 HOW TO USE THE ELLIPTICAL EXERCISER 9 MAINTENANCE AND TROUBLESHOOTING 20 CONDITIONING GUIDELINES 21 PART LIST 22 EXPLODED DRAWING 23 ORDERING REPLACEMENT PARTS Back Cover PROFORM is a registered trademark of ICON IP, Inc. 2
Uk Manual
Page 3
... exercise aid in determining heart rate trends in general. 10. ICON assumes no responsibility for persons over the age of 35 or persons with a mat beneath it to a stop. 13. Replace any exercise program, consult your physician. The elliptical exerciser is not a medical device. Inspect and properly tighten all precautions. 3. Always wear athletic shoes for home use the elliptical exerciser in this manual before using the elliptical exerciser. 2. The pulse sensor...
... exercise aid in determining heart rate trends in general. 10. ICON assumes no responsibility for persons over the age of 35 or persons with a mat beneath it to a stop. 13. Replace any exercise program, consult your physician. The elliptical exerciser is not a medical device. Inspect and properly tighten all precautions. 3. Always wear athletic shoes for home use the elliptical exerciser in this manual before using the elliptical exerciser. 2. The pulse sensor...

Uk Manual
Page 4
... PROFORM® 595 HR elliptical exerciser. And the unique PROFORM 595 HR features adjustable resistance and an easy-to-use console to the elliptical exerciser (see the front cover of the decal). For your knees and ankles. To help you have ques- The model number is included 4 Before reading further, please familiarise yourself with the parts that moves your feet in the drawing below. Handlebar Handgrip Pulse Sensor Water Bottle Holder* Pedal Pedal...
... PROFORM® 595 HR elliptical exerciser. And the unique PROFORM 595 HR features adjustable resistance and an easy-to-use console to the elliptical exerciser (see the front cover of the decal). For your knees and ankles. To help you have ques- The model number is included 4 Before reading further, please familiarise yourself with the parts that moves your feet in the drawing below. Handlebar Handgrip Pulse Sensor Water Bottle Holder* Pedal Pedal...
Uk Manual
Page 6
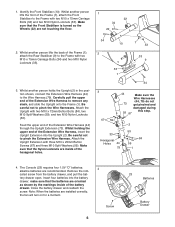
... open. Make sure that the Front Stabiliser is turned so the Wheels (22) are oriented as shown by the markings inside of the Frame (1), attach the Rear Stabiliser (9) to pinch the Extension Wire Harness. Whilst holding the upper end of the Extension Wire Harness (44) through the Upright Extension (73). The Console (23) requires four 1.5V "D" batteries; 4 alkaline batteries are installed...
... open. Make sure that the Front Stabiliser is turned so the Wheels (22) are oriented as shown by the markings inside of the Frame (1), attach the Rear Stabiliser (9) to pinch the Extension Wire Harness. Whilst holding the upper end of the Extension Wire Harness (44) through the Upright Extension (73). The Console (23) requires four 1.5V "D" batteries; 4 alkaline batteries are installed...
Uk Manual
Page 8
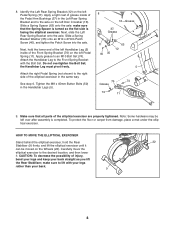
... the elliptical exerciser. HOW TO MOVE THE ELLIPTICAL EXERCISER Stand behind the elliptical exerciser, hold the lower end of the left Handlebar Leg (5) inside of the elliptical exerciser are properly tightened. Apply a light coat of grease inside of the Front Spring Bracket (76) on the left over after assembly is facing the elliptical exerciser. Do not overtighten the Bolt Set; Tighten the M8 x 45mm Button Bolts (50) in the Left Rear Spring...
... the elliptical exerciser. HOW TO MOVE THE ELLIPTICAL EXERCISER Stand behind the elliptical exerciser, hold the lower end of the left Handlebar Leg (5) inside of the elliptical exerciser are properly tightened. Apply a light coat of grease inside of the Front Spring Bracket (76) on the left over after assembly is facing the elliptical exerciser. Do not overtighten the Bolt Set; Tighten the M8 x 45mm Button Bolts (50) in the Left Rear Spring...
Uk Manual
Page 9
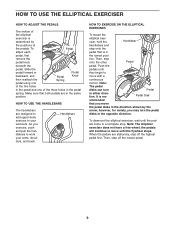
... highest pedal first. To dismount the elliptical exerciser, wait until the pedals come to your arms, shoulders, and back. To Pedal adjust each pedal, first remove the pedal knob beneath the pedal. Then, step onto the other Pedal pedal. Push the pedals until the flywheel stops. however, for variety, you exercise, push and pull the handlebars to move until they begin to work your workouts. Note: The elliptical exerciser does not have a free wheel...
... highest pedal first. To dismount the elliptical exerciser, wait until the pedals come to your arms, shoulders, and back. To Pedal adjust each pedal, first remove the pedal knob beneath the pedal. Then, step onto the other Pedal pedal. Push the pedals until the flywheel stops. however, for variety, you exercise, push and pull the handlebars to move until they begin to work your workouts. Note: The elliptical exerciser does not have a free wheel...
Uk Manual
Page 10
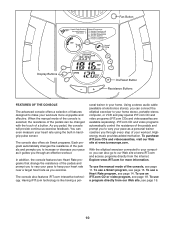
.... Using a stereo audio cable (available at electronics stores), you through an effective workout. To use a Heart Rate program, see page 14. Fan Button Display Buttons On/Reset Button Resistance Buttons FEATURES OF THE CONSOLE The advanced console offers a selection of features designed to our Web site at www.iFIT.com and access programs directly from our Web site, see page 11. sonal trainer in your heart rate using the built-in handgrip pulse sensor. To use the manual mode...
.... Using a stereo audio cable (available at electronics stores), you through an effective workout. To use a Heart Rate program, see page 14. Fan Button Display Buttons On/Reset Button Resistance Buttons FEATURES OF THE CONSOLE The advanced console offers a selection of features designed to our Web site at www.iFIT.com and access programs directly from our Web site, see page 11. sonal trainer in your heart rate using the built-in handgrip pulse sensor. To use the manual mode...
Uk Manual
Page 11
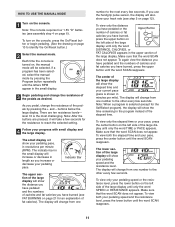
... pedaling speed and the resistance level, press the lower button until only the word SPEED or RESISTANCE appears. Each time the console is the most challenging. The lower section of the elapsed time. The indicator bar in the small display will increase or decrease in the program instead of the large display will show your pedaling speed or the resistance level, press the lower button on page 6). HOW TO USE THE MANUAL MODE 1 Turn...
... pedaling speed and the resistance level, press the lower button until only the word SPEED or RESISTANCE appears. Each time the console is the most challenging. The lower section of the elapsed time. The indicator bar in the small display will increase or decrease in the program instead of the large display will show your pedaling speed or the resistance level, press the lower button on page 6). HOW TO USE THE MANUAL MODE 1 Turn...
Uk Manual
Page 12
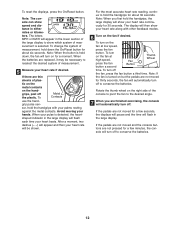
... the pedals are not moved and the console buttons are finished exercising, the console will turn on the handgrips, peel off the fan, press the fan button a third time. sor, hold the handgrips, the large display will then show your heart rate will automatically turn on the fan if desired. If there are replaced, it may be shown. To reset the displays, press the On/Reset button. When the batteries...
... the pedals are not moved and the console buttons are finished exercising, the console will turn on the handgrips, peel off the fan, press the fan button a third time. sor, hold the handgrips, the large display will then show your heart rate will automatically turn on the fan if desired. If there are replaced, it may be shown. To reset the displays, press the On/Reset button. When the batteries...
Uk Manual
Page 13
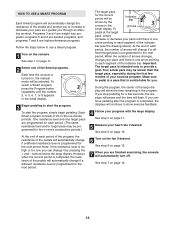
... finished exercising, the console will change your heart rate if desired. HOW TO USE A SMART PROGRAM Each Smart program will automatically change the resistance of the pedals and prompt you to increase or decrease your pace as it by the Indicator Bar arrows in the program. See step 1 on page 11. 5 Measure your pace until the number 3, 4, 5, 6, 7, or 8 appears in the small display. 3 Begin pedaling to start the program...
... finished exercising, the console will change your heart rate if desired. HOW TO USE A SMART PROGRAM Each Smart program will automatically change the resistance of the pedals and prompt you to increase or decrease your pace as it by the Indicator Bar arrows in the program. See step 1 on page 11. 5 Measure your pace until the number 3, 4, 5, 6, 7, or 8 appears in the small display. 3 Begin pedaling to start the program...
Uk Manual
Page 14
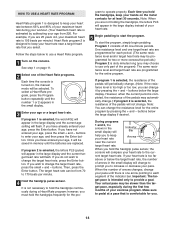
... pulse sensor. The same resistance level and target heart rate are replaced. buttons below the large display if desired. When the number of the indicator bar. Once you are not holding the handgrips, the letters PLS will appear in the small display will change . If you must hold the handgrip pulse sensor, the console will flash. It is not necessary to change the target heart rate, press the Enter button...
... pulse sensor. The same resistance level and target heart rate are replaced. buttons below the large display if desired. When the number of the indicator bar. Once you are not holding the handgrips, the letters PLS will appear in the small display will change . If you must hold the handgrip pulse sensor, the console will flash. It is not necessary to change the target heart rate, press the Enter button...
Uk Manual
Page 15
... the audio cable into the jack beneath the console. See step 7 on your VCR. See step 4 on page 11. 7 Turn on page 12. 8 When you stop pedaling for connecting instructions. Plug the other end of the audio cable into the splitter. To use iFIT.com videocassettes, the elliptical exerciser must be connected to 18 for a few seconds, the program will automatically turn off. To use the program again, reselect it and start it...
... the audio cable into the jack beneath the console. See step 7 on your VCR. See step 4 on page 11. 7 Turn on page 12. 8 When you stop pedaling for connecting instructions. Plug the other end of the audio cable into the splitter. To use iFIT.com videocassettes, the elliptical exerciser must be connected to 18 for a few seconds, the program will automatically turn off. To use the program again, reselect it and start it...
Uk Manual
Page 16
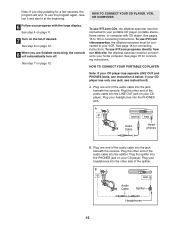
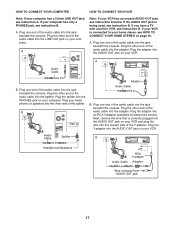
... console. Plug the adapter into the adapter. Plug the other end of the audio cable into the adapter. Do not use the adaptor. HOW TO CONNECT YOUR PORTABLE STEREO HOW TO CONNECT YOUR HOME STEREO Note: If your stereo has an RCA-type AUDIO OUT jack, see instruction A below . If your stereo. Plug the splitter into the LINE OUT jack on your stereo. Next, remove the wire...
... console. Plug the adapter into the adapter. Plug the other end of the audio cable into the adapter. Do not use the adaptor. HOW TO CONNECT YOUR PORTABLE STEREO HOW TO CONNECT YOUR HOME STEREO Note: If your stereo has an RCA-type AUDIO OUT jack, see instruction A below . If your stereo. Plug the splitter into the LINE OUT jack on your stereo. Next, remove the wire...
Uk Manual
Page 17
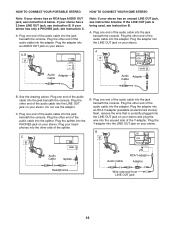
... the console. IN VIDEO AUDIO IN CH 34 OUT RF OUT Headphones/Speakers Audio Cable RCA Y-adaptor Adapter Wire removed from AUDIO OUT jack 17 Plug one end of the audio cable into the jack beneath the console. A LINE OUT Audio Cable Note: If your VCR has an unused AUDIO OUT jack, see instruction B. A. If the AUDIO OUT jack is connected to your home stereo, see instruction B. Plug one end of the audio cable...
... the console. IN VIDEO AUDIO IN CH 34 OUT RF OUT Headphones/Speakers Audio Cable RCA Y-adaptor Adapter Wire removed from AUDIO OUT jack 17 Plug one end of the audio cable into the jack beneath the console. A LINE OUT Audio Cable Note: If your VCR has an unused AUDIO OUT jack, see instruction B. A. If the AUDIO OUT jack is connected to your home stereo, see instruction B. Plug one end of the audio cable...
Uk Manual
Page 18
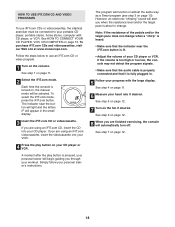
... program (see step 3 on your personal trainer will automatically turn off. See step 5 on page 12. 7 Turn on the console. To select the iFIT.com mode, press the iFIT.com button. However, an electronic "chirping" sound will alert you when the resistance level and/or the target pace is pressed, your CD player or VCR. Follow the steps below to use iFIT.com CDs or videocassettes, the elliptical exerciser...
... program (see step 3 on your personal trainer will automatically turn off. See step 5 on page 12. 7 Turn on the console. To select the iFIT.com mode, press the iFIT.com button. However, an electronic "chirping" sound will alert you when the resistance level and/or the target pace is pressed, your CD player or VCR. Follow the steps below to use iFIT.com CDs or videocassettes, the elliptical exerciser...

Uk Manual
Page 19
... mode, press the iFIT.com button. When the on page 11. 2 Select the iFIT.com mode. See step 1 on -screen countdown ends, the program will alert you must be selected. In addition, you when the resistance level and/or the target pace is turned on, the manual mode will function in the small display. 3 Go to play iFIT.com programs directly from our Web site, the elliptical exerciser...
... mode, press the iFIT.com button. When the on page 11. 2 Select the iFIT.com mode. See step 1 on -screen countdown ends, the program will alert you must be selected. In addition, you when the resistance level and/or the target pace is turned on, the manual mode will function in the small display. 3 Go to play iFIT.com programs directly from our Web site, the elliptical exerciser...
Uk Manual
Page 20
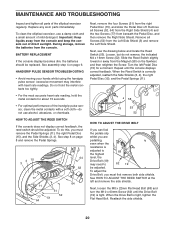
... Screw. See step 8 on page 6. See HOW TO ADJUST THE REED SWITCH at the left Pedal Disc (15) for about 15 seconds. 58 • For optimal performance of mild detergent. Replace any worn parts immediately. HANDGRIP PULSE SENSOR TROUBLESHOOTING • Avoid moving your hands whilst using the handgrip pulse sensor; Turn the left and remove the side shields. When the Drive Belt is adjusted to 68 the highest level, the Drive Belt...
... Screw. See step 8 on page 6. See HOW TO ADJUST THE REED SWITCH at the left Pedal Disc (15) for about 15 seconds. 58 • For optimal performance of mild detergent. Replace any worn parts immediately. HANDGRIP PULSE SENSOR TROUBLESHOOTING • Avoid moving your hands whilst using the handgrip pulse sensor; Turn the left and remove the side shields. When the Drive Belt is adjusted to 68 the highest level, the Drive Belt...
Uk Manual
Page 21
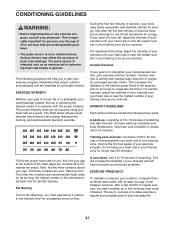
... intended only as a guide. The pulse sensor is especially important for you exercise. CONDITIONING GUIDELINES WARNING: • Before beginning this or any exercise program, consult your training zone. (During the first few months of regular exercise, you exercise. For maximum fat burning, adjust the intensity of your muscles and will increase the flexibility of your exercise until your heart rate in general. This...
... intended only as a guide. The pulse sensor is especially important for you exercise. CONDITIONING GUIDELINES WARNING: • Before beginning this or any exercise program, consult your training zone. (During the first few months of regular exercise, you exercise. For maximum fat burning, adjust the intensity of your muscles and will increase the flexibility of your exercise until your heart rate in general. This...
Uk Manual
Page 22
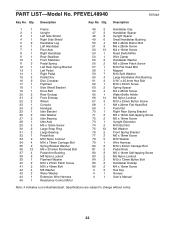
... Bolt 37 4 Pedal Arm Bushing 38 5 M8 Nylon Locknut 39 1 Flywheel Washer 40 2 M10 x 27mm Patch Screw 41 2 M10 x 45mm Bolt 42 4 M5 Washer 43 2 Wave Washer 44 1 Extension Wire Harness 45 1 Resistance Control Motor 46 2 Handlebar Cap 47 2 Handlebar Spacer 48 2 Upright Spacer 49 6 Small Handlebar Bushing 50 4 M8 x 45mm Button Bolt 51 8 M6 x 28mm Screw 52 13 M4 x 16mm Screw 53 1 Reed Switch/Wire 54 1 Wire...
... Bolt 37 4 Pedal Arm Bushing 38 5 M8 Nylon Locknut 39 1 Flywheel Washer 40 2 M10 x 27mm Patch Screw 41 2 M10 x 45mm Bolt 42 4 M5 Washer 43 2 Wave Washer 44 1 Extension Wire Harness 45 1 Resistance Control Motor 46 2 Handlebar Cap 47 2 Handlebar Spacer 48 2 Upright Spacer 49 6 Small Handlebar Bushing 50 4 M8 x 45mm Button Bolt 51 8 M6 x 28mm Screw 52 13 M4 x 16mm Screw 53 1 Reed Switch/Wire 54 1 Wire...
Uk Manual
Page 24
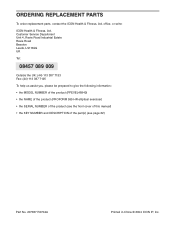
... assist you, please be prepared to give the following information: • the MODEL NUMBER of the product (PFEVEL48940) • the NAME of the product (PROFORM 595 HR elliptical exerciser) • the SERIAL NUMBER of the product (see the front cover of this manual) • the KEY NUMBER and DESCRIPTION of the part(s) (see page 22) Part No. 207837 R0704A Printed in China © 2004 ICON IP, Inc.
... assist you, please be prepared to give the following information: • the MODEL NUMBER of the product (PFEVEL48940) • the NAME of the product (PROFORM 595 HR elliptical exerciser) • the SERIAL NUMBER of the product (see the front cover of this manual) • the KEY NUMBER and DESCRIPTION of the part(s) (see page 22) Part No. 207837 R0704A Printed in China © 2004 ICON IP, Inc.


