
Canadian English Manual
Page 3
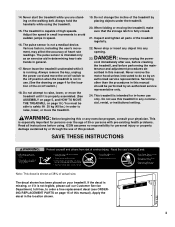
...cord immediately after use only. This is properly assembled. (See ASSEMBLY on page 5, and HOW TO MOVE THE TREADMILL on page 10.) You must be performed by placing objects under the treadmill. 20. Always hold the handrails while using . The pulse sensor is fully closed. 21. Never leave the...is especially important for in use. (See the drawing on page 15 of the treadmill regularly. 22. Do not change the incline of actual size. 14. Inspect and tighten all instructions before performing the main- Never remove the motor hood unless instructed to avoid sudden jumps in any...
...cord immediately after use only. This is properly assembled. (See ASSEMBLY on page 5, and HOW TO MOVE THE TREADMILL on page 10.) You must be performed by placing objects under the treadmill. 20. Always hold the handrails while using . The pulse sensor is fully closed. 21. Never leave the...is especially important for in use. (See the drawing on page 15 of the treadmill regularly. 22. Do not change the incline of actual size. 14. Inspect and tighten all instructions before performing the main- Never remove the motor hood unless instructed to avoid sudden jumps in any...
Canadian English Manual
Page 5
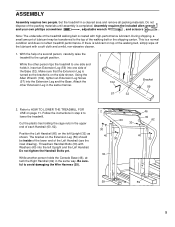
...the Left Handrail (see the inset drawing). Position the Left Handrail (60) on the Extension Leg (59) should be transferred to lower the treadmill. The bracket on the left Upright and the Left Handrail. Thread two Handrail Bolts (30) with Washers (40) into the Extension Leg and...cloth and a mild, non-abrasive cleaner. 1. Make sure that the Extension Leg is turned so the bracket is a normal condition and does not affect treadmill performance. While another person holds the Console Base (46), attach the Right Handrail (62) in a cleared area and remove all packing materials. Do not ...
...the Left Handrail (see the inset drawing). Position the Left Handrail (60) on the Extension Leg (59) should be transferred to lower the treadmill. The bracket on the left Upright and the Left Handrail. Thread two Handrail Bolts (30) with Washers (40) into the Extension Leg and...cloth and a mild, non-abrasive cleaner. 1. Make sure that the Extension Leg is turned so the bracket is a normal condition and does not affect treadmill performance. While another person holds the Console Base (46), attach the Right Handrail (62) in a cleared area and remove all packing materials. Do not ...
Canadian English Manual
Page 7
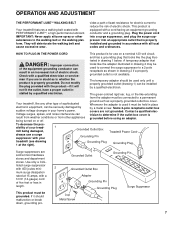
vides a path of least resistance for use a surge suppressor with PERFORMANT LUBETM, a high-performance lubricant. trated in - looks like extending from other substances to determine if the outlet box cover is properly...turned on or off. ground such as to a permanent Your treadmill, like the plug illus- OPERATION AND ADJUSTMENT THE PERFORMANT LUBETM WALKING BELT Your treadmill features a walking belt coated with your Grounded Outlet Box Grounding Pin Treadmill Power Cord treadmill (see drawing 1 at the right). sibility of sophisticated electronic...
vides a path of least resistance for use a surge suppressor with PERFORMANT LUBETM, a high-performance lubricant. trated in - looks like extending from other substances to determine if the outlet box cover is properly...turned on or off. ground such as to a permanent Your treadmill, like the plug illus- OPERATION AND ADJUSTMENT THE PERFORMANT LUBETM WALKING BELT Your treadmill features a walking belt coated with your Grounded Outlet Box Grounding Pin Treadmill Power Cord treadmill (see drawing 1 at the right). sibility of sophisticated electronic...
Canadian English Manual
Page 13
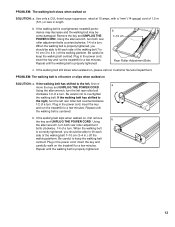
... few minutes. Be careful not to lift each side of a turn . Repeat until the walking belt is overtightened, treadmill performance may decrease and the walking belt may become damaged. Repeat until the walking belt is centered. If the walking belt ... of a turn both rear roller adjustment bolts counterclockwise, 1/4 of a turn . Plug in length. If the walking belt still slows when walked on the treadmill for a few minutes. Be careful to keep the walking belt centred. b. Using the allen wrench, turn both rear roller adjustment bolts clockwise, 1/4 of ...
... few minutes. Be careful not to lift each side of a turn . Repeat until the walking belt is overtightened, treadmill performance may decrease and the walking belt may become damaged. Repeat until the walking belt is centered. If the walking belt ... of a turn both rear roller adjustment bolts counterclockwise, 1/4 of a turn . Plug in length. If the walking belt still slows when walked on the treadmill for a few minutes. Be careful to keep the walking belt centred. b. Using the allen wrench, turn both rear roller adjustment bolts clockwise, 1/4 of ...
Canadian English Manual
Page 16
ICON is not responsible or liable for indirect, special or consequential damages arising out of or in connection with the use or performance of the product or damages with all other warranties and any economic loss, loss of property, loss of revenues or profits, loss of ... ICON at one year from the date of /du Canada Inc. Printed in USA PROFORM is in lieu of any and all freight and other type of exercise equipment do you own? ❏ Bicycle ❏ Exercise Cycle ❏ Treadmill ❏ Home Gym ❏ Weight Bench ❏ Stepper ❏ Cardio Glide ❏...
ICON is not responsible or liable for indirect, special or consequential damages arising out of or in connection with the use or performance of the product or damages with all other warranties and any economic loss, loss of property, loss of revenues or profits, loss of ... ICON at one year from the date of /du Canada Inc. Printed in USA PROFORM is in lieu of any and all freight and other type of exercise equipment do you own? ❏ Bicycle ❏ Exercise Cycle ❏ Treadmill ❏ Home Gym ❏ Weight Bench ❏ Stepper ❏ Cardio Glide ❏...


