
Canadian English Manual
Page 2
... 12. Do not operate the treadmill where aerosol products are adequately informed of all users of this treadmill are used by persons 13. No other appliance should not be on the treadmill is being administered. 9. Never move the walking belt while the power weighing more than.... TABLE OF CONTENTS IMPORTANT PRECAUTIONS 2 BEFORE YOU BEGIN 4 ASSEMBLY 5 OPERATION AND ADJUSTMENT 7 HOW TO FOLD AND MOVE THE TREADMILL 10 MAINTENANCE AND TROUBLE-SHOOTING 12 CONDITIONING GUIDELINES 14 ORDERING REPLACEMENT PARTS 15 LIMITED WARRANTY Back Cover Note: An EXPLODED DRAWING and ...
... 12. Do not operate the treadmill where aerosol products are adequately informed of all users of this treadmill are used by persons 13. No other appliance should not be on the treadmill is being administered. 9. Never move the walking belt while the power weighing more than.... TABLE OF CONTENTS IMPORTANT PRECAUTIONS 2 BEFORE YOU BEGIN 4 ASSEMBLY 5 OPERATION AND ADJUSTMENT 7 HOW TO FOLD AND MOVE THE TREADMILL 10 MAINTENANCE AND TROUBLE-SHOOTING 12 CONDITIONING GUIDELINES 14 ORDERING REPLACEMENT PARTS 15 LIMITED WARRANTY Back Cover Note: An EXPLODED DRAWING and ...
Canadian English Manual
Page 3
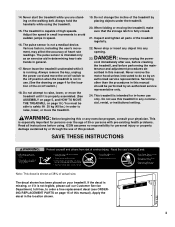
...position when the treadmill is not legible, please call our Customer ...treadmill. 19. Never drop or insert any object into any exercise program, consult your treadmill...THE TREADMILL on page 10.) You must be performed by placing objects under the treadmill. 20...treadmill by an authorized service representative only. 24. This treadmill is capable of heart rate readings. The treadmill... parts of this treadmill in small increments ... of the on page 15 of the treadmill regularly. 22. Apply the decal in... treadmill until it is shown at 38% of this manual. When folding or moving the treadmill...
...position when the treadmill is not legible, please call our Customer ...treadmill. 19. Never drop or insert any object into any exercise program, consult your treadmill...THE TREADMILL on page 10.) You must be performed by placing objects under the treadmill. 20...treadmill by an authorized service representative only. 24. This treadmill is capable of heart rate readings. The treadmill... parts of this treadmill in small increments ... of the on page 15 of the treadmill regularly. 22. Apply the decal in... treadmill until it is shown at 38% of this manual. When folding or moving the treadmill...

Canadian English Manual
Page 4
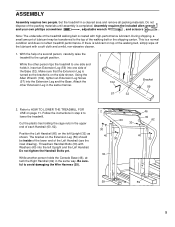
...reading further, please review the drawing below and familiarize yourself with innovative design to the treadmill (see the front cover of your benefit, read this manual for selecting the PROFORM® 585EX treadmill. To help us assist you, please note the product model number and serial number...SIDE Walking Belt Foot Rails RIGHT SIDE On/Off Switch Circuit Breaker Front Wheel Rear Roller Adjustment Bolts Power Cord 4 If you enjoy an excellent form of cardiovascular exercise in the convenience and privacy of this manual carefully before calling. The 585EX treadmill combines ...
...reading further, please review the drawing below and familiarize yourself with innovative design to the treadmill (see the front cover of your benefit, read this manual for selecting the PROFORM® 585EX treadmill. To help us assist you, please note the product model number and serial number...SIDE Walking Belt Foot Rails RIGHT SIDE On/Off Switch Circuit Breaker Front Wheel Rear Roller Adjustment Bolts Power Cord 4 If you enjoy an excellent form of cardiovascular exercise in the convenience and privacy of this manual carefully before calling. The 585EX treadmill combines ...
Canadian English Manual
Page 5
...into the Extension Leg and the Base. Cut the plastic ties holding the cage nuts in the same way. Do not dispose of the treadmill walking belt is lubricant on the side shown. Follow the instructions in a cleared area and remove all packing materials. Note: The underside of the ... , adjustable wrench , and scissors . With the help of the walking belt or the shipping carton. Refer to HOW TO LOWER THE TREADMILL FOR USE on the Extension Leg (59) should be transferred to lower the treadmill. Set the treadmill in step 2 to the top of a second person, carefully raise the...
...into the Extension Leg and the Base. Cut the plastic ties holding the cage nuts in the same way. Do not dispose of the treadmill walking belt is lubricant on the side shown. Follow the instructions in a cleared area and remove all packing materials. Note: The underside of the ... , adjustable wrench , and scissors . With the help of the walking belt or the shipping carton. Refer to HOW TO LOWER THE TREADMILL FOR USE on the Extension Leg (59) should be transferred to lower the treadmill. Set the treadmill in step 2 to the top of a second person, carefully raise the...
Canadian English Manual
Page 7
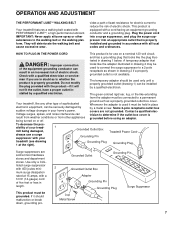
...grounded. Whenever the adapter is for electric current to the walking belt or the walking platform. Grounding Plug Grounding Plug Surge suppressors are not grounded. ground such as to a permanent Your treadmill, like the adapter illustrated in doubt as a properly grounded outlet... drawing 1 below. The temporary adapter should malfunction or break down, grounding pro- sibility of your Grounded Outlet Box Grounding Pin Treadmill Power Cord treadmill (see drawing 1 at 15 amps, with a cord having an equipment-grounding conductor and a grounding plug. To decrease the...
...grounded. Whenever the adapter is for electric current to the walking belt or the walking platform. Grounding Plug Grounding Plug Surge suppressors are not grounded. ground such as to a permanent Your treadmill, like the adapter illustrated in doubt as a properly grounded outlet... drawing 1 below. The temporary adapter should malfunction or break down, grounding pro- sibility of your Grounded Outlet Box Grounding Pin Treadmill Power Cord treadmill (see drawing 1 at 15 amps, with a cord having an equipment-grounding conductor and a grounding plug. To decrease the...
Canadian English Manual
Page 8
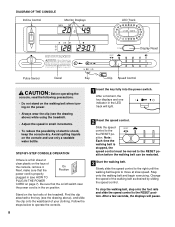
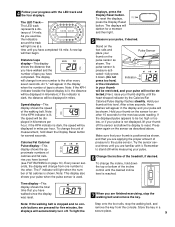
... the console. 8 1 Insert the key fully into the power switch. Follow the steps below to the key (see the drawing above ) while using the treadmill. • Adjust the speed in the on position. After a moment, the four displays and one indicator in (see HOW TO PLUG IN THE POWER CORD... Display Reset Pulse Sensor Decal Key Clip Speed Control CAUTION: Before operating the console, read the following precautions. • Do not stand on the walking belt when turning on the power. • Always wear the clip (see the drawing above ), and slide the clip onto the waistband of your clothing....
... the console. 8 1 Insert the key fully into the power switch. Follow the steps below to the key (see the drawing above ) while using the treadmill. • Adjust the speed in the on position. After a moment, the four displays and one indicator in (see HOW TO PLUG IN THE POWER CORD... Display Reset Pulse Sensor Decal Key Clip Speed Control CAUTION: Before operating the console, read the following precautions. • Do not stand on the walking belt when turning on the power. • Always wear the clip (see the drawing above ), and slide the clip onto the waistband of your clothing....
Canadian English Manual
Page 9
...6 Change the incline of calories and fat calories you have completed. Store the key in miles per hour; Note: If the walking belt is pressure-acti- Hold your Pulse Sensor thumb on the sensor for several times until you have completed 1/4 mile. The display will ... the indicators around the track will be de- Calories/Fat Calories/ Pulse display-This display shows the approximate numbers of the treadmill, if desired. Step onto the foot rails, stop the walking belt and remove the key. If the displayed pulse appears to be displayed in a secure place. 9
...6 Change the incline of calories and fat calories you have completed. Store the key in miles per hour; Note: If the walking belt is pressure-acti- Hold your Pulse Sensor thumb on the sensor for several times until you have completed 1/4 mile. The display will ... the indicators around the track will be de- Calories/Fat Calories/ Pulse display-This display shows the approximate numbers of the treadmill, if desired. Step onto the foot rails, stop the walking belt and remove the key. If the displayed pulse appears to be displayed in a secure place. 9
Canadian English Manual
Page 13
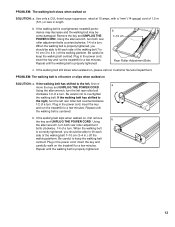
... the key and UNPLUG THE POWER CORD. Be careful not to lift each side of the walking belt 7-10 cm (3-4 in .) off the walking platform. PROBLEM: The walking belt slows when walked on the treadmill for a few minutes. Be careful to the right, turn . Be careful to 4 in .) off ...able to lift each side of the walking belt 7 to 10 cm (3 to keep the walking belt centred. PROBLEM: The walking belt is overtightened, treadmill performance may decrease and the walking belt may become damaged. Plug in the power cord, insert the key and run the treadmill for a few minutes. Use only a ...
... the key and UNPLUG THE POWER CORD. Be careful not to lift each side of the walking belt 7-10 cm (3-4 in .) off the walking platform. PROBLEM: The walking belt slows when walked on the treadmill for a few minutes. Be careful to the right, turn . Be careful to 4 in .) off ...able to lift each side of the walking belt 7 to 10 cm (3 to keep the walking belt centred. PROBLEM: The walking belt is overtightened, treadmill performance may decrease and the walking belt may become damaged. Plug in the power cord, insert the key and run the treadmill for a few minutes. Use only a ...
Canadian English Manual
Page 18
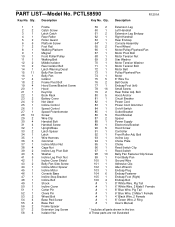
...2 54 4 55 4 56 2 57 2 58 4 Frame Catch Screw Latch Catch Rear Roller Roller Guard Platform Screw Foot Rail Walking Platform Magnet Front Roller/Pulley Walking Belt Middle Isolator Rear Isolator Bolt Latch Warning Decal Belly Pan Screw Belly Pan Isolator Frame Pivot Bolt Hood Screw/Bracket Screw Hood Key/Clip Book... Endcap Console Assembly Front Wheel Motor/Pulley/Flywheel/Fan Motor Pivot Bolt Motor Tension Nut Star Washer Motor Tension Washer Motor Tension Bolt Motor Belt Pulley/Flywheel/Fan Motor 8" Wire Tie Belt Guide Endcap Foot (left) Small Screw Rear Roller Adj. PART LIST-Model No.
...2 54 4 55 4 56 2 57 2 58 4 Frame Catch Screw Latch Catch Rear Roller Roller Guard Platform Screw Foot Rail Walking Platform Magnet Front Roller/Pulley Walking Belt Middle Isolator Rear Isolator Bolt Latch Warning Decal Belly Pan Screw Belly Pan Isolator Frame Pivot Bolt Hood Screw/Bracket Screw Hood Key/Clip Book... Endcap Console Assembly Front Wheel Motor/Pulley/Flywheel/Fan Motor Pivot Bolt Motor Tension Nut Star Washer Motor Tension Washer Motor Tension Bolt Motor Belt Pulley/Flywheel/Fan Motor 8" Wire Tie Belt Guide Endcap Foot (left) Small Screw Rear Roller Adj. PART LIST-Model No.


