
Canadian English Manual
Page 3
... that all warnings and precautions. 2. When choosing a location for both men and women. The treadmill should be on the walking belt. Wear appropriate exercise clothing when using the treadmill. 16. Do not attempt to raise, lower, or move the walking belt while the power is not a medical device. Athletic support clothes are standing on the same...
... that all warnings and precautions. 2. When choosing a location for both men and women. The treadmill should be on the walking belt. Wear appropriate exercise clothing when using the treadmill. 16. Do not attempt to raise, lower, or move the walking belt while the power is not a medical device. Athletic support clothes are standing on the same...
Canadian English Manual
Page 5
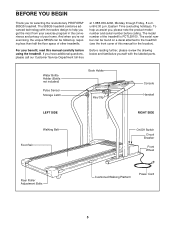
...Key/Clip Console Handrail LEFT SIDE RIGHT SIDE Walking Belt Foot Rail On/Off Switch Circuit Breaker Front Wheel Rear Roller Adjustment Bolts Cushioned Walking Platform Power Cord 5 For your home. The model number of other treadmills. And when you're not exercising, the...the treadmill. Eastern Time (excluding holidays). Before reading further, please review the drawing below and familiarize yourself with innovative design to the treadmill (see the front cover of your benefit, read this manual for selecting the revolutionary PROFORM® 585QS treadmill. The 585QS treadmill ...
...Key/Clip Console Handrail LEFT SIDE RIGHT SIDE Walking Belt Foot Rail On/Off Switch Circuit Breaker Front Wheel Rear Roller Adjustment Bolts Cushioned Walking Platform Power Cord 5 For your home. The model number of other treadmills. And when you're not exercising, the...the treadmill. Eastern Time (excluding holidays). Before reading further, please review the drawing below and familiarize yourself with innovative design to the treadmill (see the front cover of your benefit, read this manual for selecting the revolutionary PROFORM® 585QS treadmill. The 585QS treadmill ...
Canadian English Manual
Page 6
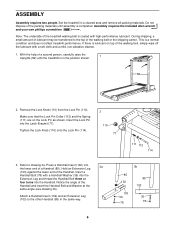
...the same angle (see drawing 3b). This is in the position shown. 82 2. Insert the Lock Pin into the lower end of the treadmill walking belt is completed. Refer to the other Handrail (85) in a cleared area and remove all packing materials. Notice the angle of the Handrail. Set... shipping, a small amount of lubricant may be transferred to the top of the packing materials until the treadmill is a normal condition and does not affect treadmill performance. Do not dispose of the walking belt or the shipping carton. Make sure that the Lock Pin Collar (112) and the Spring (111) ...
...the same angle (see drawing 3b). This is in the position shown. 82 2. Insert the Lock Pin into the lower end of the treadmill walking belt is completed. Refer to the other Handrail (85) in a cleared area and remove all packing materials. Notice the angle of the Handrail. Set... shipping, a small amount of lubricant may be transferred to the top of the packing materials until the treadmill is a normal condition and does not affect treadmill performance. Do not dispose of the walking belt or the shipping carton. Make sure that the Lock Pin Collar (112) and the Spring (111) ...
Canadian English Manual
Page 7
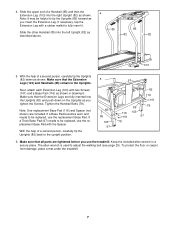
... the Screws. With the help of a Handrail (85) and then the Extension Leg (103) into the left Upright (82) as you use the treadmill. The allen wrench is used to tip the Uprights (82) forward as described above. 82 82 103 5. Slide the upper end of a second person... in a secure place. To protect the floor or carpet from damage, place a mat under the treadmill. 7 Tighten the Handrail Bolts (78). 4. Note: One replacement Base Pad (116) and Spacer (not shown) are included. If a Thick Base Pad (97) needs to be helpful to adjust the walking belt (see page 20).
... the Screws. With the help of a Handrail (85) and then the Extension Leg (103) into the left Upright (82) as you use the treadmill. The allen wrench is used to tip the Uprights (82) forward as described above. 82 82 103 5. Slide the upper end of a second person... in a secure place. To protect the floor or carpet from damage, place a mat under the treadmill. 7 Tighten the Handrail Bolts (78). 4. Note: One replacement Base Pad (116) and Spacer (not shown) are included. If a Thick Base Pad (97) needs to be helpful to adjust the walking belt (see page 20).
Canadian English Manual
Page 8
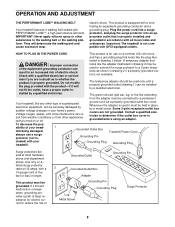
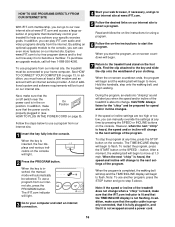
... a ULlisted surge protector, rated at most hardware stores and department stores. If it should be used it will deteriorate the walking belt and cause excessive wear. HOW TO PLUG IN THE POWER CORD This product is used only until a properly grounded outlet (... 2 Grounded Outlet Box Adapter Grounding Pin Grounding Plug Lug Metal Screw Surge Protector 8 OPERATION AND ADJUSTMENT THE PERFORMANT LUBETM WALKING BELT Your treadmill features a walking belt coated with all local codes and ordinances. The temporary adapter should malfunction or break down, grounding provides a path of...
... a ULlisted surge protector, rated at most hardware stores and department stores. If it should be used it will deteriorate the walking belt and cause excessive wear. HOW TO PLUG IN THE POWER CORD This product is used only until a properly grounded outlet (... 2 Grounded Outlet Box Adapter Grounding Pin Grounding Plug Lug Metal Screw Surge Protector 8 OPERATION AND ADJUSTMENT THE PERFORMANT LUBETM WALKING BELT Your treadmill features a walking belt coated with all local codes and ordinances. The temporary adapter should malfunction or break down, grounding provides a path of...
Canadian English Manual
Page 9
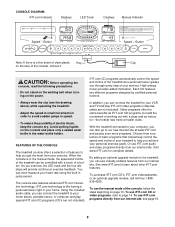
... of basic programs that interactively control the speed and incline of your treadmill to help you can connect the treadmill to your personal exercise goals. CAUTION: Before operating the console, read the following precautions. • Do not stand on the walking belt when turning on the console and place only a sealed water bottle in...
... of basic programs that interactively control the speed and incline of your treadmill to help you can connect the treadmill to your personal exercise goals. CAUTION: Before operating the console, read the following precautions. • Do not stand on the walking belt when turning on the console and place only a sealed water bottle in...
Canadian English Manual
Page 10
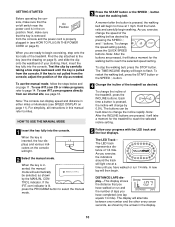
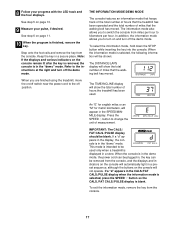
...the selected speed setting. When the key is in (see the drawing on page 8). The TIME/INCLINE display will take a moment for the walking belt to change the incline rapidly. To change the speed setting quickly, press the QUICK SPEED buttons. Note: After the INCLINE buttons are ready to... manual refer to page 14. The display will change the speed of the treadmill, press the INCLINE buttons. To use iFIT.com CD or video programs, refer to miles. To change the incline of the walking belt as shown by carefully taking a few steps backward until you exercise, change ...
...the selected speed setting. When the key is in (see the drawing on page 8). The TIME/INCLINE display will take a moment for the walking belt to change the incline rapidly. To change the speed setting quickly, press the QUICK SPEED buttons. Note: After the INCLINE buttons are ready to... manual refer to page 14. The display will change the speed of the treadmill, press the INCLINE buttons. To use iFIT.com CD or video programs, refer to miles. To change the incline of the walking belt as shown by carefully taking a few steps backward until you exercise, change ...
Canadian English Manual
Page 11
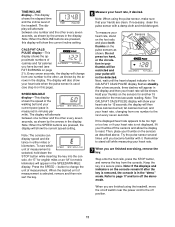
...will not be restricted and your thumbs off the sensors and allow the display to change from the console. When the desired unit of the walking belt and your heart rate, changing from one number and the other , as shown by the arrows in the display. Note: The CALS/...miles or an "M" for metric kilometers will then show the current speed setting. Next, wait until you have burned (see which unit of the treadmill. the display will appear in a secure place. Try the pulse sensor several times until the heart-shaped indicator in minutes per mile). Refer ...
...will not be restricted and your thumbs off the sensors and allow the display to change from the console. When the desired unit of the walking belt and your heart rate, changing from one number and the other , as shown by the arrows in the display. Note: The CALS/...miles or an "M" for metric kilometers will then show the current speed setting. Next, wait until you have burned (see which unit of the treadmill. the display will appear in a secure place. Try the pulse sensor several times until the heart-shaped indicator in minutes per mile). Refer ...
Canadian English Manual
Page 15
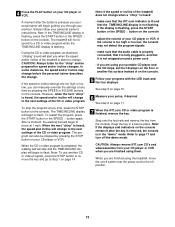
... your pulse, if desired. 4 Press the PLAY button on /off switch near the power cord to the off the demo mode. After a moment, the walking belt will begin to step 1 on page 10. 6 Measure your workout. Note: To use another flat surface instead of the CD or video program. Note: ... to move the on your personal trainer will change . When the next "chirp" is completed, the walking belt will stop the program at any time, press the STOP button on the console • adjust the volume of the treadmill is pressed, your CD player or VCR. If the display is flashing. The...
... your pulse, if desired. 4 Press the PLAY button on /off switch near the power cord to the off the demo mode. After a moment, the walking belt will begin to step 1 on page 10. 6 Measure your workout. Note: To use another flat surface instead of the CD or video program. Note: ... to move the on your personal trainer will change . When the next "chirp" is completed, the walking belt will stop the program at any time, press the STOP button on the console • adjust the volume of the treadmill is pressed, your CD player or VCR. If the display is flashing. The...
Canadian English Manual
Page 16
... will begin to the key and slide the clip onto the waistband of the program. After a moment, the walking belt will light. 3 Go to your computer and start an internet connection. 4 Start your treadmill to help you can use another program, press the STOP button and go to flash. To use programs from... demos and to find out how easy it is to the treadmill and stand on the foot rails. In addition, you must be found on our internet site. In addition, make sure that the TIME/INCLINE display is completed, the walking belt will stop the program at any time by pressing the SPEED...
... will begin to the key and slide the clip onto the waistband of the program. After a moment, the walking belt will light. 3 Go to your computer and start an internet connection. 4 Start your treadmill to help you can use another program, press the STOP button and go to flash. To use programs from... demos and to find out how easy it is to the treadmill and stand on the foot rails. In addition, you must be found on our internet site. In addition, make sure that the TIME/INCLINE display is completed, the walking belt will stop the program at any time by pressing the SPEED...
Canadian English Manual
Page 17
... finished using the treadmill, move the on the console will appear in a secure place. Press the SPEED v button to the off the demo mode. When the console is displayed in a store. 8 Follow your pulse, if desired. The TIME/INCLINE display will show the total number of miles that the walking belt has moved... allows you to kilometers per hour to turn on and turn off switch near the power cord to change the unit of miles that the walking belt has moved. If a "d" appears in the display, the console is in the "demo" mode.
... finished using the treadmill, move the on the console will appear in a secure place. Press the SPEED v button to the off the demo mode. When the console is displayed in a store. 8 Follow your pulse, if desired. The TIME/INCLINE display will show the total number of miles that the walking belt has moved... allows you to kilometers per hour to turn on and turn off switch near the power cord to change the unit of miles that the walking belt has moved. If a "d" appears in the display, the console is in the "demo" mode.
Canadian English Manual
Page 20
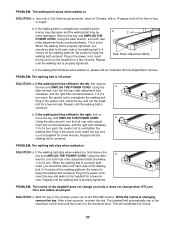
... incline level and then return to keep the walking belt centered. If the walking belt is centered. When the walking belt is changing, remove the key. Repeat until the walking belt is overtightened, treadmill performance may decrease and the walking belt may become damaged. Repeat until the walking belt is correctly tight- b. If the walking belt slips when walked on , please call our Customer Service Department...
... incline level and then return to keep the walking belt centered. If the walking belt is centered. When the walking belt is changing, remove the key. Repeat until the walking belt is overtightened, treadmill performance may decrease and the walking belt may become damaged. Repeat until the walking belt is correctly tight- b. If the walking belt slips when walked on , please call our Customer Service Department...
Canadian English Manual
Page 23
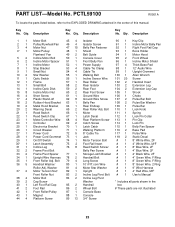
...Base Pad Stop Bracket 53 4 Cable Tie Clamp 98 1 12" Audio Wire Small Nut 54 4 Cable Tie 99 1 Upright Grommet Star Washer 55 1 Walking Belt 100 1 Allen Wrench Optic Switch 56 1 Incline Sensor Wire 101 20 Screw Frame 57 1 Rear Roller 102 2 Handrail Insert Small Bolt 58 2 Rear ... Screw 113 1 Pin Clip Controller 69 2 Catch Screw 114 1 Lock Pin Electronics Bracket 70 1 Latch Catch 115 1 Belly Pan Spacer Circuit Breaker 71 1 Walking Platform 116 2 Base Pad Power Cord 72 5 8" Cable Tie 117 1 Pulse Wire Power Cord Grommet 73 1 Jack 118 2 Static Decal On/Off Switch ...
...Base Pad Stop Bracket 53 4 Cable Tie Clamp 98 1 12" Audio Wire Small Nut 54 4 Cable Tie 99 1 Upright Grommet Star Washer 55 1 Walking Belt 100 1 Allen Wrench Optic Switch 56 1 Incline Sensor Wire 101 20 Screw Frame 57 1 Rear Roller 102 2 Handrail Insert Small Bolt 58 2 Rear ... Screw 113 1 Pin Clip Controller 69 2 Catch Screw 114 1 Lock Pin Electronics Bracket 70 1 Latch Catch 115 1 Belly Pan Spacer Circuit Breaker 71 1 Walking Platform 116 2 Base Pad Power Cord 72 5 8" Cable Tie 117 1 Pulse Wire Power Cord Grommet 73 1 Jack 118 2 Static Decal On/Off Switch ...


