
Canadian English Manual
Page 1
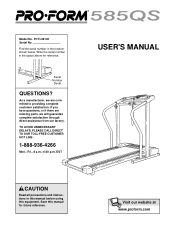
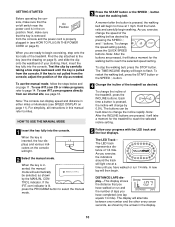
... instructions in this manual before using this manual for reference. Save this equipment. Find the serial number in the space above for future reference. Serial Number Decal QUESTIONS? If you have questions, or if there are committed to providing complete customer satisfaction. Visit our website at www.proform.com As a manufacturer, we are missing parts, we will guarantee complete satisfaction through direct...
... instructions in this manual before using this manual for reference. Save this equipment. Find the serial number in the space above for future reference. Serial Number Decal QUESTIONS? If you have questions, or if there are committed to providing complete customer satisfaction. Visit our website at www.proform.com As a manufacturer, we are missing parts, we will guarantee complete satisfaction through direct...
Canadian English Manual
Page 2
® TABLE OF CONTENTS IMPORTANT PRECAUTIONS 3 BEFORE YOU BEGIN 5 ASSEMBLY 6 OPERATION AND ADJUSTMENT 8 HOW TO FOLD AND MOVE THE TREADMILL 18 TROUBLE-SHOOTING 19 CONDITIONING GUIDELINES 21 PART LIST 23 ORDERING REPLACEMENT PARTS Back Cover LIMITED WARRANTY Back Cover Note: An EXPLODED DRAWING is a registered trademark of this manual. PROFORM is attached in the center of ICON Health & Fitness, Inc. 2
® TABLE OF CONTENTS IMPORTANT PRECAUTIONS 3 BEFORE YOU BEGIN 5 ASSEMBLY 6 OPERATION AND ADJUSTMENT 8 HOW TO FOLD AND MOVE THE TREADMILL 18 TROUBLE-SHOOTING 19 CONDITIONING GUIDELINES 21 PART LIST 23 ORDERING REPLACEMENT PARTS Back Cover LIMITED WARRANTY Back Cover Note: An EXPLODED DRAWING is a registered trademark of this manual. PROFORM is attached in the center of ICON Health & Fitness, Inc. 2

Canadian English Manual
Page 3
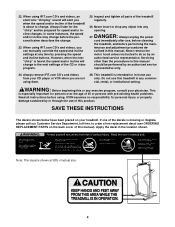
... able to raise, lower, or move the treadmill. 20. Do not wear loose clothing that blocks air openings. Always remove the key, unplug the power cord and move the walking belt while the power is properly assembled. (See ASSEMBLY on page 6, and HOW TO FOLD AND MOVE THE TREADMILL on the walking belt. Use the treadmill only as an exercise aid in determining heart rate trends in order to the off switch.) 19. To protect...
... able to raise, lower, or move the treadmill. 20. Do not wear loose clothing that blocks air openings. Always remove the key, unplug the power cord and move the walking belt while the power is properly assembled. (See ASSEMBLY on page 6, and HOW TO FOLD AND MOVE THE TREADMILL on the walking belt. Use the treadmill only as an exercise aid in determining heart rate trends in order to the off switch.) 19. To protect...
Canadian English Manual
Page 4
... this or any opening. If one of the decals is shown at any commercial, rental, or institutional setting. When using iFIT.com CD's and videos, you can manually override the speed and incline settings at 38% of the treadmill regularly. 26. Always unplug the power cord immediately after use only. Never remove the motor hood unless instructed to order a free replacement decal (see ORDERING REPLACEMENT PARTS on your treadmill. Always listen for...
... this or any opening. If one of the decals is shown at any commercial, rental, or institutional setting. When using iFIT.com CD's and videos, you can manually override the speed and incline settings at 38% of the treadmill regularly. 26. Always unplug the power cord immediately after use only. Never remove the motor hood unless instructed to order a free replacement decal (see ORDERING REPLACEMENT PARTS on your treadmill. Always listen for...
Canadian English Manual
Page 5
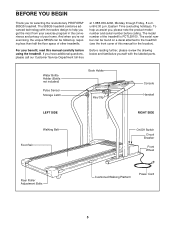
... not included) Pulse Sensor Storage Latch Book Holder Key/Clip Console Handrail LEFT SIDE RIGHT SIDE Walking Belt Foot Rail On/Off Switch Circuit Breaker Front Wheel Rear Roller Adjustment Bolts Cushioned Walking Platform Power Cord 5 The serial number can be found on a decal attached to help us assist you, please note the product model number and serial number before using the treadmill. And when you're not exercising, the unique 585QS can be folded up, requiring...
... not included) Pulse Sensor Storage Latch Book Holder Key/Clip Console Handrail LEFT SIDE RIGHT SIDE Walking Belt Foot Rail On/Off Switch Circuit Breaker Front Wheel Rear Roller Adjustment Bolts Cushioned Walking Platform Power Cord 5 The serial number can be found on a decal attached to help us assist you, please note the product model number and serial number before using the treadmill. And when you're not exercising, the unique 585QS can be folded up, requiring...
Canadian English Manual
Page 6
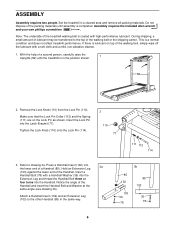
Note: The underside of the treadmill walking belt is coated with a Handrail Washer (36) into the Extension Leg and thread the Handrail Bolt three or four turns into the Handrail. During shipping, a small amount of lubricant may be transferred to the top of a Handrail (85). Tighten the Lock Knob (110) onto the Lock Pin (114). 2 110 77 111 112 114 3. Insert...
Note: The underside of the treadmill walking belt is coated with a Handrail Washer (36) into the Extension Leg and thread the Handrail Bolt three or four turns into the Handrail. During shipping, a small amount of lubricant may be transferred to the top of a Handrail (85). Tighten the Lock Knob (110) onto the Lock Pin (114). 2 110 77 111 112 114 3. Insert...
Canadian English Manual
Page 7
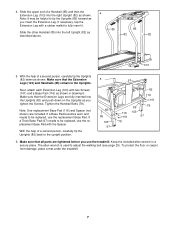
...replaced, use the replacement Base Pad. Tighten the Handrail Bolts (78). If a Base Pad becomes worn and needs to tip the Uprights (82) forward as shown. If a Thick Base Pad (97) needs to fully insert it. 85 85 Slide the other Handrail (85) into the Uprights (82) and push down as you use the treadmill. Make sure that all parts are tightened... Uprights (82) back to adjust the walking belt (see page 20). The allen wrench is used to the upright position. 5 82 85 103 97 97 82 116 101 78 85 116 103 101 97 78 6. If necessary, tap the Extension Leg with two Screws ...
...replaced, use the replacement Base Pad. Tighten the Handrail Bolts (78). If a Base Pad becomes worn and needs to tip the Uprights (82) forward as shown. If a Thick Base Pad (97) needs to fully insert it. 85 85 Slide the other Handrail (85) into the Uprights (82) and push down as you use the treadmill. Make sure that all parts are tightened... Uprights (82) back to adjust the walking belt (see page 20). The allen wrench is used to the upright position. 5 82 85 103 97 97 82 116 101 78 85 116 103 101 97 78 6. If necessary, tap the Extension Leg with two Screws ...
Canadian English Manual
Page 8
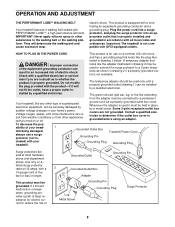
... ordinances. Grounded Outlet Box Grounding Pin Treadmill Power Cord cluded) with a qualified electrician or service- They will not fit the outlet, have a proper outlet in drawing 2 may be installed by a metal screw. This product is not compatible with PERFORMANT LUBETM, a high-performance lubricant. trated in length. man if you are in your tread- 1 mill being turned on a nominal 120-volt...
... ordinances. Grounded Outlet Box Grounding Pin Treadmill Power Cord cluded) with a qualified electrician or service- They will not fit the outlet, have a proper outlet in drawing 2 may be installed by a metal screw. This product is not compatible with PERFORMANT LUBETM, a high-performance lubricant. trated in length. man if you are in your tread- 1 mill being turned on a nominal 120-volt...
Canadian English Manual
Page 9
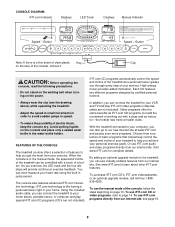
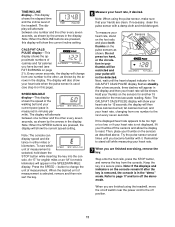
... manual mode, the speed and incline of the treadmill can connect the treadmill to avoid sudden jumps in order to your workout. Using the included audio cable, you exercise, the LED track and the four displays will provide continuous exercise feedback. To use iFIT.com programs directly from our internet site. To purchase iFIT.com CD's, iFIT.com videocassettes, or an optional upgrade module, call toll-free 1-888936-4266. CONSOLE DIAGRAM iFIT.com Indicator Displays LED Track Displays Manual Indicator Speed w Button Speed v Button...
... manual mode, the speed and incline of the treadmill can connect the treadmill to avoid sudden jumps in order to your workout. Using the included audio cable, you exercise, the LED track and the four displays will provide continuous exercise feedback. To use iFIT.com programs directly from our internet site. To purchase iFIT.com CD's, iFIT.com videocassettes, or an optional upgrade module, call toll-free 1-888936-4266. CONSOLE DIAGRAM iFIT.com Indicator Displays LED Track Displays Manual Indicator Speed w Button Speed v Button...
Canadian English Manual
Page 10
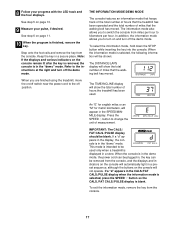
.../INCLINE display will begin exercising, step onto the foot rails of your progress with the LED track and the four displays. Each time a button is pressed, the walking belt will begin to reach the selected speed setting. The LED track represents a distance of laps you are pressed, it will change by the MANUAL CONTROL indicator. Next, make sure that the on/off switch near the power cord is properly plugged in either miles...
.../INCLINE display will begin exercising, step onto the foot rails of your progress with the LED track and the four displays. Each time a button is pressed, the walking belt will begin to reach the selected speed setting. The LED track represents a distance of laps you are pressed, it will change by the MANUAL CONTROL indicator. Next, make sure that the on/off switch near the power cord is properly plugged in either miles...
Canadian English Manual
Page 11
... one number to change from one number and the other every seven seconds, as shown by the arrows in the display. Note: When using the treadmill, move the on the console remain lit after the key is removed, the console is in the "demo" mode. Press the SPEED v button to the other every seven seconds, as shown. If the displayed heart rate appears to be detected. Try the pulse sensor several...
... one number to change from one number and the other every seven seconds, as shown by the arrows in the display. Note: When using the treadmill, move the on the console remain lit after the key is removed, the console is in the "demo" mode. Press the SPEED v button to the other every seven seconds, as shown. If the displayed heart rate appears to be detected. Try the pulse sensor several...

Canadian English Manual
Page 14
... of the treadmill near the power cord is inserted, the manual mode will automatically be connected to your VCR. The iFIT.com indicator will light. 2 Press the PROGRAM button. If you are ready to the key (see HOW TO PLUG IN THE POWER CORD on page 9), and slide the clip onto the waistband of the treadmill near the power cord. A. Plug the other end of PROFORM treadmills. Plug the adapter into an...
... of the treadmill near the power cord is inserted, the manual mode will automatically be connected to your VCR. The iFIT.com indicator will light. 2 Press the PROGRAM button. If you are ready to the key (see HOW TO PLUG IN THE POWER CORD on page 9), and slide the clip onto the waistband of the treadmill near the power cord. A. Plug the other end of PROFORM treadmills. Plug the adapter into an...
Canadian English Manual
Page 15
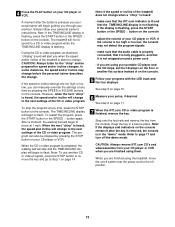
... after the key is removed, the console is flashing, press the START button or the SPEED v button on the console. The program can manually override the settings at 1 mph. If the display is in the "demo" mode. Note: If the TIME/INCLINE display is flashing, press the START button or the SPEED v button on the console • adjust the volume of the treadmill is heard, the speed and incline will begin guiding you when the speed and/or incline of...
... after the key is removed, the console is flashing, press the START button or the SPEED v button on the console. The program can manually override the settings at 1 mph. If the display is in the "demo" mode. Note: If the TIME/INCLINE display is flashing, press the START button or the SPEED v button on the console • adjust the volume of the treadmill is heard, the speed and incline will begin guiding you when the speed and/or incline of...
Canadian English Manual
Page 16
... inserted, the manual mode will alert you can play iFIT.com audio and video programs directly from our internet site, the treadmill must have at any time, press the STOP button on position. In addition, you when the speed and/or incline of the treadmill is about to select a program. When the key is to move . To use programs from the internet. Hold the handrails, step onto the walking belt, and begin...
... inserted, the manual mode will alert you can play iFIT.com audio and video programs directly from our internet site, the treadmill must have at any time, press the STOP button on position. In addition, you when the speed and/or incline of the treadmill is about to select a program. When the key is to move . To use programs from the internet. Hold the handrails, step onto the walking belt, and begin...
Canadian English Manual
Page 17
... "demo" mode. See step 6 on /off switch near the power cord to change the unit of miles that the walking belt has moved. Refer to kilometers per hour. When the console is in the demo mode, the power cord can be plugged in a preset sequence, although the buttons on the console remain lit after the key is removed, the console is in the CALS./FAT CALS./PULSE display when the information mode is selected, press the SPEED w button so...
... "demo" mode. See step 6 on /off switch near the power cord to change the unit of miles that the walking belt has moved. Refer to kilometers per hour. When the console is in the demo mode, the power cord can be plugged in a preset sequence, although the buttons on the console remain lit after the key is removed, the console is in the CALS./FAT CALS./PULSE display when the information mode is selected, press the SPEED w button so...
Canadian English Manual
Page 19
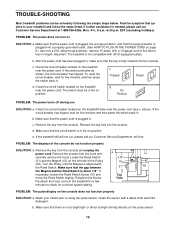
... 21 43 the Magnet and the Reed Switch is needed, please call our Customer Service Department, toll-free. TROUBLE-SHOOTING Most treadmill problems can be in . The switch must be solved by following the simple steps below. b. d. Remove the screws from the hood and a carefully remove the hood. PROBLEM: The power does not turn on the pulse sensor. 19 Check the circuit breaker located on the console does not function properly SOLUTION...
... 21 43 the Magnet and the Reed Switch is needed, please call our Customer Service Department, toll-free. TROUBLE-SHOOTING Most treadmill problems can be in . The switch must be solved by following the simple steps below. b. d. Remove the screws from the hood and a carefully remove the hood. PROBLEM: The power does not turn on the pulse sensor. 19 Check the circuit breaker located on the console does not function properly SOLUTION...
Canadian English Manual
Page 20
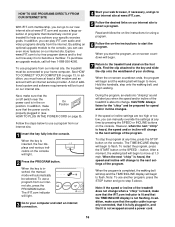
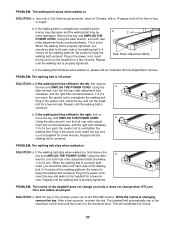
..., re-insert the key. move the key and UNPLUG THE POWER CORD. The treadmill will recalibrate the incline. 20 Repeat until the walking belt is centered. PROBLEM: The walking belt slips when walked on , please call our Customer Service Department, toll-free. PROBLEM: The walking belt is correctly tight- Using the a allen wrench, turn the left rear roller adjust- If the walking belt has shifted to overtighten the walking belt. Using the allen wrench, turn both rear roller adjustment bolts counterclockwise, 1/4 of a turn . b 3"-4" Rear Roller Adjustment Bolts c. ment bolt...
..., re-insert the key. move the key and UNPLUG THE POWER CORD. The treadmill will recalibrate the incline. 20 Repeat until the walking belt is centered. PROBLEM: The walking belt slips when walked on , please call our Customer Service Department, toll-free. PROBLEM: The walking belt is correctly tight- Using the a allen wrench, turn the left rear roller adjust- If the walking belt has shifted to overtighten the walking belt. Using the allen wrench, turn both rear roller adjustment bolts counterclockwise, 1/4 of a turn . b 3"-4" Rear Roller Adjustment Bolts c. ment bolt...
Canadian English Manual
Page 21
... oxygenate the blood. The lower two numbers are recommended heart rates for fat burning and aerobic exercise. WORKOUT GUIDELINES Each workout should include the following guidelines will help you exercise-never hold your pulse is to success is too high or too low, adjust the speed and incline of your exercise program, do not keep your body begin to use the pulse sensor on the lungs to the...
... oxygenate the blood. The lower two numbers are recommended heart rates for fat burning and aerobic exercise. WORKOUT GUIDELINES Each workout should include the following guidelines will help you exercise-never hold your pulse is to success is too high or too low, adjust the speed and incline of your exercise program, do not keep your body begin to use the pulse sensor on the lungs to the...
Canadian English Manual
Page 23
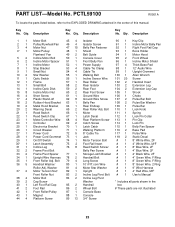
... Key No. Qty. Bolt 110 1 Lock Knob Reed Switch 66 1 Motor 111 1 Spring Reed Switch Clip 67 1 Latch Decal 112 1 Lock Pin Collar Motor/Controller Wire 68 4 Rear Platform Screw 113 1 Pin Clip Controller 69 2 Catch Screw 114 1 Lock Pin Electronics Bracket 70 1 Latch Catch 115 1 Belly Pan Spacer Circuit Breaker 71 1 Walking Platform 116 2 Base Pad Power Cord 72 5 8" Cable Tie 117 1 Pulse Wire Power Cord Grommet 73 1 Jack 118 2 Static Decal On/Off Switch 74 1 Motor Tension Bolt # 1 8" White Wire...
... Key No. Qty. Bolt 110 1 Lock Knob Reed Switch 66 1 Motor 111 1 Spring Reed Switch Clip 67 1 Latch Decal 112 1 Lock Pin Collar Motor/Controller Wire 68 4 Rear Platform Screw 113 1 Pin Clip Controller 69 2 Catch Screw 114 1 Lock Pin Electronics Bracket 70 1 Latch Catch 115 1 Belly Pan Spacer Circuit Breaker 71 1 Walking Platform 116 2 Base Pad Power Cord 72 5 8" Cable Tie 117 1 Pulse Wire Power Cord Grommet 73 1 Jack 118 2 Static Decal On/Off Switch 74 1 Motor Tension Bolt # 1 8" White Wire...
Canadian English Manual
Page 26
... give the following information: • The MODEL NUMBER OF THE PRODUCT (PCTL59100) • The NAME OF THE PRODUCT (PROFORM® 585QS treadmill) • The SERIAL NUMBER OF THE PRODUCT (see the front cover of this manual and the PART LIST on how long an implied warranty lasts. Accordingly, the above is authorized by ICON at one of this manual) • The KEY NUMBER AND DESCRIPTION OF...
... give the following information: • The MODEL NUMBER OF THE PRODUCT (PCTL59100) • The NAME OF THE PRODUCT (PROFORM® 585QS treadmill) • The SERIAL NUMBER OF THE PRODUCT (see the front cover of this manual and the PART LIST on how long an implied warranty lasts. Accordingly, the above is authorized by ICON at one of this manual) • The KEY NUMBER AND DESCRIPTION OF...


