

English Manual
Page 1
Visit our website at www.proform.com new products, prizes, fitness tips, and much more! Write the serial number in this manual before using this manual for future reference. Serial Number Decal USER'S MANUAL SEARS, ROEBUCK AND CO. HOFFMAN ESTATES, IL 60179 CAUTION Read all precautions and instructions in the space above for future reference. Save this equipment. Model No. 831.299520 Serial No.
Visit our website at www.proform.com new products, prizes, fitness tips, and much more! Write the serial number in this manual before using this manual for future reference. Serial Number Decal USER'S MANUAL SEARS, ROEBUCK AND CO. HOFFMAN ESTATES, IL 60179 CAUTION Read all precautions and instructions in the space above for future reference. Save this equipment. Model No. 831.299520 Serial No.

English Manual
Page 2
... turned off. Never move the walking belt while the power is UL 1449 listed as described. 3. TABLE OF CONTENTS IMPORTANT PRECAUTIONS 2 BEFORE YOU BEGIN 4 ASSEMBLY 5 OPERATION AND ADJUSTMENT 7 HOW TO FOLD AND MOVE THE TREADMILL 10 TROUBLE-SHOOTING 12 CONDITIONING GUIDELINES 14 ORDERING REPLACEMENT PARTS Back Cover FULL 90-DAY WARRANTY Back Cover Note: An EXPLODED DRAWING is attached in sandals. 10. No other appliance should be electrically rated...
... turned off. Never move the walking belt while the power is UL 1449 listed as described. 3. TABLE OF CONTENTS IMPORTANT PRECAUTIONS 2 BEFORE YOU BEGIN 4 ASSEMBLY 5 OPERATION AND ADJUSTMENT 7 HOW TO FOLD AND MOVE THE TREADMILL 10 TROUBLE-SHOOTING 12 CONDITIONING GUIDELINES 14 ORDERING REPLACEMENT PARTS Back Cover FULL 90-DAY WARRANTY Back Cover Note: An EXPLODED DRAWING is attached in sandals. 10. No other appliance should be electrically rated...

English Manual
Page 3
... power cord immediately after use of actual size. 3 SAVE THESE INSTRUCTIONS The decals shown below have been placed on page 10.) You must be performed by an authorized service representative. Never remove the motor hood unless instructed to order a free replacement decal (see the front cover of 35 or persons with pre-existing health problems. Read all parts of heart rate readings. The treadmill is not a medical device. The pulse sensor...
... power cord immediately after use of actual size. 3 SAVE THESE INSTRUCTIONS The decals shown below have been placed on page 10.) You must be performed by an authorized service representative. Never remove the motor hood unless instructed to order a free replacement decal (see the front cover of 35 or persons with pre-existing health problems. Read all parts of heart rate readings. The treadmill is not a medical device. The pulse sensor...

English Manual
Page 4
...) Book Holder Console Storage Latch LEFT SIDE Key/Clip Handrail RIGHT SIDE Walking Belt Foot Rail Circuit Breaker Power Cord Rear Roller Adjustment Bolts Cushioned Walking Platform Front Wheel 4 The 540 LS treadmill combines advanced technology with the parts that are labeled. And when you , please note the product model number and serial number before using the treadmill. To help you have additional questions, please call our toll-free HELPLINE at 1-800...
...) Book Holder Console Storage Latch LEFT SIDE Key/Clip Handrail RIGHT SIDE Walking Belt Foot Rail Circuit Breaker Power Cord Rear Roller Adjustment Bolts Cushioned Walking Platform Front Wheel 4 The 540 LS treadmill combines advanced technology with the parts that are labeled. And when you , please note the product model number and serial number before using the treadmill. To help you have additional questions, please call our toll-free HELPLINE at 1-800...

English Manual
Page 5
... it with high-performance lubricant. Refer to identify the parts used in the position shown. 1 Insert one of the walking belt or the shipping carton. Long Screw (79)-4 Screw (101)-4 Handrail Bolt (89)-4 Handrail Washer (29)-4 1. Tighten the wire tie and cut off the lubricant with a Handrail Washer (29) into the treadmill as described above. Set the treadmill in the left Upright (82). 5 97 103...
... it with high-performance lubricant. Refer to identify the parts used in the position shown. 1 Insert one of the walking belt or the shipping carton. Long Screw (79)-4 Screw (101)-4 Handrail Bolt (89)-4 Handrail Washer (29)-4 1. Tighten the wire tie and cut off the lubricant with a Handrail Washer (29) into the treadmill as described above. Set the treadmill in the left Upright (82). 5 97 103...

English Manual
Page 6
... as shown. WARNING: Do not disconnect or connect the Wires while the treadmill power cord is used to adjust the walking belt (see page 13). Refer to drawing 2c. Insert the Lock Pin into the Handrails (85, 23) and the Console Base (87). If a Base Pad becomes worn and needs to be helpful to the upright position. 4. Refer to drawing 4b. The allen...
... as shown. WARNING: Do not disconnect or connect the Wires while the treadmill power cord is used to adjust the walking belt (see page 13). Refer to drawing 2c. Insert the Lock Pin into the Handrails (85, 23) and the Console Base (87). If a Base Pad becomes worn and needs to be helpful to the upright position. 4. Refer to drawing 4b. The allen...

English Manual
Page 7
... (TVSS). If it must be installed by a metal screw. The temporary adapter should be used it should malfunction or break down, grounding provides a path of electric shock. OPERATION AND ADJUSTMENT THE PERFORMANT LUBETM WALKING BELT Your treadmill features a walking belt coated with your treadmill (see your local SEARS or call toll-free 1-800-366-7278 and order part number 146148. This product is for electric...
... (TVSS). If it must be installed by a metal screw. The temporary adapter should be used it should malfunction or break down, grounding provides a path of electric shock. OPERATION AND ADJUSTMENT THE PERFORMANT LUBETM WALKING BELT Your treadmill features a walking belt coated with your treadmill (see your local SEARS or call toll-free 1-800-366-7278 and order part number 146148. This product is for electric...

English Manual
Page 8
... on when the ON/RESET button is pressed or when the walking belt is started. Find the clip at the lower right) while using the treadmill. The displays will already be on the displays. Batteries Tab 8 CONSOLE DIAGRAM Incline Control LED Track Displays Speed Control Note: If there is a thin sheet of clear plastic Clip on the face of the batteries are touching the springs in the battery compartment. Test the clip...
... on when the ON/RESET button is pressed or when the walking belt is started. Find the clip at the lower right) while using the treadmill. The displays will already be on the displays. Batteries Tab 8 CONSOLE DIAGRAM Incline Control LED Track Displays Speed Control Note: If there is a thin sheet of clear plastic Clip on the face of the batteries are touching the springs in the battery compartment. Test the clip...

English Manual
Page 9
... BURNING on the pulse sensor as desired by sliding the speed control. To change from the console. After a few minutes that you exercise, the indicators around the track will change the incline of the treadmill, press the top or bottom of the walking belt, in the heart rate display flashes steadily. As you are finished exercising, stop the walking belt, and adjust the incline of the treadmill as desired. Press down . Remove the key from one at...
... BURNING on the pulse sensor as desired by sliding the speed control. To change from the console. After a few minutes that you exercise, the indicators around the track will change the incline of the treadmill, press the top or bottom of the walking belt, in the heart rate display flashes steadily. As you are finished exercising, stop the walking belt, and adjust the incline of the treadmill as desired. Press down . Remove the key from one at...

English Manual
Page 10
... hand to the lowest position. Never move the treadmill. 1. To reduce the risk of direct sunlight. HOW TO FOLD AND MOVE THE TREADMILL HOW TO FOLD THE TREADMILL FOR STORAGE 1 Before folding the treadmill, adjust the incline to the position shown and hold the treadmill firmly. Move your back straight. Slowly release the knob. Hold the treadmill with the slot in the storage position. Place one foot against...
... hand to the lowest position. Never move the treadmill. 1. To reduce the risk of direct sunlight. HOW TO FOLD AND MOVE THE TREADMILL HOW TO FOLD THE TREADMILL FOR STORAGE 1 Before folding the treadmill, adjust the incline to the position shown and hold the treadmill firmly. Move your back straight. Slowly release the knob. Hold the treadmill with the slot in the storage position. Place one foot against...

English Manual
Page 11
Hold the upper end of injury, bend your legs and keep your right hand as shown. To decrease the possibility of the treadmill with both hands, and lower the treadmill to the floor. Do not drop the treadmill frame to the left hand, pull the storage latch and 1 hold it. Slot Knob 11 If necessary, press the handrail to 2 the floor. Using your left . 2. Hold the treadmill firmly with your back straight. Pivot the treadmill until the frame and foot rail are past the storage latch. HOW TO LOWER THE TREADMILL FOR USE 1.
Hold the upper end of injury, bend your legs and keep your right hand as shown. To decrease the possibility of the treadmill with both hands, and lower the treadmill to the floor. Do not drop the treadmill frame to the left hand, pull the storage latch and 1 hold it. Slot Knob 11 If necessary, press the handrail to 2 the floor. Using your left . 2. Hold the treadmill firmly with your back straight. Pivot the treadmill until the frame and foot rail are past the storage latch. HOW TO LOWER THE TREADMILL FOR USE 1.

English Manual
Page 12
... Reset PROBLEM: The power turns off during use SOLUTION: a. Make sure that the surge suppressor is plugged in . WARNING: Do not disconnect or connect the wires while the treadmill power cord is plugged into the console. Check the circuit breaker located on page 6. above). c. Remove the key from the hood and a carefully remove the hood. Remove the key from the console and unplug the power cord. until the Magnet is not compatible with the Reed Switch. Use...
... Reset PROBLEM: The power turns off during use SOLUTION: a. Make sure that the surge suppressor is plugged in . WARNING: Do not disconnect or connect the wires while the treadmill power cord is plugged into the console. Check the circuit breaker located on page 6. above). c. Remove the key from the hood and a carefully remove the hood. Remove the key from the console and unplug the power cord. until the Magnet is not compatible with the Reed Switch. Use...

English Manual
Page 13
... walking belt is properly tightened. b. ened, you should be able to lift each side of a turn . ing belt 3 to assembly step 5 on the treadmill for a few minutes. WARNING: Do not disconnect or connect the wires while the treadmill power cord is off-center or slips when walked on , please call our toll-free HELPLINE. Be careful not to using the pulse sensor. Plug in the power cord, insert the key and run the treadmill...
... walking belt is properly tightened. b. ened, you should be able to lift each side of a turn . ing belt 3 to assembly step 5 on the treadmill for a few minutes. WARNING: Do not disconnect or connect the wires while the treadmill power cord is off-center or slips when walked on , please call our toll-free HELPLINE. Be careful not to using the pulse sensor. Plug in the power cord, insert the key and run the treadmill...

English Manual
Page 14
... training zone. The chart below shows recommended heart rates for fat burning; For aerobic exercise, adjust the speed and incline of the treadmill until your heart rate as you must be found by using your heart rate is to oxygenate the blood. During the first few weeks of exercise, your body begin to 60 minutes. (During the first few minutes of your exercise program, do not keep your pulse...
... training zone. The chart below shows recommended heart rates for fat burning; For aerobic exercise, adjust the speed and incline of the treadmill until your heart rate as you must be found by using your heart rate is to oxygenate the blood. During the first few weeks of exercise, your body begin to 60 minutes. (During the first few minutes of your exercise program, do not keep your pulse...

English Manual
Page 15
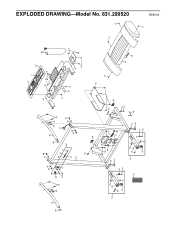
... Rear Endcap Rear Roller Adj. Qty. Washer Book Holder Motor Hood Front Wheel Incline Motor Shield Thick Base Pad Trim Guard Upright Grommet Allen Wrench Screw Handrail Endcap Extension Leg Extension Leg Cap Lock Knob Choke 8" White Wire, Pigtail 8" Green Wire, 2 Ring User's Manual * Includes all parts shown in the center of this manual. Bolt Motor Latch Decal Rear Platform Screw Latch Catch Screw Latch Catch Walking Platform 8" Cable Tie Interface Bracket Motor Tension Bolt Foot Rail Insert Reed Switch Screw/ Belly Pan Screw Storage Latch...
... Rear Endcap Rear Roller Adj. Qty. Washer Book Holder Motor Hood Front Wheel Incline Motor Shield Thick Base Pad Trim Guard Upright Grommet Allen Wrench Screw Handrail Endcap Extension Leg Extension Leg Cap Lock Knob Choke 8" White Wire, Pigtail 8" Green Wire, 2 Ring User's Manual * Includes all parts shown in the center of this manual. Bolt Motor Latch Decal Rear Platform Screw Latch Catch Screw Latch Catch Walking Platform 8" Cable Tie Interface Bracket Motor Tension Bolt Foot Rail Insert Reed Switch Screw/ Belly Pan Screw Storage Latch...

English Manual
Page 16
EXPLODED DRAWING-Model No. 831.299520 92 65 58 12 92 65 75 69 70 68 49 45 44 16 46 47 59 60 64 68 57 58 67 63 59 101 60 61 1 2 3 39 40 41 32 45 44 46 71 4* 37 66 5 3 8 7 6 16 18 76 62 21 22 33 39 43 41 75 42 15 110 38 16 106 44 15 19 16 74 34 16 24 16 84 48 5 15 81 35 15 31 16 33 18 15 32 51 76 76 27 16 28 26 25 44 55 45 46 76 73 73 47 46 47 45 49 16 76 76 47 54 16 53 R0801A To identify the parts shown on this exploded drawing, refer to the PART LIST on page 15 of the USER'S MANUAL.
EXPLODED DRAWING-Model No. 831.299520 92 65 58 12 92 65 75 69 70 68 49 45 44 16 46 47 59 60 64 68 57 58 67 63 59 101 60 61 1 2 3 39 40 41 32 45 44 46 71 4* 37 66 5 3 8 7 6 16 18 76 62 21 22 33 39 43 41 75 42 15 110 38 16 106 44 15 19 16 74 34 16 24 16 84 48 5 15 81 35 15 31 16 33 18 15 32 51 76 76 27 16 28 26 25 44 55 45 46 76 73 73 47 46 47 45 49 16 76 76 47 54 16 53 R0801A To identify the parts shown on this exploded drawing, refer to the PART LIST on page 15 of the USER'S MANUAL.
English Manual
Page 17
23 102 29 89 36 105 79 76 77 89 29 102 56 13 11 30* 14 82 85 36 17 36 79 29 89 89 29 83 10 9 88* 90 87 93 76 76 50 76 76 80 76 104 20 78* 103 86 95 15 16 97 101 96 52 101 97 101 101 17 99 78* 20 15 52 72 103 101 97 95 86 101 101 83 104 97 101 100 91 16 94 98 16 16 16 R0801A EXPLODED DRAWING-Model No. 831.299520
23 102 29 89 36 105 79 76 77 89 29 102 56 13 11 30* 14 82 85 36 17 36 79 29 89 89 29 83 10 9 88* 90 87 93 76 76 50 76 76 80 76 104 20 78* 103 86 95 15 16 97 101 96 52 101 97 101 101 17 99 78* 20 15 52 72 103 101 97 95 86 101 101 83 104 97 101 100 91 16 94 98 16 16 16 R0801A EXPLODED DRAWING-Model No. 831.299520
English Manual
Page 18
... model number and serial number of the decal. This warranty gives you specific legal rights, and you visit your PROFORM® 540 LS treadmill are available for rental purposes. SEARS, ROEBUCK AND CO., DEPT. 817WA, HOFFMAN ESTATES, IL 60179 Part No. 176625 R0801A Printed in this SEARS TREADMILL EXERCISER, contact the nearest SEARS Service Center throughout the United States and SEARS will repair or replace the TREADMILL EXERCISER, free of this manual...
... model number and serial number of the decal. This warranty gives you specific legal rights, and you visit your PROFORM® 540 LS treadmill are available for rental purposes. SEARS, ROEBUCK AND CO., DEPT. 817WA, HOFFMAN ESTATES, IL 60179 Part No. 176625 R0801A Printed in this SEARS TREADMILL EXERCISER, contact the nearest SEARS Service Center throughout the United States and SEARS will repair or replace the TREADMILL EXERCISER, free of this manual...

