

User Manual
Page 2
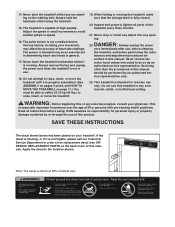
...250 lbs.) or less. TABLE OF CONTENTS IMPORTANT PRECAUTIONS 2 BEFORE YOU BEGIN 4 ASSEMBLY 5 OPERATION AND ADJUSTMENT 7 HOW TO FOLD AND MOVE THE TREADMILL 10 TROUBLESHOOTING 12 CONDITIONING GUIDELINES 14 ORDERING REPLACEMENT PARTS Back Cover Note: An EXPLODED DRAWING and a PART LIST are adequately informed of all warnings and...WARNING: To reduce the risk of 12 and pets 13. It is no longer than one person on each side. Do not put the treadmill in the treadmill. Do not wear loose clothes that blocks any air openings. Never use only a 3conductor, 1 mm2 (14-gauge) cord that is ...
...250 lbs.) or less. TABLE OF CONTENTS IMPORTANT PRECAUTIONS 2 BEFORE YOU BEGIN 4 ASSEMBLY 5 OPERATION AND ADJUSTMENT 7 HOW TO FOLD AND MOVE THE TREADMILL 10 TROUBLESHOOTING 12 CONDITIONING GUIDELINES 14 ORDERING REPLACEMENT PARTS Back Cover Note: An EXPLODED DRAWING and a PART LIST are adequately informed of all warnings and...WARNING: To reduce the risk of 12 and pets 13. It is no longer than one person on each side. Do not put the treadmill in the treadmill. Do not wear loose clothes that blocks any air openings. Never use only a 3conductor, 1 mm2 (14-gauge) cord that is ...
User Manual
Page 3
...any commercial, rental, or institutional setting. DANGER: 22. Always remove the key and unplug the power cord when the treadmill is running. This treadmill is especially important for in the location shown. This is intended for persons over the age of this or any opening....Always unplug the power cord immediately after use this manual. vice representative only. 23. Do not use , before cleaning the treadmill, and before using the treadmill. 15. Inspect and properly tighten all instructions before performing the main- Note: The decal is not a medical device. The ...
...any commercial, rental, or institutional setting. DANGER: 22. Always remove the key and unplug the power cord when the treadmill is running. This treadmill is especially important for in the location shown. This is intended for persons over the age of this or any opening....Always unplug the power cord immediately after use this manual. vice representative only. 23. Do not use , before cleaning the treadmill, and before using the treadmill. 15. Inspect and properly tighten all instructions before performing the main- Note: The decal is not a medical device. The ...
User Manual
Page 4
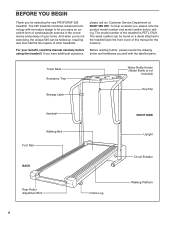
... Handrail Foot Rail Walking Belt BACK Rear Roller Adjustment Bolt Incline Leg RIGHT SIDE Upright Circuit Breaker Walking Platform 4 The 525 treadmill combines advanced technology with the labelled parts. To help us assist you have additional questions, please call our Customer Service Department... 089 009. The serial number can be found on a decal attached to the treadmill (see the front cover of your benefit, read this manual for selecting the new PROFORM® 525 treadmill. Towel Rack Accessory Tray Storage Latch Water Bottle Holder (Water Bottle is PETL17021. ...
... Handrail Foot Rail Walking Belt BACK Rear Roller Adjustment Bolt Incline Leg RIGHT SIDE Upright Circuit Breaker Walking Platform 4 The 525 treadmill combines advanced technology with the labelled parts. To help us assist you have additional questions, please call our Customer Service Department... 089 009. The serial number can be found on a decal attached to the treadmill (see the front cover of your benefit, read this manual for selecting the new PROFORM® 525 treadmill. Towel Rack Accessory Tray Storage Latch Water Bottle Holder (Water Bottle is PETL17021. ...
User Manual
Page 5
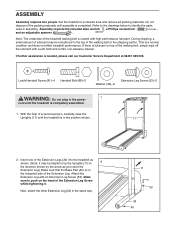
... Pad (40) is completed. With the help of a second person, carefully raise the Uprights (11) until assembly is on the head of the treadmill walking belt is needed, please call our Customer Service Department at 08457 089 009. Attach the Extension Leg with a soft cloth and a mild, non...-abrasive cleaner. ASSEMBLY Assembly requires two people. Set the treadmill in the same way. 11 53 34 40 If there is in assembly. During shipping, a small amount of lubricant may be transferred to identify ...
... Pad (40) is completed. With the help of a second person, carefully raise the Uprights (11) until assembly is on the head of the treadmill walking belt is needed, please call our Customer Service Department at 08457 089 009. Attach the Extension Leg with a soft cloth and a mild, non...-abrasive cleaner. ASSEMBLY Assembly requires two people. Set the treadmill in the same way. 11 53 34 40 If there is in assembly. During shipping, a small amount of lubricant may be transferred to identify ...
User Manual
Page 6
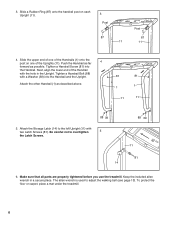
...the Handrail. 3. Be careful not to adjust the walking belt (see page 13). Make sure that all parts are properly tightened before you use the treadmill. The allen wrench is used to overtighten 5 the Latch Screws. 14 88 39 11 81 6. Tighten a Handrail Bolt (88) with two Latch Screws... (81). To protect the floor or carpet, place a mat under the treadmill. 6 Push the Handrail as far 4 forward as described above. 81 81 1 1 11 11 88 39 5. Next, align the lower end of the Uprights (...
...the Handrail. 3. Be careful not to adjust the walking belt (see page 13). Make sure that all parts are properly tightened before you use the treadmill. The allen wrench is used to overtighten 5 the Latch Screws. 14 88 39 11 81 6. Tighten a Handrail Bolt (88) with two Latch Screws... (81). To protect the floor or carpet, place a mat under the treadmill. 6 Push the Handrail as far 4 forward as described above. 81 81 1 1 11 11 88 39 5. Next, align the lower end of the Uprights (...
User Manual
Page 7
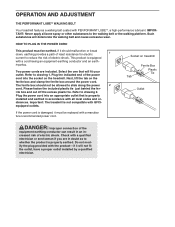
...dinances. equipped outlets. Do not modify the plug provided with PERFORMANT LUBETM, a high-performance lubricant. Next, lift the tab on treadmill Ferrite Box Plastic Tie Tab Outlet If the power cord is equipped with all local codes and or- The ferrite box should malfunction ... fit your outlet. Check with a qualified electrician or serviceman if you are included. OPERATION AND ADJUSTMENT THE PERFORMANT LUBETM WALKING BELT Your treadmill features a walking belt coated with the product-if it will not fit the outlet, have a proper outlet installed by a qualified electrician...
...dinances. equipped outlets. Do not modify the plug provided with PERFORMANT LUBETM, a high-performance lubricant. Next, lift the tab on treadmill Ferrite Box Plastic Tie Tab Outlet If the power cord is equipped with all local codes and or- The ferrite box should malfunction ... fit your outlet. Check with a qualified electrician or serviceman if you are included. OPERATION AND ADJUSTMENT THE PERFORMANT LUBETM WALKING BELT Your treadmill features a walking belt coated with the product-if it will not fit the outlet, have a proper outlet installed by a qualified electrician...
User Manual
Page 8
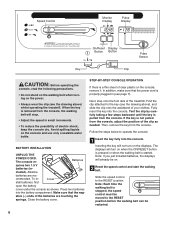
...key into the battery compartment. The displays will stop. • Adjust the speed in (see the drawing above ) whilst operating the treadmill. Slide the speed control to operate the console. 1 Insert the key fully into the console. Press two batteries into the console. Test...Follow the steps below to the RESET position. When the key is properly plugged in small increments. • To reduce the possibility of the treadmill. Batteries quires two 1.5 V batteries (in - To in - BATTERY INSTALLATION UNPLUG THE POWER CORD. Close the battery cover. In addition, make...
...key into the battery compartment. The displays will stop. • Adjust the speed in (see the drawing above ) whilst operating the treadmill. Slide the speed control to operate the console. 1 Insert the key fully into the console. Press two batteries into the console. Test...Follow the steps below to the RESET position. When the key is properly plugged in small increments. • To reduce the possibility of the treadmill. Batteries quires two 1.5 V batteries (in - To in - BATTERY INSTALLATION UNPLUG THE POWER CORD. Close the battery cover. In addition, make...
User Manual
Page 10
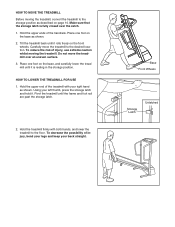
..." position shown in the locations shown at the same height. Move your right hand to the position shown and hold it. Raise the treadmill until the storage latch closes over the catch. Make sure that both incline pins are three different incline levels. Make sure that the storage...incline pins are inserted from damage, place a mat under the treadmill. As you have adjusted the incline legs, lower the treadmill (see HOW TO FOLD THE TREADMILL FOR STORAGE below . There are fully inserted at the right. Hold the treadmill with your hands in the inset drawing. HOW TO CHANGE THE...
..." position shown in the locations shown at the same height. Move your right hand to the position shown and hold it. Raise the treadmill until the storage latch closes over the catch. Make sure that both incline pins are three different incline levels. Make sure that the storage...incline pins are inserted from damage, place a mat under the treadmill. As you have adjusted the incline legs, lower the treadmill (see HOW TO FOLD THE TREADMILL FOR STORAGE below . There are fully inserted at the right. Hold the treadmill with your hands in the inset drawing. HOW TO CHANGE THE...
User Manual
Page 11
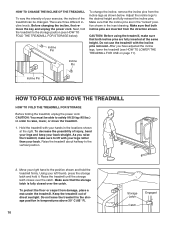
... injury, bend your legs and keep your back straight. Hold the upper end of the handrails. Place one foot on the front wheels. Pivot the treadmill until it rolls freely on the base, and carefully lower the tread mill until it . HOW TO MOVE THE... TREADMILL Before moving the treadmill. To decrease the possibility of injury, use extreme caution whilst moving the treadmill, convert the treadmill to the floor. Hold the treadmill firmly with your left thumb, press the storage latch and hold it is fully...
... injury, bend your legs and keep your back straight. Hold the upper end of the handrails. Place one foot on the front wheels. Pivot the treadmill until it rolls freely on the base, and carefully lower the tread mill until it . HOW TO MOVE THE... TREADMILL Before moving the treadmill. To decrease the possibility of injury, use extreme caution whilst moving the treadmill, convert the treadmill to the floor. Hold the treadmill firmly with your left thumb, press the storage latch and hold it is fully...
User Manual
Page 12
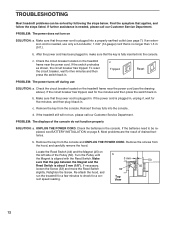
...cord is needed , please call our Customer Service Department. After the power cord has been plugged in . Check the circuit breaker located on the treadmill frame near the power cord. Remove the key from the console and UNPLUG THE POWER CORD. Reinsert the key fully into the console. Check ... Switch is plugged in, unplug it, wait for five minutes and then press the switch back in . PROBLEM: The power does not turn on the treadmill frame near the power cord (see page 7). b. Check the circuit breaker located on SOLUTION: a. If the circuit breaker has tripped, wait for five ...
...cord is needed , please call our Customer Service Department. After the power cord has been plugged in . Check the circuit breaker located on the treadmill frame near the power cord. Remove the key from the console and UNPLUG THE POWER CORD. Reinsert the key fully into the console. Check ... Switch is plugged in, unplug it, wait for five minutes and then press the switch back in . PROBLEM: The power does not turn on the treadmill frame near the power cord (see page 7). b. Check the circuit breaker located on SOLUTION: a. If the circuit breaker has tripped, wait for five ...
User Manual
Page 13
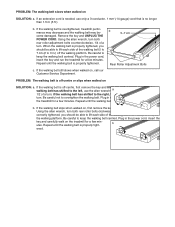
... careful to the left rear roller bolt clockwise 1/2 of the walking belt 5 to 7 cm (2 to 3 in the power cord, insert the key and run the treadmill for a few minutes. b 5-7 cm Rear Roller Adjustment Bolts PROBLEM: The walking belt is no longer than 1.5 m (5 ft.). When the walking belt is properly ..., turn both rear roller bolts clockwise, 1/4 of the walking belt 5 to 7 cm (2 to 3 in the power cord, insert the key and run the treadmill for a few minutes. Plug in .) off -centre, first remove the key and UNPLUG THE POWER CORD. Be careful not to the right, turn the bolt...
... careful to the left rear roller bolt clockwise 1/2 of the walking belt 5 to 7 cm (2 to 3 in the power cord, insert the key and run the treadmill for a few minutes. b 5-7 cm Rear Roller Adjustment Bolts PROBLEM: The walking belt is no longer than 1.5 m (5 ft.). When the walking belt is properly ..., turn both rear roller bolts clockwise, 1/4 of the walking belt 5 to 7 cm (2 to 3 in the power cord, insert the key and run the treadmill for a few minutes. Plug in .) off -centre, first remove the key and UNPLUG THE POWER CORD. Be careful not to the right, turn the bolt...
User Manual
Page 14
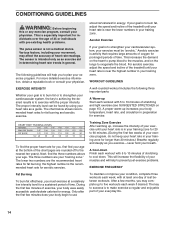
..., complete three workouts each workout with the proper intensity. If your goal is to burn fat, adjust the speed and incline of the treadmill until your heart rate is to exercise with 5 to 10 minutes of oxygen for energy. For aerobic exercise, adjust the speed and incline... (ages are rounded off to make exercise a regular and enjoyable part of your body uses easily accessible carbohydrate calories for prolonged periods of the treadmill until your heart rate is to the nearest ten years). Aerobic exercise is not a medical device. For more detailed exercise information, obtain a...
..., complete three workouts each workout with the proper intensity. If your goal is to burn fat, adjust the speed and incline of the treadmill until your heart rate is to exercise with 5 to 10 minutes of oxygen for energy. For aerobic exercise, adjust the speed and incline... (ages are rounded off to make exercise a regular and enjoyable part of your body uses easily accessible carbohydrate calories for prolonged periods of the treadmill until your heart rate is to the nearest ten years). Aerobic exercise is not a medical device. For more detailed exercise information, obtain a...

User Manual
Page 16
... the following information: • the MODEL NUMBER of the product (PETL17021) • the NAME of the product (PROFORM® 525 treadmill) • the SERIAL NUMBER of the product (see the front cover of this manual) PROFORM is a registered trademark of the part(s) (see the PART LIST and the EXPLODED DRAWING attached in Canada ©...
... the following information: • the MODEL NUMBER of the product (PETL17021) • the NAME of the product (PROFORM® 525 treadmill) • the SERIAL NUMBER of the product (see the front cover of this manual) PROFORM is a registered trademark of the part(s) (see the PART LIST and the EXPLODED DRAWING attached in Canada ©...


