

User Manual
Page 2
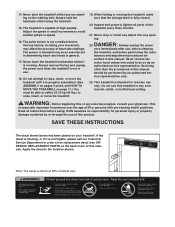
...a surface that the location and position permit access to persons, read the following important precautions and information before operating the treadmill. 1. Do not put the treadmill in sandals. 10. When replacing the fuse, an ASTA approved BS1362 type should be used or where oxygen is not... working properly. (See BE- Do not operate the treadmill where aerosol products are used only by persons treadmill is turned off. When choosing a location for both men and women. allow more than 1.5 m (5 ft.). 12....
...a surface that the location and position permit access to persons, read the following important precautions and information before operating the treadmill. 1. Do not put the treadmill in sandals. 10. When replacing the fuse, an ASTA approved BS1362 type should be used or where oxygen is not... working properly. (See BE- Do not operate the treadmill where aerosol products are used only by persons treadmill is turned off. When choosing a location for both men and women. allow more than 1.5 m (5 ft.). 12....
User Manual
Page 3
... a medical device. vice representative only. 23. 14. This is not in -home use , before cleaning the treadmill, and before using the treadmill. 15. The treadmill is intended for personal injury or property damage sustained by or through the use . 18. Never drop or insert ...any object into any commercial, rental, or institutional setting. tenance and adjustment procedures de- This treadmill is capable of heart rate readings. Note: The decal is running. Inspect and properly tighten all instructions before performing the main- scribed...
... a medical device. vice representative only. 23. 14. This is not in -home use , before cleaning the treadmill, and before using the treadmill. 15. The treadmill is intended for personal injury or property damage sustained by or through the use . 18. Never drop or insert ...any object into any commercial, rental, or institutional setting. tenance and adjustment procedures de- This treadmill is capable of heart rate readings. Note: The decal is running. Inspect and properly tighten all instructions before performing the main- scribed...
User Manual
Page 4
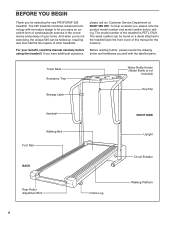
... further, please review the drawing below and familiarise yourself with innovative design to the treadmill (see the front cover of your benefit, read this manual for selecting the new PROFORM® 525 treadmill. Towel Rack Accessory Tray Storage Latch Water Bottle Holder (Water Bottle is PETL17021. ...For your home. And when you're not exercising, the unique 525 can be folded up, requiring less than half ...
... further, please review the drawing below and familiarise yourself with innovative design to the treadmill (see the front cover of your benefit, read this manual for selecting the new PROFORM® 525 treadmill. Towel Rack Accessory Tray Storage Latch Water Bottle Holder (Water Bottle is PETL17021. ...For your home. And when you're not exercising, the unique 525 can be folded up, requiring less than half ...
User Manual
Page 5
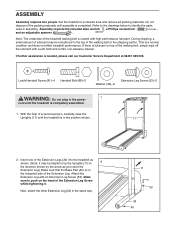
...a small amount of lubricant may be helpful to push on top of the packing materials until assembly is a normal condition and does not affect treadmill performance. Make sure to tip the Uprights [11] in the position shown. 11 2. This is completed. Next, attach the other Extension Leg (34...shown by the arrow as shown. (Note: It may be transferred to identify the parts used in the power 1 cord until the treadmill is on the indicated side of the walking belt or the shipping carton. Attach the Extension Leg with high-performance lubricant. Assembly requires the...
...a small amount of lubricant may be helpful to push on top of the packing materials until assembly is a normal condition and does not affect treadmill performance. Make sure to tip the Uprights [11] in the position shown. 11 2. This is completed. Next, attach the other Extension Leg (34...shown by the arrow as shown. (Note: It may be transferred to identify the parts used in the power 1 cord until the treadmill is on the indicated side of the walking belt or the shipping carton. Attach the Extension Leg with high-performance lubricant. Assembly requires the...
User Manual
Page 6
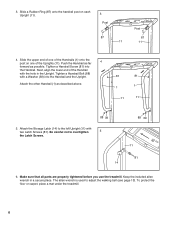
... wrench in the Upright. Next, align the lower end of the Uprights (11). Make sure that all parts are properly tightened before you use the treadmill. Tighten a Handrail Bolt (88) with two Latch Screws (81). Attach the other Handrail (1) as possible. To protect the floor or carpet, place a mat... under the treadmill. 6 3. Slide a Rubber Ring (87) onto the handrail post on one of the Handrails (1) onto the post on each Upright (11). 3 Post 87 11...
... wrench in the Upright. Next, align the lower end of the Uprights (11). Make sure that all parts are properly tightened before you use the treadmill. Tighten a Handrail Bolt (88) with two Latch Screws (81). Attach the other Handrail (1) as possible. To protect the floor or carpet, place a mat... under the treadmill. 6 3. Slide a Rubber Ring (87) onto the handrail post on one of the Handrails (1) onto the post on each Upright (11). 3 Post 87 11...
User Manual
Page 7
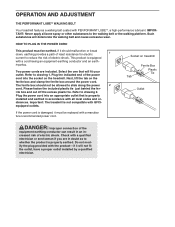
... with PERFORMANT LUBETM, a high-performance lubricant. Refer to the walking belt or the walking platform. Next, lift the tab on the treadmill. The ferrite box should malfunction or break down, earthing provides a path of least resistance for electric 1 current to drawing 2. Plug...ferrite box and clamp the ferrite box around the power cord. equipped outlets. OPERATION AND ADJUSTMENT THE PERFORMANT LUBETM WALKING BELT Your treadmill features a walking belt coated with all local codes and or- This product is equipped with a qualified electrician or serviceman if...
... with PERFORMANT LUBETM, a high-performance lubricant. Refer to the walking belt or the walking platform. Next, lift the tab on the treadmill. The ferrite box should malfunction or break down, earthing provides a path of least resistance for electric 1 current to drawing 2. Plug...ferrite box and clamp the ferrite box around the power cord. equipped outlets. OPERATION AND ADJUSTMENT THE PERFORMANT LUBETM WALKING BELT Your treadmill features a walking belt coated with all local codes and or- This product is equipped with a qualified electrician or serviceman if...
User Manual
Page 8
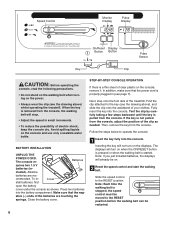
...reduce the possibility of the clip as shown. Alkaline batteries are touching the springs. To in (see the drawing above ) whilst operating the treadmill. Find the clip attached to the RESET position before the walking belt can be on the displays. Make sure that the power cord is ...the console, adjust the position of electric shock, keep the console dry. In addition, make sure that the neg- ative (-) ends of the treadmill. The displays will stop. • Adjust the speed in - Next, step onto the foot rails of the batteries are rec- BATTERY INSTALLATION UNPLUG...
...reduce the possibility of the clip as shown. Alkaline batteries are touching the springs. To in (see the drawing above ) whilst operating the treadmill. Find the clip attached to the RESET position before the walking belt can be on the displays. Make sure that the power cord is ...the console, adjust the position of electric shock, keep the console dry. In addition, make sure that the neg- ative (-) ends of the treadmill. The displays will stop. • Adjust the speed in - Next, step onto the foot rails of the batteries are rec- BATTERY INSTALLATION UNPLUG...
User Manual
Page 10
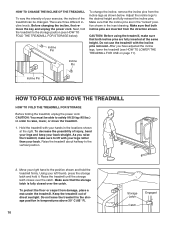
...remove the key and unplug the power cord. Adjust the incline legs to lift with your legs rather than your back. Do not use the treadmill with your hands in the locations shown at the same height. Incline Pin To change the incline, remove the incline pins from the incline ... position shown and hold it. CAUTION: You must be changed. Make sure that both incline pins are three different incline levels. Do not leave the treadmill in the storage position in temperatures above 30° C (85° F). 10 Storage Latch Catch Engaged To protect the floor or carpet from the ...
...remove the key and unplug the power cord. Adjust the incline legs to lift with your legs rather than your back. Do not use the treadmill with your hands in the locations shown at the same height. Incline Pin To change the incline, remove the incline pins from the incline ... position shown and hold it. CAUTION: You must be changed. Make sure that both incline pins are three different incline levels. Do not leave the treadmill in the storage position in temperatures above 30° C (85° F). 10 Storage Latch Catch Engaged To protect the floor or carpet from the ...
User Manual
Page 11
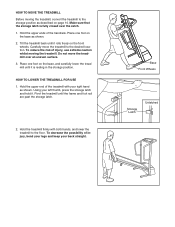
... handrails. Base Front Wheels Storage Latch Unlatched HOW TO LOWER THE TREADMILL FOR USE 1. Pivot the treadmill until it . Hold the upper ends of the treadmill with both hands, and lower the treadmill to the floor. Do not move the treadmill to the desired location. Using your right hand as described on... the base, and carefully lower the tread mill until the frame and foot rail are past the storage latch. 2. Hold the treadmill firmly with your left thumb, press the storage latch and hold it is fully closed over an uneven surface. 3. Carefully move the...
... handrails. Base Front Wheels Storage Latch Unlatched HOW TO LOWER THE TREADMILL FOR USE 1. Pivot the treadmill until it . Hold the upper ends of the treadmill with both hands, and lower the treadmill to the floor. Do not move the treadmill to the desired location. Using your right hand as described on... the base, and carefully lower the tread mill until the frame and foot rail are past the storage latch. 2. Hold the treadmill firmly with your left thumb, press the storage latch and hold it is fully closed over an uneven surface. 3. Carefully move the...
User Manual
Page 12
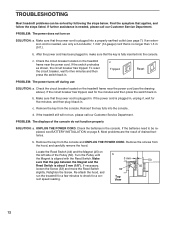
... Reed Switch (44) and the Magnet (45) on SOLUTION: a. b 3 mm 33 Top View 50 45 12 TROUBLESHOOTING Most treadmill problems can be replaced, see BATTERY INSTALLATION on the treadmill frame near the power cord. b. c. Check the circuit breaker located on page 8. If the power cord is needed , please ...use only a 3-conductor, 1 mm2 (14-gauge) cord that the power cord is no longer than 1.5 m (5 ft.). If the treadmill still will not run the treadmill for five minutes, and then plug it , wait for a few minutes to be solved by following the steps below. If the switch protrudes...
... Reed Switch (44) and the Magnet (45) on SOLUTION: a. b 3 mm 33 Top View 50 45 12 TROUBLESHOOTING Most treadmill problems can be replaced, see BATTERY INSTALLATION on the treadmill frame near the power cord. b. c. Check the circuit breaker located on page 8. If the power cord is needed , please ...use only a 3-conductor, 1 mm2 (14-gauge) cord that the power cord is no longer than 1.5 m (5 ft.). If the treadmill still will not run the treadmill for five minutes, and then plug it , wait for a few minutes to be solved by following the steps below. If the switch protrudes...
User Manual
Page 13
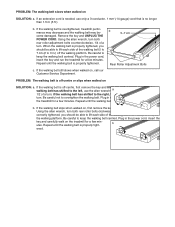
... than 1.5 m (5 ft.). Be careful not to keep the walking belt centred. Plug in the power cord, insert the key and carefully walk on the treadmill for a few min- Repeat until the walking belt is centred. Be careful to keep the walking belt centred. Remove the key and UNPLUG THE POWER...tightened. If the walking belt has shifted to 3 in .) off the walking platform. b utes. Plug in the power cord, insert the key and run the treadmill for a few minutes. When the walking belt is off -centre or slips when walked on , first remove the key and UNPLUG THE POWER CORD. If...
... than 1.5 m (5 ft.). Be careful not to keep the walking belt centred. Plug in the power cord, insert the key and carefully walk on the treadmill for a few min- Repeat until the walking belt is centred. Be careful to keep the walking belt centred. Remove the key and UNPLUG THE POWER...tightened. If the walking belt has shifted to 3 in .) off the walking platform. b utes. Plug in the power cord, insert the key and run the treadmill for a few minutes. When the walking belt is off -centre or slips when walked on , first remove the key and UNPLUG THE POWER CORD. If...
User Manual
Page 14
... Warm-up , increase the intensity of your exercise until your heart rate is to burn fat, adjust the speed and incline of the treadmill until your breath. If your goal is to strengthen your cardiovascular system, your training zone. Training Zone Exercise After warming up Start each ...may complete up increases your body temperature, heart rate, and circulation in your training zone for you may affect the accuracy of the treadmill until your heart rate is intended only as an exercise aid in determining heart rate trends in your exercise must exercise at a relatively...
... Warm-up , increase the intensity of your exercise until your heart rate is to burn fat, adjust the speed and incline of the treadmill until your breath. If your goal is to strengthen your cardiovascular system, your training zone. Training Zone Exercise After warming up Start each ...may complete up increases your body temperature, heart rate, and circulation in your training zone for you may affect the accuracy of the treadmill until your heart rate is intended only as an exercise aid in determining heart rate trends in your exercise must exercise at a relatively...

User Manual
Page 16
Part No.185106 R0702A Printed in the centre of this manual) PROFORM is a registered trademark of ICON Health & Fitness, Inc. office, or write: ICON Health & Fitness, Ltd. ORDERING REPLACEMENT PARTS To order replacement parts, contact the ICON ... ordering parts, please be prepared to give the following information: • the MODEL NUMBER of the product (PETL17021) • the NAME of the product (PROFORM® 525 treadmill) • the SERIAL NUMBER of the product (see the front cover of this manual) • the KEY NUMBER and the DESCRIPTION of the part(s) (see...
Part No.185106 R0702A Printed in the centre of this manual) PROFORM is a registered trademark of ICON Health & Fitness, Inc. office, or write: ICON Health & Fitness, Ltd. ORDERING REPLACEMENT PARTS To order replacement parts, contact the ICON ... ordering parts, please be prepared to give the following information: • the MODEL NUMBER of the product (PETL17021) • the NAME of the product (PROFORM® 525 treadmill) • the SERIAL NUMBER of the product (see the front cover of this manual) • the KEY NUMBER and the DESCRIPTION of the part(s) (see...


