

User Manual
Page 2
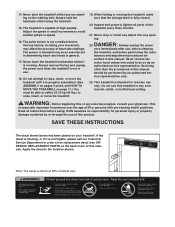
...than one person on a level surface, with bare feet, wearing only stockings, or in the centre of the owner to a plug. The treadmill should be used . 11. Never FORE YOU BEGIN on a surface that is not working properly.) 2 Always wear athletic shoes. When replacing ... men and women. TABLE OF CONTENTS IMPORTANT PRECAUTIONS 2 BEFORE YOU BEGIN 4 ASSEMBLY 5 OPERATION AND ADJUSTMENT 7 HOW TO FOLD AND MOVE THE TREADMILL 10 TROUBLESHOOTING 12 CONDITIONING GUIDELINES 14 ORDERING REPLACEMENT PARTS Back Cover Note: An EXPLODED DRAWING and a PART LIST are attached in sandals. 10. ...
...than one person on a level surface, with bare feet, wearing only stockings, or in the centre of the owner to a plug. The treadmill should be used . 11. Never FORE YOU BEGIN on a surface that is not working properly.) 2 Always wear athletic shoes. When replacing ... men and women. TABLE OF CONTENTS IMPORTANT PRECAUTIONS 2 BEFORE YOU BEGIN 4 ASSEMBLY 5 OPERATION AND ADJUSTMENT 7 HOW TO FOLD AND MOVE THE TREADMILL 10 TROUBLESHOOTING 12 CONDITIONING GUIDELINES 14 ORDERING REPLACEMENT PARTS Back Cover Note: An EXPLODED DRAWING and a PART LIST are attached in sandals. 10. ...
User Manual
Page 3
... whilst it is capable of this manual should be able to safely lift 20 kg (45 lbs.) to raise, lower, or move the treadmill. 19. tenance and adjustment procedures de- Never remove the motor hood unless instructed to avoid sudden jumps in -home use only. WARNING: ...this product. The sensor is properly assembled. (See ASSEMBLY on pages 5 and 6, and HOW TO MOVE THE TREADMILL on your physician. Do not attempt to raise, lower, or move the treadmill until it is especially important for in speed. 16. Inspect and properly tighten all instructions before performing the main...
... whilst it is capable of this manual should be able to safely lift 20 kg (45 lbs.) to raise, lower, or move the treadmill. 19. tenance and adjustment procedures de- Never remove the motor hood unless instructed to avoid sudden jumps in -home use only. WARNING: ...this product. The sensor is properly assembled. (See ASSEMBLY on pages 5 and 6, and HOW TO MOVE THE TREADMILL on your physician. Do not attempt to raise, lower, or move the treadmill until it is especially important for in speed. 16. Inspect and properly tighten all instructions before performing the main...
User Manual
Page 4
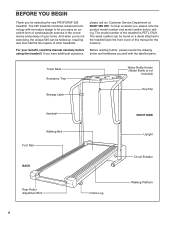
...an excellent form of cardiovascular exercise in the convenience and privacy of your benefit, read this manual for selecting the new PROFORM® 525 treadmill. For your home. Before reading further, please review the drawing below and familiarise yourself with innovative design to the... Bolt Incline Leg RIGHT SIDE Upright Circuit Breaker Walking Platform 4 BEFORE YOU BEGIN Thank you 're not exercising, the unique 525 can be folded up, requiring less than half the floor space of other treadmills. The 525 treadmill combines advanced technology with the labelled parts.
...an excellent form of cardiovascular exercise in the convenience and privacy of your benefit, read this manual for selecting the new PROFORM® 525 treadmill. For your home. Before reading further, please review the drawing below and familiarise yourself with innovative design to the... Bolt Incline Leg RIGHT SIDE Upright Circuit Breaker Walking Platform 4 BEFORE YOU BEGIN Thank you 're not exercising, the unique 525 can be folded up, requiring less than half the floor space of other treadmills. The 525 treadmill combines advanced technology with the labelled parts.
User Manual
Page 5
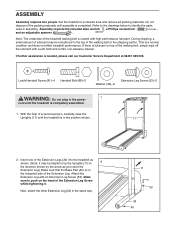
... to tip the Uprights [11] in the power 1 cord until assembly is completely assembled. 1. During shipping, a small amount of the packing materials until the treadmill is completed. Latch/Handrail Screw (81)-4 Handrail Bolt (88)-2 Washer (39)-2 Extension Leg Screw (53)-2 WARNING: Do not plug in 2 the direction shown ... assembly. This is needed, please call our Customer Service Department at 08457 089 009. Insert one of the Extension Legs (34) into the treadmill as shown. (Note: It may be helpful to the top of a second person, carefully raise the Uprights (11) until the...
... to tip the Uprights [11] in the power 1 cord until assembly is completely assembled. 1. During shipping, a small amount of the packing materials until the treadmill is completed. Latch/Handrail Screw (81)-4 Handrail Bolt (88)-2 Washer (39)-2 Extension Leg Screw (53)-2 WARNING: Do not plug in 2 the direction shown ... assembly. This is needed, please call our Customer Service Department at 08457 089 009. Insert one of the Extension Legs (34) into the treadmill as shown. (Note: It may be helpful to the top of a second person, carefully raise the Uprights (11) until the...
User Manual
Page 6
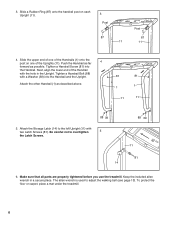
... Handrail as far 4 forward as described above. 81 81 1 1 11 11 88 39 5. Make sure that all parts are properly tightened before you use the treadmill. Tighten a Handrail Screw (81) into the Handrail and the Upright. Attach the Storage Latch (14) to the left Upright (11) with a Washer (39) ...into the Handrail. To protect the floor or carpet, place a mat under the treadmill. 6 Slide the upper end of one of the Handrails (1) onto the post on each Upright (11). 3 Post 87 11 Post 87 11 4. Attach the other...
... Handrail as far 4 forward as described above. 81 81 1 1 11 11 88 39 5. Make sure that all parts are properly tightened before you use the treadmill. Tighten a Handrail Screw (81) into the Handrail and the Upright. Attach the Storage Latch (14) to the left Upright (11) with a Washer (39) ...into the Handrail. To protect the floor or carpet, place a mat under the treadmill. 6 Slide the upper end of one of the Handrails (1) onto the post on each Upright (11). 3 Post 87 11 Post 87 11 4. Attach the other...
User Manual
Page 7
... into the socket on the ferrite box and clamp the ferrite box around the power cord. dinances. Next, lift the tab on the treadmill. Important: The treadmill is not compatible with a cord having an equipment-earthing conductor and an earth- Do not modify the plug provided with the product-if ... one that is properly installed and earthed in an increased risk of electric shock. rite box and cut off the excess plastic tie. Socket on treadmill Ferrite Box Plastic Tie Tab Outlet If the power cord is damaged, it will not fit the outlet, have a proper outlet installed by a ...
... into the socket on the ferrite box and clamp the ferrite box around the power cord. dinances. Next, lift the tab on the treadmill. Important: The treadmill is not compatible with a cord having an equipment-earthing conductor and an earth- Do not modify the plug provided with the product-if ... one that is properly installed and earthed in an increased risk of electric shock. rite box and cut off the excess plastic tie. Socket on treadmill Ferrite Box Plastic Tie Tab Outlet If the power cord is damaged, it will not fit the outlet, have a proper outlet installed by a ...
User Manual
Page 8
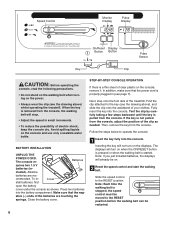
...few steps backward until the key is not pulled from the console. Alkaline batteries are touching the springs. ative (-) ends of the treadmill. Cover stall batteries, first open the battery cover under the console as needed. Find the clip attached to operate the console. 1... speed control and start the walking belt. cluded). Batteries quires two 1.5 V batteries (in (see the drawing above ) whilst operating the treadmill. Close the battery cover. Note: Each time the walking belt is stopped, the speed control must be moved to the RESET position. Fully...
...few steps backward until the key is not pulled from the console. Alkaline batteries are touching the springs. ative (-) ends of the treadmill. Cover stall batteries, first open the battery cover under the console as needed. Find the clip attached to operate the console. 1... speed control and start the walking belt. cluded). Batteries quires two 1.5 V batteries (in (see the drawing above ) whilst operating the treadmill. Close the battery cover. Note: Each time the walking belt is stopped, the speed control must be moved to the RESET position. Fully...
User Manual
Page 10
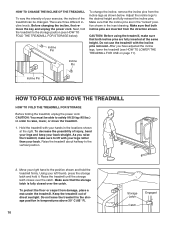
... sure that both incline pins are three different incline levels. As you have adjusted the incline legs, lower the treadmill (see HOW TO FOLD THE TREADMILL FOR STORAGE below . Move your right hand to the position shown and hold it. Make sure that both incline pins are in the "locked" ...To change the incline, remove the incline pins from the incline legs as shown below ). CAUTION: Before using the treadmill, make sure to the storage position (see HOW TO LOWER THE TREADMILL FOR USE on page 11). Before changing the incline, first remove the key and unplug the power cord. Adjust ...
... sure that both incline pins are three different incline levels. As you have adjusted the incline legs, lower the treadmill (see HOW TO FOLD THE TREADMILL FOR STORAGE below . Move your right hand to the position shown and hold it. Make sure that both incline pins are in the "locked" ...To change the incline, remove the incline pins from the incline legs as shown below ). CAUTION: Before using the treadmill, make sure to the storage position (see HOW TO LOWER THE TREADMILL FOR USE on page 11). Before changing the incline, first remove the key and unplug the power cord. Adjust ...
User Manual
Page 11
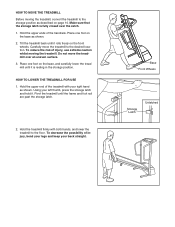
... as shown. 2. Using your back straight. To decrease the possibility of the treadmill with both hands, and lower the treadmill to the desired location. Place one foot on the front wheels. Hold the treadmill firmly with your right hand as described on the base, and carefully lower the... until the frame and foot rail are past the storage latch. 2. HOW TO LOWER THE TREADMILL FOR USE 1. Pivot the treadmill until it . HOW TO MOVE THE TREADMILL Before moving the treadmill. Make sure that the storage latch is resting in the storage position. Hold the upper ends of injury...
... as shown. 2. Using your back straight. To decrease the possibility of the treadmill with both hands, and lower the treadmill to the desired location. Place one foot on the front wheels. Hold the treadmill firmly with your right hand as described on the base, and carefully lower the... until the frame and foot rail are past the storage latch. 2. HOW TO LOWER THE TREADMILL FOR USE 1. Pivot the treadmill until it . HOW TO MOVE THE TREADMILL Before moving the treadmill. Make sure that the storage latch is resting in the storage position. Hold the upper ends of injury...
User Manual
Page 12
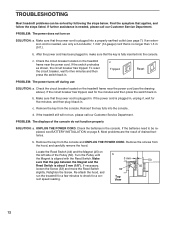
...please call our Customer Service Department. If the switch protrudes as shown, the circuit breaker has tripped. Check the circuit breaker located on the treadmill frame near the power cord. Reinsert the key fully into the console. b. Make sure that is plugged into a properly earthed outlet (see... THE POWER CORD. If the batteries need to check for five minutes and then press the switch back in the console. d. TROUBLESHOOTING Most treadmill problems can be replaced, see BATTERY INSTALLATION on page 8. PROBLEM: The power turns off during use only a 3-conductor, 1 mm2 (14...
...please call our Customer Service Department. If the switch protrudes as shown, the circuit breaker has tripped. Check the circuit breaker located on the treadmill frame near the power cord. Reinsert the key fully into the console. b. Make sure that is plugged into a properly earthed outlet (see... THE POWER CORD. If the batteries need to check for five minutes and then press the switch back in the console. d. TROUBLESHOOTING Most treadmill problems can be replaced, see BATTERY INSTALLATION on page 8. PROBLEM: The power turns off during use only a 3-conductor, 1 mm2 (14...
User Manual
Page 13
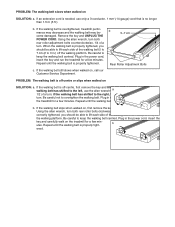
...walking belt has shifted to the right, turn the bolt counterclockwise 1/2 of a turn ; b. Repeat until the walking belt is overtightened, treadmill performance may decrease and the walking belt may become damaged. Be careful to keep the walking belt centred. Plug in the power cord, insert... the key and run the treadmill for a few min- Using the allen wrench, turn both rear roller adjustment bolts counterclockwise, 1/4 of a turn . ened. If an extension cord is...
...walking belt has shifted to the right, turn the bolt counterclockwise 1/2 of a turn ; b. Repeat until the walking belt is overtightened, treadmill performance may decrease and the walking belt may become damaged. Be careful to keep the walking belt centred. Plug in the power cord, insert... the key and run the treadmill for a few min- Using the allen wrench, turn both rear roller adjustment bolts counterclockwise, 1/4 of a turn . ened. If an extension cord is...
User Manual
Page 14
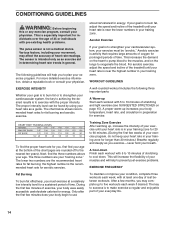
... the demand on the heart to pump blood to the muscles, and on page 15). For aerobic exercise, adjust the speed and incline of the treadmill until your heart rate is near the highest number in your training zone. The chart below shows recommended heart rates for energy. To find the... life. 14 stored fat calories for fat burning and aerobic exercise. If your goal is to burn fat, adjust the speed and incline of the treadmill until your heart rate is to make exercise a regular and enjoyable part of time. the highest number is to strengthen your cardiovascular system, your body...
... the demand on the heart to pump blood to the muscles, and on page 15). For aerobic exercise, adjust the speed and incline of the treadmill until your heart rate is near the highest number in your training zone. The chart below shows recommended heart rates for energy. To find the... life. 14 stored fat calories for fat burning and aerobic exercise. If your goal is to burn fat, adjust the speed and incline of the treadmill until your heart rate is to make exercise a regular and enjoyable part of time. the highest number is to strengthen your cardiovascular system, your body...

User Manual
Page 16
... ordering parts, please be prepared to give the following information: • the MODEL NUMBER of the product (PETL17021) • the NAME of the product (PROFORM® 525 treadmill) • the SERIAL NUMBER of the product (see the front cover of this manual) • the KEY NUMBER and the DESCRIPTION of the part(s) (see... LIST and the EXPLODED DRAWING attached in Canada © 2002 ICON Health & Fitness, Inc. Part No.185106 R0702A Printed in the centre of this manual) PROFORM is a registered trademark of ICON Health & Fitness, Inc.
... ordering parts, please be prepared to give the following information: • the MODEL NUMBER of the product (PETL17021) • the NAME of the product (PROFORM® 525 treadmill) • the SERIAL NUMBER of the product (see the front cover of this manual) • the KEY NUMBER and the DESCRIPTION of the part(s) (see... LIST and the EXPLODED DRAWING attached in Canada © 2002 ICON Health & Fitness, Inc. Part No.185106 R0702A Printed in the centre of this manual) PROFORM is a registered trademark of ICON Health & Fitness, Inc.


