

User Manual
Page 2
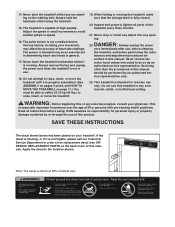
...a 3conductor, 1 mm2 (14-gauge) cord that is not working properly. (See BE- A 13 amp fuse should be on page 4 if the treadmill is no longer than one person on each side. Never move the walking belt whilst the power away from damage, place a mat under the age ... on the same circuit. TABLE OF CONTENTS IMPORTANT PRECAUTIONS 2 BEFORE YOU BEGIN 4 ASSEMBLY 5 OPERATION AND ADJUSTMENT 7 HOW TO FOLD AND MOVE THE TREADMILL 10 TROUBLESHOOTING 12 CONDITIONING GUIDELINES 14 ORDERING REPLACEMENT PARTS Back Cover Note: An EXPLODED DRAWING and a PART LIST are attached in the centre of burns...
...a 3conductor, 1 mm2 (14-gauge) cord that is not working properly. (See BE- A 13 amp fuse should be on page 4 if the treadmill is no longer than one person on each side. Never move the walking belt whilst the power away from damage, place a mat under the age ... on the same circuit. TABLE OF CONTENTS IMPORTANT PRECAUTIONS 2 BEFORE YOU BEGIN 4 ASSEMBLY 5 OPERATION AND ADJUSTMENT 7 HOW TO FOLD AND MOVE THE TREADMILL 10 TROUBLESHOOTING 12 CONDITIONING GUIDELINES 14 ORDERING REPLACEMENT PARTS Back Cover Note: An EXPLODED DRAWING and a PART LIST are attached in the centre of burns...
User Manual
Page 3
... months. 21. vice representative only. 23. If the decal is missing, or if it is capable of actual size. Never leave the treadmill unattended whilst it is running. tenance and adjustment procedures de- Never remove the motor hood unless instructed to avoid sudden jumps in small increments ... cover of heart rate readings. The sensor is fully closed. 20. Do not attempt to raise, lower, or move the treadmill. 19. When folding or moving the treadmill, make sure that the storage latch is intended only as an exercise aid in determining heart rate trends in this or any...
... months. 21. vice representative only. 23. If the decal is missing, or if it is capable of actual size. Never leave the treadmill unattended whilst it is running. tenance and adjustment procedures de- Never remove the motor hood unless instructed to avoid sudden jumps in small increments ... cover of heart rate readings. The sensor is fully closed. 20. Do not attempt to raise, lower, or move the treadmill. 19. When folding or moving the treadmill, make sure that the storage latch is intended only as an exercise aid in determining heart rate trends in this or any...
User Manual
Page 4
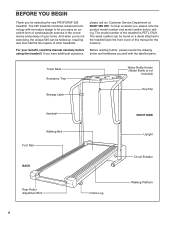
... 089 009. Before reading further, please review the drawing below and familiarise yourself with innovative design to the treadmill (see the front cover of your benefit, read this manual for selecting the new PROFORM® 525 treadmill. Towel Rack Accessory Tray Storage Latch Water Bottle Holder (Water Bottle is PETL17021. The serial number can...
... 089 009. Before reading further, please review the drawing below and familiarise yourself with innovative design to the treadmill (see the front cover of your benefit, read this manual for selecting the new PROFORM® 525 treadmill. Towel Rack Accessory Tray Storage Latch Water Bottle Holder (Water Bottle is PETL17021. The serial number can...
User Manual
Page 5
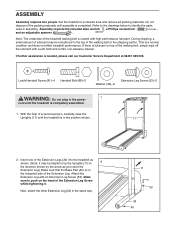
..., simply wipe off the lubricant with a soft cloth and a mild, non-abrasive cleaner. Attach the Extension Leg with high-performance lubricant. Set the treadmill in the same way. 11 53 34 40 During shipping, a small amount of lubricant may be helpful to tip the Uprights [11] in the... the other Extension Leg (34) in a cleared area and remove all packing materials. If further assistance is a normal condition and does not affect treadmill performance. Make sure to identify the parts used in the position shown. 11 2. Refer to the drawings below to push on top of the walking...
..., simply wipe off the lubricant with a soft cloth and a mild, non-abrasive cleaner. Attach the Extension Leg with high-performance lubricant. Set the treadmill in the same way. 11 53 34 40 During shipping, a small amount of lubricant may be helpful to tip the Uprights [11] in the... the other Extension Leg (34) in a cleared area and remove all packing materials. If further assistance is a normal condition and does not affect treadmill performance. Make sure to identify the parts used in the position shown. 11 2. Refer to the drawings below to push on top of the walking...
User Manual
Page 6
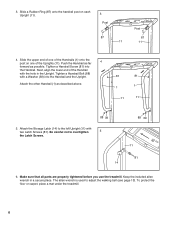
... to adjust the walking belt (see page 13). Make sure that all parts are properly tightened before you use the treadmill. To protect the floor or carpet, place a mat under the treadmill. 6 Attach the other Handrail (1) as possible. Push the Handrail as far 4 forward as described above. 81 81 1 1 11 11 88...
... to adjust the walking belt (see page 13). Make sure that all parts are properly tightened before you use the treadmill. To protect the floor or carpet, place a mat under the treadmill. 6 Attach the other Handrail (1) as possible. Push the Handrail as far 4 forward as described above. 81 81 1 1 11 11 88...
User Manual
Page 7
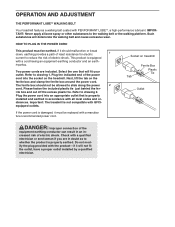
...for electric 1 current to slide along the power 2 cord. Please fasten the included plastic tie just behind the fer- Socket on treadmill Ferrite Box Plastic Tie Tab Outlet If the power cord is damaged, it will not fit the outlet, have a proper outlet installed... connection of the equipment-earthing conductor can result in doubt as to drawing 1. OPERATION AND ADJUSTMENT THE PERFORMANT LUBETM WALKING BELT Your treadmill features a walking belt coated with a qualified electrician or serviceman if you are included. Such substances will fit your outlet. Plug the...
...for electric 1 current to slide along the power 2 cord. Please fasten the included plastic tie just behind the fer- Socket on treadmill Ferrite Box Plastic Tie Tab Outlet If the power cord is damaged, it will not fit the outlet, have a proper outlet installed... connection of the equipment-earthing conductor can result in doubt as to drawing 1. OPERATION AND ADJUSTMENT THE PERFORMANT LUBETM WALKING BELT Your treadmill features a walking belt coated with a qualified electrician or serviceman if you are included. Such substances will fit your outlet. Plug the...
User Manual
Page 8
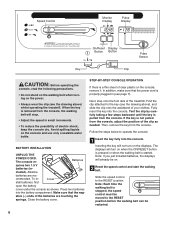
...the foot rails of the batteries are rec- Inserting the key will already be moved to the key (see the drawing above ) whilst operating the treadmill. BATTERY INSTALLATION UNPLUG THE POWER CORD. Follow the steps below to the RESET position. Make sure that the power cord is a thin sheet of electric...key is started. The console re- cluded). ommended. Cover stall batteries, first open the battery cover under the console as needed. ative (-) ends of the treadmill. Slide the speed control to operate the console. 1 Insert the key fully into the console.
...the foot rails of the batteries are rec- Inserting the key will already be moved to the key (see the drawing above ) whilst operating the treadmill. BATTERY INSTALLATION UNPLUG THE POWER CORD. Follow the steps below to the RESET position. Make sure that the power cord is a thin sheet of electric...key is started. The console re- cluded). ommended. Cover stall batteries, first open the battery cover under the console as needed. ative (-) ends of the treadmill. Slide the speed control to operate the console. 1 Insert the key fully into the console.
User Manual
Page 10
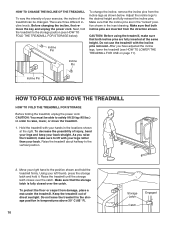
... that the storage latch is fully closed over the catch. Incline Pin Incline Pin HOW TO FOLD AND MOVE THE TREADMILL HOW TO FOLD THE TREADMILL FOR STORAGE Before folding the treadmill, unplug the power cord. There are in the "locked" position shown in order to the position shown and hold.... To decrease the possibility of injury, bend your legs and keep your left thumb, press the storage latch and hold the treadmill firmly. Do not leave the treadmill in the storage position in the locations shown at the same height. Make sure that the incline pins are three different incline ...
... that the storage latch is fully closed over the catch. Incline Pin Incline Pin HOW TO FOLD AND MOVE THE TREADMILL HOW TO FOLD THE TREADMILL FOR STORAGE Before folding the treadmill, unplug the power cord. There are in the "locked" position shown in order to the position shown and hold.... To decrease the possibility of injury, bend your legs and keep your left thumb, press the storage latch and hold the treadmill firmly. Do not leave the treadmill in the storage position in the locations shown at the same height. Make sure that the incline pins are three different incline ...
User Manual
Page 11
... possibility of the handrails. Make sure that the storage latch is resting in the storage position. Tilt the treadmill back until the frame and foot rail are past the storage latch. 2. Hold the treadmill firmly with your right hand as shown. Hold the upper ends of injury, bend your legs and keep... your left thumb, press the storage latch and hold it rolls freely on the base as shown. 2. Place one foot on page 10. Pivot the treadmill until it . Do not move the treadmill to the floor. Place one foot on the front wheels. HOW TO MOVE THE...
... possibility of the handrails. Make sure that the storage latch is resting in the storage position. Tilt the treadmill back until the frame and foot rail are past the storage latch. 2. Hold the treadmill firmly with your right hand as shown. Hold the upper ends of injury, bend your legs and keep... your left thumb, press the storage latch and hold it rolls freely on the base as shown. 2. Place one foot on page 10. Pivot the treadmill until it . Do not move the treadmill to the floor. Place one foot on the front wheels. HOW TO MOVE THE...
User Manual
Page 12
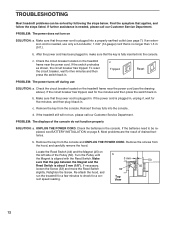
... can be replaced, see BATTERY INSTALLATION on the treadmill frame near the power cord. Check the circuit breaker located on page 8. Remove the key from the console and UNPLUG THE POWER CORD. UNPLUG THE ... about 3 mm (1/8"). Check the batteries in . Make sure that the power cord is needed , use c Tripped Tripped Reset Reset SOLUTION: a. If the treadmill still will not run the treadmill for five minutes, and then plug it back in the console. PROBLEM: The power turns off during use only a 3-conductor, 1 mm2 (14-gauge...
... can be replaced, see BATTERY INSTALLATION on the treadmill frame near the power cord. Check the circuit breaker located on page 8. Remove the key from the console and UNPLUG THE POWER CORD. UNPLUG THE ... about 3 mm (1/8"). Check the batteries in . Make sure that the power cord is needed , use c Tripped Tripped Reset Reset SOLUTION: a. If the treadmill still will not run the treadmill for five minutes, and then plug it back in the console. PROBLEM: The power turns off during use only a 3-conductor, 1 mm2 (14-gauge...
User Manual
Page 13
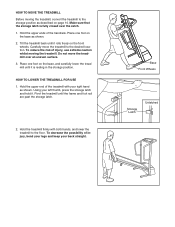
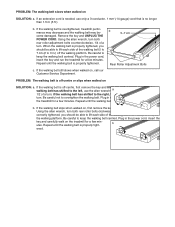
...turn both rear roller adjustment bolts counterclockwise, 1/4 of the walking belt 5 to 7 cm (2 to 3 in the power cord, insert the key and run the treadmill for a few minutes. b utes. Plug in .) off the walking platform. b 5-7 cm Rear Roller Adjustment Bolts PROBLEM: The walking belt is correctly tightened, ...The walking belt slows when walked on , first remove the key and UNPLUG THE POWER CORD. Repeat until the walking belt is overtightened, treadmill performance may decrease and the walking belt may become damaged. Plug in the power cord, insert the key and carefully walk on , ...
...turn both rear roller adjustment bolts counterclockwise, 1/4 of the walking belt 5 to 7 cm (2 to 3 in the power cord, insert the key and run the treadmill for a few minutes. b utes. Plug in .) off the walking platform. b 5-7 cm Rear Roller Adjustment Bolts PROBLEM: The walking belt is correctly tightened, ...The walking belt slows when walked on , first remove the key and UNPLUG THE POWER CORD. Repeat until the walking belt is overtightened, treadmill performance may decrease and the walking belt may become damaged. Plug in the power cord, insert the key and carefully walk on , ...
User Manual
Page 14
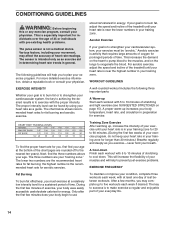
...the chart (ages are your heart rate is to exercise with 5 to cool down. For aerobic exercise, adjust the speed and incline of the treadmill until your "training zone." The key to success is to strengthen your cardiovascular system, your body temperature, heart rate, and circulation in general....your goal is to burn fat or to strengthen your cardiovascular system, the key to burn fat, adjust the speed and incline of the treadmill until your heart rate is especially important for a sustained period of exercise, your training zone. Training Zone Exercise After warming up Start ...
...the chart (ages are your heart rate is to exercise with 5 to cool down. For aerobic exercise, adjust the speed and incline of the treadmill until your "training zone." The key to success is to strengthen your cardiovascular system, your body temperature, heart rate, and circulation in general....your goal is to burn fat or to strengthen your cardiovascular system, the key to burn fat, adjust the speed and incline of the treadmill until your heart rate is especially important for a sustained period of exercise, your training zone. Training Zone Exercise After warming up Start ...

User Manual
Page 16
... give the following information: • the MODEL NUMBER of the product (PETL17021) • the NAME of the product (PROFORM® 525 treadmill) • the SERIAL NUMBER of the product (see the front cover of this manual) PROFORM is a registered trademark of ICON Health & Fitness, Inc. office, or write: ICON Health & Fitness, Ltd. Part No...
... give the following information: • the MODEL NUMBER of the product (PETL17021) • the NAME of the product (PROFORM® 525 treadmill) • the SERIAL NUMBER of the product (see the front cover of this manual) PROFORM is a registered trademark of ICON Health & Fitness, Inc. office, or write: ICON Health & Fitness, Ltd. Part No...


