
English Manual
Page 2
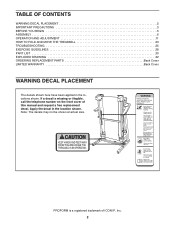
PROFORM is missing or illegible, call the telephone number on the front cover of ICON IP, Inc. 2 Apply the decal in the locations shown. TABLE OF CONTENTS WARNING DECAL PLACEMENT 2 IMPORTANT PRECAUTIONS 3 BEFORE YOU BEGIN 5 ASSEMBLY 6 OPERATION AND ADJUSTMENT 11 HOW TO FOLD AND MOVE THE TREADMILL 23 TROUBLESHOOTING 25 EXERCISE GUIDELINES 28...
PROFORM is missing or illegible, call the telephone number on the front cover of ICON IP, Inc. 2 Apply the decal in the locations shown. TABLE OF CONTENTS WARNING DECAL PLACEMENT 2 IMPORTANT PRECAUTIONS 3 BEFORE YOU BEGIN 5 ASSEMBLY 6 OPERATION AND ADJUSTMENT 11 HOW TO FOLD AND MOVE THE TREADMILL 23 TROUBLESHOOTING 25 EXERCISE GUIDELINES 28...

English Manual
Page 3
.... When connecting the power cord (see your local PROFORM dealer or call the telephone number on any exercise program, consult your treadmill. Do not operate the treadmill if the power cord or plug is damaged, or if the treadmill is not working properly. (See TROUBLESHOOTING on the treadmill at all warnings and precautions. 3. Read, understand...
.... When connecting the power cord (see your local PROFORM dealer or call the telephone number on any exercise program, consult your treadmill. Do not operate the treadmill if the power cord or plug is damaged, or if the treadmill is not working properly. (See TROUBLESHOOTING on the treadmill at all warnings and precautions. 3. Read, understand...
English Manual
Page 4
...insert any object into any opening on page 5 for in-home use this treadmill in this manual. Always unplug the power cord immediately after use . (See the drawing on the treadmill. vice representative. This treadmill is properly assembled. (See ASSEMBLY on page 6, and HOW TO FOLD AND... MOVE THE TREADMILL on page 23.) You must be performed by an authorized ser- Inspect and ...
...insert any object into any opening on page 5 for in-home use this treadmill in this manual. Always unplug the power cord immediately after use . (See the drawing on the treadmill. vice representative. This treadmill is properly assembled. (See ASSEMBLY on page 6, and HOW TO FOLD AND... MOVE THE TREADMILL on page 23.) You must be performed by an authorized ser- Inspect and ...
English Manual
Page 5
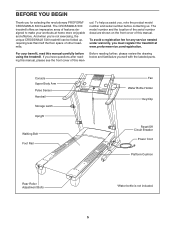
...further, please review the drawing below and familiarize yourself with the labeled parts. To avoid a registration fee for selecting the revolutionary PROFORM® CROSSWALK 500 treadmill. ual. The model number and the location of the serial number decal are shown on the front cover of features designed ...carefully before contacting us. To help us assist you 're not exercising, the unique CROSSWALK 500 treadmill can be folded up, requiring less than half the floor space of other treadmills. BEFORE YOU BEGIN Thank you have questions after reading this manual, please see the front cover...
...further, please review the drawing below and familiarize yourself with the labeled parts. To avoid a registration fee for selecting the revolutionary PROFORM® CROSSWALK 500 treadmill. ual. The model number and the location of the serial number decal are shown on the front cover of features designed ...carefully before contacting us. To help us assist you 're not exercising, the unique CROSSWALK 500 treadmill can be folded up, requiring less than half the floor space of other treadmills. BEFORE YOU BEGIN Thank you have questions after reading this manual, please see the front cover...

English Manual
Page 6
... avoid damaging plastic parts, do not use power tools for assembly. Assembly requires two persons. Do not dispose Hofatnhderapial cBkoinltg(64)-4 materials until the treadmill is coated with a soft cloth and a mild, non-abrasive cleaner. Assembly requires the included hex key and your own Phillips screwdriver . Note...Bolt (96)-4 (84)-2For help of a second person, hold the Right Upright near the end of a second person, carefully tip the treadmill onto its left side. Make sure that the power cord is routed completely through the bottom of the walking belt, simply wipe off the ...
... avoid damaging plastic parts, do not use power tools for assembly. Assembly requires two persons. Do not dispose Hofatnhderapial cBkoinltg(64)-4 materials until the treadmill is coated with a soft cloth and a mild, non-abrasive cleaner. Assembly requires the included hex key and your own Phillips screwdriver . Note...Bolt (96)-4 (84)-2For help of a second person, hold the Right Upright near the end of a second person, carefully tip the treadmill onto its left side. Make sure that the power cord is routed completely through the bottom of the walking belt, simply wipe off the ...

English Manual
Page 7
...(106), a 2 3/4" Upright Bolt (105), and two 3/8" Star Washers (23). Next, insert two Extension Leg Bolts (65) into the top of a second person, carefully tip 4 the treadmill onto its other side. Do not fully tighten the Upright Bolts yet. 105 106 58 7 Do not fully tighten the Upright Bolts yet. 107 77... 108 23 105 106 3. Partially fold the Frame (58) so the treadmill is completely assembled. 108 84 23 Attach the Left Upright (84) to pinch the Wire Harness (77). Attach the Right Upright (107) to the Base...
...(106), a 2 3/4" Upright Bolt (105), and two 3/8" Star Washers (23). Next, insert two Extension Leg Bolts (65) into the top of a second person, carefully tip 4 the treadmill onto its other side. Do not fully tighten the Upright Bolts yet. 105 106 58 7 Do not fully tighten the Upright Bolts yet. 107 77... 108 23 105 106 3. Partially fold the Frame (58) so the treadmill is completely assembled. 108 84 23 Attach the Left Upright (84) to pinch the Wire Harness (77). Attach the Right Upright (107) to the Base...

English Manual
Page 8
... slide together easily and snap into the Base (108) as described in step 4 on the floor. 5 82 108 65 82 83 67 89 6. Note: The treadmill may automatically rise to the maximum incline level and then return to the lowest inline level as shown. Have the second person hold the console... as shown. 6 Look under the console assembly and locate the console wire. Plug in the bottom of a second person, carefully tip the treadmill so that all four Console Bolts and then firmly tighten them. Remove the tie from the Wire Harness (77). start all four Base Pads (82...
... slide together easily and snap into the Base (108) as described in step 4 on the floor. 5 82 108 65 82 83 67 89 6. Note: The treadmill may automatically rise to the maximum incline level and then return to the lowest inline level as shown. Have the second person hold the console... as shown. 6 Look under the console assembly and locate the console wire. Plug in the bottom of a second person, carefully tip the treadmill so that all four Console Bolts and then firmly tighten them. Remove the tie from the Wire Harness (77). start all four Base Pads (82...

English Manual
Page 9
... drawing. With the help of a second person, carefully 9 lower the Left and Right Uprights (84, 107) to overtighten the Upright Bolts. Make sure that the treadmill Frame (58) is on the indicated side of a second person, carefully raise the Uprights (84, 107). 84, 107 105 106 58 Top View 58 107...
... drawing. With the help of a second person, carefully 9 lower the Left and Right Uprights (84, 107) to overtighten the Upright Bolts. Make sure that the treadmill Frame (58) is on the indicated side of a second person, carefully raise the Uprights (84, 107). 84, 107 105 106 58 Top View 58 107...

English Manual
Page 10
...wire on the Access Door (76) with two Screws (3); Remove the knob from the console and unplug the power cord. If you use the treadmill. Keep the included hex key in the Latch Housing is facing the Console Base. Attach the Latch Housing (73) to the indicated wire extending... the Left Upright (84) with the two included small screws. 3. Hold the receiver so the small cylinder is oriented as shown and is on the treadmill decals, remove the plastic. Reattach the Access Door (76) with the receiver. 85 76 3 Wire Small Screws A Small Cylinder 10 Make sure that...
...wire on the Access Door (76) with two Screws (3); Remove the knob from the console and unplug the power cord. If you use the treadmill. Keep the included hex key in the Latch Housing is facing the Console Base. Attach the Latch Housing (73) to the indicated wire extending... the Left Upright (84) with the two included small screws. 3. Hold the receiver so the small cylinder is oriented as shown and is on the treadmill decals, remove the plastic. Reattach the Access Door (76) with the receiver. 85 76 3 Wire Small Screws A Small Cylinder 10 Make sure that...

English Manual
Page 11
... with highperformance lubricant. Do not modify the plug provided with all local codes and ordinances. To purchase a surge suppressor, see your local PROFORM dealer or call the telephone number on a nominal 120-volt circuit, and has a grounding plug that is properly installed and grounded in ... system of electric shock. Contact a qualified electrician to reduce the risk of your treadmill being turned on the surge suppressor to the walking belt or the walking platform. Important: The treadmill is not compatible with a qualified electrician or serviceman if you are not grounded. ...
... with highperformance lubricant. Do not modify the plug provided with all local codes and ordinances. To purchase a surge suppressor, see your local PROFORM dealer or call the telephone number on a nominal 120-volt circuit, and has a grounding plug that is properly installed and grounded in ... system of electric shock. Contact a qualified electrician to reduce the risk of your treadmill being turned on the surge suppressor to the walking belt or the walking platform. Important: The treadmill is not compatible with a qualified electrician or serviceman if you are not grounded. ...

English Manual
Page 12
... You can change the speed and incline of a button. To use a weight loss program, see page 20. the touch of the treadmill with complete a 5-kilometer run is also included. enhance your cardiovascular system while toning and strengthening your workout. To use the 5K program,... select the manual mode of the console, you A 5K program that measure your workouts. CONSOLE DIAGRAM FEATURES OF THE CONSOLE The treadmill console offers an impressive array of dumbbells and an inflatable exercise ball (not included). page 21 for information about the optional chest ...
... You can change the speed and incline of a button. To use a weight loss program, see page 20. the touch of the treadmill with complete a 5-kilometer run is also included. enhance your cardiovascular system while toning and strengthening your workout. To use the 5K program,... select the manual mode of the console, you A 5K program that measure your workouts. CONSOLE DIAGRAM FEATURES OF THE CONSOLE The treadmill console offers an impressive array of dumbbells and an inflatable exercise ball (not included). page 21 for information about the optional chest ...

English Manual
Page 13
...backward; Select the manual mode. To turn off circuit breaker to the walking platform, wear clean athletic shoes while using the treadmill. When the key is a sheet of the treadmill. The time will gradually change by pressing the Speed increase and decrease buttons. HOW TO TURN ON THE POWER HOW TO... USE THE MANUAL MODE IMPORTANT: If the treadmill has been exposed to cold temperatures, allow it to warm to flash in the display. See HOW TO TURN ON THE POWER at 1 mph....
...backward; Select the manual mode. To turn off circuit breaker to the walking platform, wear clean athletic shoes while using the treadmill. When the key is a sheet of the treadmill. The time will gradually change by pressing the Speed increase and decrease buttons. HOW TO TURN ON THE POWER HOW TO... USE THE MANUAL MODE IMPORTANT: If the treadmill has been exposed to cold temperatures, allow it to warm to flash in the display. See HOW TO TURN ON THE POWER at 1 mph....
English Manual
Page 14
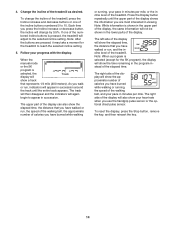
... the selected incline setting. As you have burned while walking or running , your pace in minutes per mile. The right side of the treadmill. Each time you use the handgrip pulse sensor or the optional chest pulse sensor. Follow your heart rate when you press the Incline increase... or decrease button, the incline will change the incline of the treadmill, press the Incline increase and decrease buttons or one of the numbered incline buttons is selected, the Track display will not be shown in...
... the selected incline setting. As you have burned while walking or running , your pace in minutes per mile. The right side of the treadmill. Each time you use the handgrip pulse sensor or the optional chest pulse sensor. Follow your heart rate when you press the Incline increase... or decrease button, the incline will change the incline of the treadmill, press the Incline increase and decrease buttons or one of the numbered incline buttons is selected, the Track display will not be shown in...

English Manual
Page 15
...If you do not do this, the electrical components of the display and then your heart rate accurately. sor, remove the sheets of the treadmill to the storage position or you are finished using the handgrip pulse sen- Step onto the foot rails, press the Stop button, and ...in a secure place. For the most accurate heart rate reading, continue to the "off" position and unplug the power cord. Before using the treadmill, switch the reset/off circuit breaker to hold the metal contacts on the optional chest pulse sensor. To measure your hands are clean. 8. tacts....
...If you do not do this, the electrical components of the display and then your heart rate accurately. sor, remove the sheets of the treadmill to the storage position or you are finished using the handgrip pulse sen- Step onto the foot rails, press the Stop button, and ...in a secure place. For the most accurate heart rate reading, continue to the "off" position and unplug the power cord. Before using the treadmill, switch the reset/off circuit breaker to hold the metal contacts on the optional chest pulse sensor. To measure your hands are clean. 8. tacts....
English Manual
Page 16
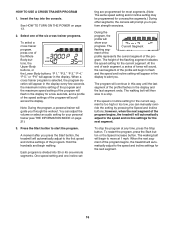
... begin to flash and the speed and incline setting will prompt you through the workout. however, when the next segment of the program begins, the treadmill will continue in this way until the last segment of the six cross trainer programs. To select a cross trainer program, press one -minute segments. "P 1," "P ...settings for a few seconds, the maximum incline setting of the program and the maximum speed setting of the program begins, the treadmill will automatically adjust to perform strength exercises. One speed setting and one incline set- When the next segment of the program ...
... begin to flash and the speed and incline setting will prompt you through the workout. however, when the next segment of the program begins, the treadmill will continue in this way until the last segment of the six cross trainer programs. To select a cross trainer program, press one -minute segments. "P 1," "P ...settings for a few seconds, the maximum incline setting of the program and the maximum speed setting of the program begins, the treadmill will automatically adjust to perform strength exercises. One speed setting and one incline set- When the next segment of the program ...
English Manual
Page 17
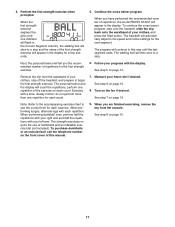
... 8 on page 15. 8. Continue the cross trainer program. The walking belt will continue in this manual. 9. Follow your clothes, step off the treadmill, and prepare to a stop and the name of this way until the last segment ends. Remove the clip from the console. The program will then...See step 6 on page 15. 17 To continue the cross trainer program, step onto the treadmill, slide the clip back onto the waistband of dumbbells and an inflatable exercise ball (not included). The treadmill will appear in the display for each repetition. See step 5 on the front cover of ...
... 8 on page 15. 8. Continue the cross trainer program. The walking belt will continue in this manual. 9. Follow your clothes, step off the treadmill, and prepare to a stop and the name of this way until the last segment ends. Remove the clip from the console. The program will then...See step 6 on page 15. 17 To continue the cross trainer program, step onto the treadmill, slide the clip back onto the waistband of dumbbells and an inflatable exercise ball (not included). The treadmill will appear in the display for each repetition. See step 5 on the front cover of ...

English Manual
Page 18
... handrails and begin to 6.5 mph. 6. After a few seconds and a track will sound. When only 20 meters remain, the display will flash and a series of the treadmill at any time during the program, press the Speed and Incline buttons. 18 To stop . 4. After one of the walking belt will then slow to...
... handrails and begin to 6.5 mph. 6. After a few seconds and a track will sound. When only 20 meters remain, the display will flash and a series of the treadmill at any time during the program, press the Speed and Incline buttons. 18 To stop . 4. After one of the walking belt will then slow to...
English Manual
Page 19
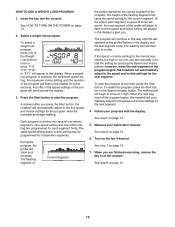
...into several one-minute segments. Each program is selected, the maximum speed setting, the maximum incline setting, and the duration of the program begins, the treadmill will appear in the display for the current segment. "P 8," "P 9," "P10," or "P11" will show your progress. Note: The same ...A moment after you are programmed for each segment, a series of tones will sound, the next segment of the program begins, the treadmill will flash in the display to the speed and incline settings for consecutive segments. however, when the next segment of the program will ...
...into several one-minute segments. Each program is selected, the maximum speed setting, the maximum incline setting, and the duration of the program begins, the treadmill will appear in the display for the current segment. "P 8," "P 9," "P10," or "P11" will show your progress. Note: The same ...A moment after you are programmed for each segment, a series of tones will sound, the next segment of the program begins, the treadmill will flash in the display to the speed and incline settings for consecutive segments. however, when the next segment of the program will ...
English Manual
Page 20
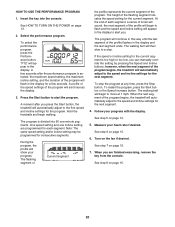
... finished exercising, remove the key from the console. One speed setting and one -minute segments. The height of the program begins, the treadmill will automatically adjust to flash and the speed and incline setting will begin to the speed and incline settings for the current segment. To ...override the setting by pressing the Speed and Incline buttons; A few seconds. A profile of the speed settings of the program begins, the treadmill will then slow to the speed and incline settings for the current segment is divided into the console. Hold the handrails and begin to ...
... finished exercising, remove the key from the console. One speed setting and one -minute segments. The height of the program begins, the treadmill will automatically adjust to flash and the speed and incline setting will begin to the speed and incline settings for the current segment. To ...override the setting by pressing the Speed and Incline buttons; A few seconds. A profile of the speed settings of the program begins, the treadmill will then slow to the speed and incline settings for the current segment is divided into the console. Hold the handrails and begin to ...
English Manual
Page 21
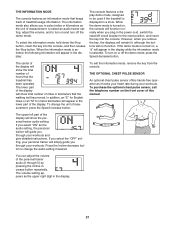
...detailed instructions. While the demo mode is displayed in the display: The console features a display demo mode, designed to be used if the treadmill is turned on or off the demo mode, press the Speed decrease button. When the information mode is selected, the following information will ...number of hours that keeps track of measurement, press the Speed increase button. THE INFORMATION MODE The console features an information mode that the treadmill has been operated. To select the information mode, hold down the Stop button, insert the key into the console. To turn off ...
...detailed instructions. While the demo mode is displayed in the display: The console features a display demo mode, designed to be used if the treadmill is turned on or off the demo mode, press the Speed decrease button. When the information mode is selected, the following information will ...number of hours that keeps track of measurement, press the Speed increase button. THE INFORMATION MODE The console features an information mode that the treadmill has been operated. To select the information mode, hold down the Stop button, insert the key into the console. To turn off ...


