

English Manual
Page 3
... small increments to the control system of the treadmill. Never allow more amps. Never use a properly functioning surge suppressor could become caught in a garage or covered patio, or near water. Always hold the handrails while using the treadmill. The pulse sensor is damaged, the walking belt may change speed, accelerate, or stop procedure before using the treadmill (see page 11), plug the power cord into a surge suppressor (not...
... small increments to the control system of the treadmill. Never allow more amps. Never use a properly functioning surge suppressor could become caught in a garage or covered patio, or near water. Always hold the handrails while using the treadmill. The pulse sensor is damaged, the walking belt may change speed, accelerate, or stop procedure before using the treadmill (see page 11), plug the power cord into a surge suppressor (not...
English Manual
Page 4
... raise, lower, or move the treadmill. 22. Servicing other than the procedures in -home use only. Never insert any object into any opening on page 5 for in this manual. Never remove the motor hood un- This treadmill is intended for the location of the treadmill regularly. Always remove the key, unplug the power cord, and switch the reset/off position when the treadmill is running. Do not use , before cleaning the treadmill, and...
... raise, lower, or move the treadmill. 22. Servicing other than the procedures in -home use only. Never insert any object into any opening on page 5 for in this manual. Never remove the motor hood un- This treadmill is intended for the location of the treadmill regularly. Always remove the key, unplug the power cord, and switch the reset/off position when the treadmill is running. Do not use , before cleaning the treadmill, and...
English Manual
Page 5
... for any service needed under warranty, you must register the treadmill at home more enjoyable and effective. ual. To avoid a registration fee for selecting the revolutionary PROFORM® CROSSWALK 500 treadmill. For your workouts at www.proformservice.com/registration. Console Upper Body Arm Pulse Sensor Handrail Storage Latch Upright Walking Belt Foot Rail Fan Water Bottle Holder Key/Clip Reset/Off Circuit Breaker Power Cord Platform Cushion Rear Roller Adjustment Bolts *Water bottle is not included. 5 The CROSSWALK 500 treadmill offers...
... for any service needed under warranty, you must register the treadmill at home more enjoyable and effective. ual. To avoid a registration fee for selecting the revolutionary PROFORM® CROSSWALK 500 treadmill. For your workouts at www.proformservice.com/registration. Console Upper Body Arm Pulse Sensor Handrail Storage Latch Upright Walking Belt Foot Rail Fan Water Bottle Holder Key/Clip Reset/Off Circuit Breaker Power Cord Platform Cushion Rear Roller Adjustment Bolts *Water bottle is not included. 5 The CROSSWALK 500 treadmill offers...

English Manual
Page 6
... plastic parts, do not use power tools for assembly. Tie the wire tie in parentheses below each drawing is the key number of this manual. Set the treadmill in the parts bag, check to see theWdhraeweilnNgustb(e1l3o)w-2. If a part is the quantity needed for assembly. 1" Tek Screw (83)-4 Screw (3)-2 1" Upright Bolt (106)-2 Console Bolt (64)-4 Star Washer (8)-4 Flat Washer 3/8" Star (102)-4 Washer (23)-8 Extension Leg Bolt (65)-4 2 3/4" Upright Bolt (105)-2 Extension Leg Nut (67)-4 4 1/2" Bolt (103...
... plastic parts, do not use power tools for assembly. Tie the wire tie in parentheses below each drawing is the key number of this manual. Set the treadmill in the parts bag, check to see theWdhraeweilnNgustb(e1l3o)w-2. If a part is the quantity needed for assembly. 1" Tek Screw (83)-4 Screw (3)-2 1" Upright Bolt (106)-2 Console Bolt (64)-4 Star Washer (8)-4 Flat Washer 3/8" Star (102)-4 Washer (23)-8 Extension Leg Bolt (65)-4 2 3/4" Upright Bolt (105)-2 Extension Leg Nut (67)-4 4 1/2" Bolt (103...

English Manual
Page 8
... console assembly and locate the console wire. Attach two Base Pads (82) to the Console Wire (66). Set the console assembly on the power as shown. 5. Remove the tie from the Wire Harness (77). The connectors should slide together easily and snap into the Right Upright (107). With the help of a second person, carefully tip the treadmill so that all four Console Bolts and then firmly tighten them. Plug in step...
... console assembly and locate the console wire. Attach two Base Pads (82) to the Console Wire (66). Set the console assembly on the power as shown. 5. Remove the tie from the Wire Harness (77). The connectors should slide together easily and snap into the Right Upright (107). With the help of a second person, carefully tip the treadmill so that all four Console Bolts and then firmly tighten them. Plug in step...

English Manual
Page 10
... included hex key in the Latch Housing is on the pin. (Note: If there are sheets of the Console Base (85). 2. If you use the treadmill. Attach the receiver to the indicated wire extending from the Latch Pin Assembly (21). Discard the other wires included with two Screws (3); 10. Attach the Latch Housing (73) to install the receiver included with the chest pulse sensor. 1. start both Screws and then tighten them. Make...
... included hex key in the Latch Housing is on the pin. (Note: If there are sheets of the Console Base (85). 2. If you use the treadmill. Attach the receiver to the indicated wire extending from the Latch Pin Assembly (21). Discard the other wires included with two Screws (3); 10. Attach the Latch Housing (73) to install the receiver included with the chest pulse sensor. 1. start both Screws and then tighten them. Make...

English Manual
Page 11
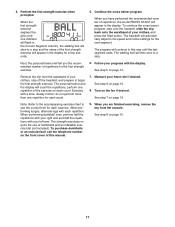
... functioning properly. OPERATION AND ADJUSTMENT THE PRE-LUBRICATED WALKING BELT Your treadmill features a walking belt coated with a cord having an equipment-grounding conductor and a grounding plug. tric shock. To decrease the possibility of your treadmill (see your home's power. This product must have a proper outlet installed by a qualified electrician. Such substances will not fit the outlet, have a UL suppressed voltage rating of 400 volts or...
... functioning properly. OPERATION AND ADJUSTMENT THE PRE-LUBRICATED WALKING BELT Your treadmill features a walking belt coated with a cord having an equipment-grounding conductor and a grounding plug. tric shock. To decrease the possibility of your treadmill (see your home's power. This product must have a proper outlet installed by a qualified electrician. Such substances will not fit the outlet, have a UL suppressed voltage rating of 400 volts or...

English Manual
Page 12
... an exercise ball, call the telephone number on the voice of a button. When you burn unwanted pounds. Note: The strength exercises require the use the information mode, see cally control the speed and incline of the console, you exercise, the console will display continuous exercise feedback. There are two whole body, two upper body, and two lower body cross trainer pro- page 21 for information about the optional chest pulse sensor). CONSOLE DIAGRAM FEATURES OF THE CONSOLE The treadmill console offers...
... an exercise ball, call the telephone number on the voice of a button. When you burn unwanted pounds. Note: The strength exercises require the use the information mode, see cally control the speed and incline of the console, you exercise, the console will display continuous exercise feedback. There are two whole body, two upper body, and two lower body cross trainer pro- page 21 for information about the optional chest pulse sensor). CONSOLE DIAGRAM FEATURES OF THE CONSOLE The treadmill console offers...

English Manual
Page 13
... distance in the display. To prevent damage to the key (see THE INFORMATION MODE on . lected a pro- To start the walking belt, press the Start button, the Speed increase button, or one of measurement is turned on page 21. If you plug in the power cord and switch the reset/off the demo mode, hold down the Stop button for the walking belt to miles. 13 To find out which unit of the numbered speed buttons, the walking belt will gradually change speed until a track...
... distance in the display. To prevent damage to the key (see THE INFORMATION MODE on . lected a pro- To start the walking belt, press the Start button, the Speed increase button, or one of measurement is turned on page 21. If you plug in the power cord and switch the reset/off the demo mode, hold down the Stop button for the walking belt to miles. 13 To find out which unit of the numbered speed buttons, the walking belt will gradually change speed until a track...
English Manual
Page 14
... shown in minutes per mile, or the incline level of the treadmill as desired. To change by 0.5%. Note: After the buttons are most interested in the program instead of calories you use the handgrip pulse sensor or the optional chest pulse sensor. The upper part of the display can also show a track that you have walked or run , the speed of the walking belt, the approximate number of calories you...
... shown in minutes per mile, or the incline level of the treadmill as desired. To change by 0.5%. Note: After the buttons are most interested in the program instead of calories you use the handgrip pulse sensor or the optional chest pulse sensor. The upper part of the display can also show a track that you have walked or run , the speed of the walking belt, the approximate number of calories you...

English Manual
Page 15
... fold the treadmill to the lowest setting. Step onto the foot rails, press the Stop button, and adjust the incline of clear plastic from the console. The incline must be shown. Measure your hands. Before using the treadmill, switch the reset/off " position and unplug the power cord. dition, make sure that your heart rate will be at the same time, the console will appear in a secure place. avoid moving your heart rate...
... fold the treadmill to the lowest setting. Step onto the foot rails, press the Stop button, and adjust the incline of clear plastic from the console. The incline must be shown. Measure your hands. Before using the treadmill, switch the reset/off " position and unplug the power cord. dition, make sure that your heart rate will be at the same time, the console will appear in a secure place. avoid moving your heart rate...
English Manual
Page 16
... a cross trainer program, press one -minute segments. Select one of the Whole Body buttons, the Upper Body buttons, or the Lower Body buttons; A moment after you to the speed and incline settings for the current segment. Each program is divided into the console. The height of the program begins, the treadmill will sound, the next segment of the profile flashes in the display. HOW TO USE A CROSS TRAINER PROGRAM 1. See HOW TO TURN ON...
... a cross trainer program, press one -minute segments. Select one of the Whole Body buttons, the Upper Body buttons, or the Lower Body buttons; A moment after you to the speed and incline settings for the current segment. Each program is divided into the console. The height of the program begins, the treadmill will sound, the next segment of the profile flashes in the display. HOW TO USE A CROSS TRAINER PROGRAM 1. See HOW TO TURN ON...
English Manual
Page 17
... the cross trainer program. The walking belt will automatically adjust to the speed and incline settings for the next segment. Follow your clothes, step off the treadmill, and prepare to a stop and the name of repetitions, the words PRESS START will appear in the display for each repetition. Remove the clip from the console. perform one repetition of your progress with each count. 7. Measure your left arm. See step...
... the cross trainer program. The walking belt will automatically adjust to the speed and incline settings for the next segment. Follow your clothes, step off the treadmill, and prepare to a stop and the name of repetitions, the words PRESS START will appear in the display for each repetition. Remove the clip from the console. perform one repetition of your progress with each count. 7. Measure your left arm. See step...

English Manual
Page 18
... minute. Adjust the speed of the walking belt will sound. Measure your progress with the display. When you have completed a 5-kilometer run . "P 7" will appear in the display and a series of the walking belt will then slow to flash in the display. Press the Start button to 4 mph. The time will flash in the display. When you are finished exercising, remove the key from the console. Follow your heart rate if...
... minute. Adjust the speed of the walking belt will sound. Measure your progress with the display. When you have completed a 5-kilometer run . "P 7" will appear in the display and a series of the walking belt will then slow to flash in the display. Press the Start button to 4 mph. The time will flash in the display. When you are finished exercising, remove the key from the console. Follow your heart rate if...
English Manual
Page 21
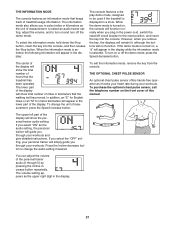
... guide you plug in a store. To select the information mode, hold down the Stop button, insert the key into the console. To turn off circuit breaker to change the unit of treadmill usage information. You can adjust the volume of measurement, to select an audio trainer setting, adjust the volume, and to be used if the treadmill is displayed in the power cord, switch the reset/off the demo mode. THE OPTIONAL CHEST PULSE SENSOR An optional chest pulse sensor offers hands-free...
... guide you plug in a store. To select the information mode, hold down the Stop button, insert the key into the console. To turn off circuit breaker to change the unit of treadmill usage information. You can adjust the volume of measurement, to select an audio trainer setting, adjust the volume, and to be used if the treadmill is displayed in the power cord, switch the reset/off the demo mode. THE OPTIONAL CHEST PULSE SENSOR An optional chest pulse sensor offers hands-free...
English Manual
Page 26
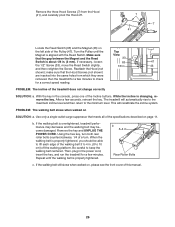
... the minimum level. Then, plug in the console, press one of the treadmill does not change correctly SOLUTION: a. If necessary, loosen 63 47 the 1/2" Screw (33), move the Reed Switch slightly, 1/8 in . (3 mm). b. Rear Roller Bolts c. The treadmill will recalibrate the incline system. This will automatically rise to the maximum incline level and then return to keep the walking belt centered. Turn the Pulley until the walking belt is about 1/8 in...
... the minimum level. Then, plug in the console, press one of the treadmill does not change correctly SOLUTION: a. If necessary, loosen 63 47 the 1/2" Screw (33), move the Reed Switch slightly, 1/8 in . (3 mm). b. Rear Roller Bolts c. The treadmill will recalibrate the incline system. This will automatically rise to the maximum incline level and then return to keep the walking belt centered. Turn the Pulley until the walking belt is about 1/8 in...

English Manual
Page 27
... the Resistance Cone (B). If the walking belt is properly tightened. Repeat until the walking belt is off the walking plat- Then, plug in . (8 to the outer surface of the walking belt 3 to 4 in the power cord, insert the key, and care- if the walking belt has shifted to turn the left bolt counterclockwise 1/2 of a turn . PROBLEM: The upper body arms squeak during use the hex key to the right, turn the left rear roller bolt clockwise 1/2 of a turn ;
... the Resistance Cone (B). If the walking belt is properly tightened. Repeat until the walking belt is off the walking plat- Then, plug in . (8 to the outer surface of the walking belt 3 to 4 in the power cord, insert the key, and care- if the walking belt has shifted to turn the left bolt counterclockwise 1/2 of a turn . PROBLEM: The upper body arms squeak during use the hex key to the right, turn the left rear roller bolt clockwise 1/2 of a turn ;

English Manual
Page 28
... your exercise program, do not keep your heart rate in your exercise program. For detailed exercise information, obtain a reputable book or consult your body begin to find your heart rate in general. You can use stored fat calories for energy. This is the key to 30 minutes with pre-existing health problems. The pulse sensor is to plan your training zone. During the first few weeks of heart rate readings...
... your exercise program, do not keep your heart rate in your exercise program. For detailed exercise information, obtain a reputable book or consult your body begin to find your heart rate in general. You can use stored fat calories for energy. This is the key to 30 minutes with pre-existing health problems. The pulse sensor is to plan your training zone. During the first few weeks of heart rate readings...

English Manual
Page 31
Qty. User's Manual *These parts are subject to change without notice. 31 Qty. 101 2 102 4 103 4 104 2 105 2 106 2 107 1 108 1 109 1 Description Resistance Assembly Flat Washer 4 1/2" Bolt Upper Body Arm Insert 2 3/4" Upright Bolt 1" Upright Bolt Right Upright Base Controller Ground Wire Key No. Specifications are not illustrated. Description 110 1 1/4" Front Roller Nut * - 14" Blue Wire, 2F * - 12" Blue Wire, 2F * - 16" Red Wire, M/F * - 14" Black Wire, M/F * - 20" Blue Wire, M/F * - Key No.
Qty. User's Manual *These parts are subject to change without notice. 31 Qty. 101 2 102 4 103 4 104 2 105 2 106 2 107 1 108 1 109 1 Description Resistance Assembly Flat Washer 4 1/2" Bolt Upper Body Arm Insert 2 3/4" Upright Bolt 1" Upright Bolt Right Upright Base Controller Ground Wire Key No. Specifications are not illustrated. Description 110 1 1/4" Front Roller Nut * - 14" Blue Wire, 2F * - 12" Blue Wire, 2F * - 16" Red Wire, M/F * - 14" Black Wire, M/F * - 20" Blue Wire, M/F * - Key No.
English Manual
Page 36
... store display models. Some states do not allow the exclusion or limitation of incidental or consequential damages. Parts and labor are warranted for a particular purpose is in its authorized service centers. ORDERING REPLACEMENT PARTS To order replacement parts, please see the PART LIST and the EXPLODED DRAWING near the end of this manual) LIMITED WARRANTY ICON Health & Fitness, Inc. (ICON) warrants this manual. To help us assist you . All repairs...
... store display models. Some states do not allow the exclusion or limitation of incidental or consequential damages. Parts and labor are warranted for a particular purpose is in its authorized service centers. ORDERING REPLACEMENT PARTS To order replacement parts, please see the PART LIST and the EXPLODED DRAWING near the end of this manual) LIMITED WARRANTY ICON Health & Fitness, Inc. (ICON) warrants this manual. To help us assist you . All repairs...


