

English Manual
Page 2
... WARNING DECAL PLACEMENT 2 IMPORTANT PRECAUTIONS 3 BEFORE YOU BEGIN 4 PART IDENTIFICATION CHART 5 ASSEMBLY 6 HOW TO USE THE EXERCISE BIKE 12 FCC INFORMATION 21 MAINTENANCE AND TROUBLESHOOTING 22 EXERCISE GUIDELINES 24 PART LIST 26 EXPLODED... DRAWING 27 ORDERING REPLACEMENT PARTS Back Cover LIMITED WARRANTY Back Cover WARNING DECAL PLACEMENT This drawing shows the location(s) of this manual and request a free replacement decal. Apply the decal in the location shown. PROFORM...
... WARNING DECAL PLACEMENT 2 IMPORTANT PRECAUTIONS 3 BEFORE YOU BEGIN 4 PART IDENTIFICATION CHART 5 ASSEMBLY 6 HOW TO USE THE EXERCISE BIKE 12 FCC INFORMATION 21 MAINTENANCE AND TROUBLESHOOTING 22 EXERCISE GUIDELINES 24 PART LIST 26 EXPLODED... DRAWING 27 ORDERING REPLACEMENT PARTS Back Cover LIMITED WARRANTY Back Cover WARNING DECAL PLACEMENT This drawing shows the location(s) of this manual and request a free replacement decal. Apply the decal in the location shown. PROFORM...

English Manual
Page 5
The number in the hardware kit, check to identify the small parts needed for assembly. M6 Split Washer (74)–-4 M8 Split Washer (64)–-8 M8 Locknut (72)–-4 M4 x 16mm Screw (43)–-4 M4 x 22mm Screw (31)–-4 M6 x ... not in parentheses below to see if it has been preassembled. PART IDENTIFICATION CHART Use the drawings below each drawing is the quantity needed for assembly. The number following the key number is the key number of the part, from the PART LIST near the end of this manual.
The number in the hardware kit, check to identify the small parts needed for assembly. M6 Split Washer (74)–-4 M8 Split Washer (64)–-8 M8 Locknut (72)–-4 M4 x 16mm Screw (43)–-4 M4 x 22mm Screw (31)–-4 M6 x ... not in parentheses below to see if it has been preassembled. PART IDENTIFICATION CHART Use the drawings below each drawing is the quantity needed for assembly. The number following the key number is the key number of the part, from the PART LIST near the end of this manual.

English Manual
Page 6
...step. Have a second person 2 hold the Frame to read the QR code at the right. •• Assembly requires two persons. •• Place all assembly steps. •• Left parts are marked “"L”" or “"Left”" and right parts are marked... one adjustable wrench Assembly may be easier if you complete this step. Wheel 2 53 1 6 ASSEMBLY •• To hire an authorized service technician to assemble this product, call 1-800-445-2480. •• To watch an assembly video, go to http://productvideo.co/ assembly/proform or use power ...
...step. Have a second person 2 hold the Frame to read the QR code at the right. •• Assembly requires two persons. •• Place all assembly steps. •• Left parts are marked “"L”" or “"Left”" and right parts are marked... one adjustable wrench Assembly may be easier if you complete this step. Wheel 2 53 1 6 ASSEMBLY •• To hire an authorized service technician to assemble this product, call 1-800-445-2480. •• To watch an assembly video, go to http://productvideo.co/ assembly/proform or use power ...
English Manual
Page 9
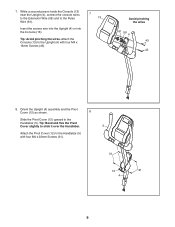
.... Attach the Console (13) to the Handlebar (5) with four M4 x 16mm Screws (43). 7 13 Avoid pinching the wires 61 59 4 43 43 8. 7. Orient the Upright (4) assembly and the Pivot Cover (12) as shown. 8 Slide the Pivot Cover (12) upward to the Pulse Wire (61). While a second person holds the Console (13...
.... Attach the Console (13) to the Handlebar (5) with four M4 x 16mm Screws (43). 7 13 Avoid pinching the wires 61 59 4 43 43 8. 7. Orient the Upright (4) assembly and the Pivot Cover (12) as shown. 8 Slide the Pivot Cover (12) upward to the Pulse Wire (61). While a second person holds the Console (13...

English Manual
Page 26
Assembly Tool * –- Qty. For information about ordering replacement parts, see the back cover of this manual. *These parts are subject to change without notice. Description ...
Assembly Tool * –- Qty. For information about ordering replacement parts, see the back cover of this manual. *These parts are subject to change without notice. Description ...


