

English Manual
Page 2
PROFORM is missing or illegible, see the front cover of this manual and request a free replacement decal. Note: The decal(s) may not be shown at actual size. TABLE OF CONTENTS WARNING DECAL PLACEMENT 2 IMPORTANT PRECAUTIONS 3 BEFORE YOU BEGIN 4 PART IDENTIFICATION CHART 5 ASSEMBLY 6 HOW TO USE THE EXERCISE BIKE 12 FCC INFORMATION 21 MAINTENANCE AND...
PROFORM is missing or illegible, see the front cover of this manual and request a free replacement decal. Note: The decal(s) may not be shown at actual size. TABLE OF CONTENTS WARNING DECAL PLACEMENT 2 IMPORTANT PRECAUTIONS 3 BEFORE YOU BEGIN 4 PART IDENTIFICATION CHART 5 ASSEMBLY 6 HOW TO USE THE EXERCISE BIKE 12 FCC INFORMATION 21 MAINTENANCE AND...

English Manual
Page 5
... x 20mm Screw (18)–-4 M8 x 16mm Screw (65)–-4 M10 x 95mm Screw (53)–-4 5 The number following the key number is the quantity needed for assembly. Note: If a part is the key number of the part, from the PART LIST near the end of this manual. The number in the hardware...
... x 20mm Screw (18)–-4 M8 x 16mm Screw (65)–-4 M10 x 95mm Screw (53)–-4 5 The number following the key number is the quantity needed for assembly. Note: If a part is the key number of the part, from the PART LIST near the end of this manual. The number in the hardware...

English Manual
Page 6
... a cleared area and remove the packing materials. ASSEMBLY •• To hire an authorized service technician to assemble this product, call 1-800-445-2480. •• To watch an assembly video, go to http://productvideo.co/ assembly/proform or use power tools. 1. Attach the Front Stabilizer... (2) to read the QR code at the right. •• Assembly requires two persons. •• Place all assembly steps. •• Left parts ...
... a cleared area and remove the packing materials. ASSEMBLY •• To hire an authorized service technician to assemble this product, call 1-800-445-2480. •• To watch an assembly video, go to http://productvideo.co/ assembly/proform or use power tools. 1. Attach the Front Stabilizer... (2) to read the QR code at the right. •• Assembly requires two persons. •• Place all assembly steps. •• Left parts ...
English Manual
Page 9
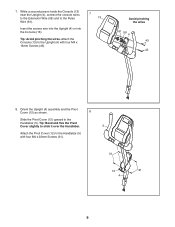
... (43). 7 13 Avoid pinching the wires 61 59 4 43 43 8. Insert the excess wire into the Upright (4) or into the Console (13). Orient the Upright (4) assembly and the Pivot Cover (12) as shown. 8 Slide the Pivot Cover (12) upward to the Pulse Wire (61). Tip: Bend and flex the Pivot Cover...
... (43). 7 13 Avoid pinching the wires 61 59 4 43 43 8. Insert the excess wire into the Upright (4) or into the Console (13). Orient the Upright (4) assembly and the Pivot Cover (12) as shown. 8 Slide the Pivot Cover (12) upward to the Pulse Wire (61). Tip: Bend and flex the Pivot Cover...

English Manual
Page 26
... Screw 74 4 M6 Split Washer 75 1 Spacer * –- Description Key No. User’'s Manual Note: Specifications are not illustrated. 26 PFEX52912.0 R0712A Key No. Qty. Assembly Tool * –- For information about ordering replacement parts, see the back cover of this manual. *These parts are subject to change without notice.
... Screw 74 4 M6 Split Washer 75 1 Spacer * –- Description Key No. User’'s Manual Note: Specifications are not illustrated. 26 PFEX52912.0 R0712A Key No. Qty. Assembly Tool * –- For information about ordering replacement parts, see the back cover of this manual. *These parts are subject to change without notice.


