
English Manual
Page 1
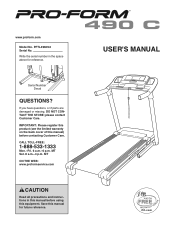
... damaged or missing, DO NOT CONTACT THE STORE; Serial Number Decal QUESTIONS? CALL TOLL-FREE: 1-888-533-1333 Mon.-Fri. 6 a.m.-6 p.m. USER'S MANUAL MT ON THE WEB: www.proformservice.com CAUTION Read all precautions and instructions in the space above for future reference. MT Sat. 8 a.m.-4 p.m. please ...contact Customer Care. Save this equipment. www.proform.com Model No. PFTL49609.0 Serial No. IMPORTANT: Please register this product (see the limited warranty on the back cover of this...
... damaged or missing, DO NOT CONTACT THE STORE; Serial Number Decal QUESTIONS? CALL TOLL-FREE: 1-888-533-1333 Mon.-Fri. 6 a.m.-6 p.m. USER'S MANUAL MT ON THE WEB: www.proformservice.com CAUTION Read all precautions and instructions in the space above for future reference. MT Sat. 8 a.m.-4 p.m. please ...contact Customer Care. Save this equipment. www.proform.com Model No. PFTL49609.0 Serial No. IMPORTANT: Please register this product (see the limited warranty on the back cover of this...
English Manual
Page 2
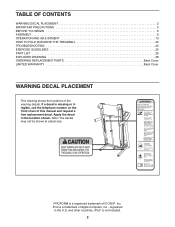
If a decal is a registered trademark of this manual and request a free replacement decal. iPod is not included. 2 PROFORM is missing or illegible, call the telephone number on the front cover of ICON IP, Inc. and other countries. Apply the decal... OF CONTENTS WARNING DECAL PLACEMENT 2 IMPORTANT PRECAUTIONS 3 BEFORE YOU BEGIN 5 ASSEMBLY 6 OPERATION AND ADJUSTMENT 13 HOW TO FOLD AND MOVE THE TREADMILL 20 TROUBLESHOOTING 22 EXERCISE GUIDELINES 25 PART LIST 26 EXPLODED DRAWING 28 ORDERING REPLACEMENT PARTS Back Cover LIMITED WARRANTY Back Cover WARNING DECAL PLACEMENT This...
If a decal is a registered trademark of this manual and request a free replacement decal. iPod is not included. 2 PROFORM is missing or illegible, call the telephone number on the front cover of ICON IP, Inc. and other countries. Apply the decal... OF CONTENTS WARNING DECAL PLACEMENT 2 IMPORTANT PRECAUTIONS 3 BEFORE YOU BEGIN 5 ASSEMBLY 6 OPERATION AND ADJUSTMENT 13 HOW TO FOLD AND MOVE THE TREADMILL 20 TROUBLESHOOTING 22 EXERCISE GUIDELINES 25 PART LIST 26 EXPLODED DRAWING 28 ORDERING REPLACEMENT PARTS Back Cover LIMITED WARRANTY Back Cover WARNING DECAL PLACEMENT This...

English Manual
Page 3
...or stop procedure before using the treadmill (see your local PROFORM dealer or call the telephone number on the treadmill at least 8 ft. (2.4 m) of 16. To protect the floor or carpet from damage, place a mat under age 12 and pets away from the treadmill at all warnings and precautions.... carrying 15 or more than one person on the front cover of this manual and all users of all times. 15. Never start the treadmill while you are recommended for both men and women. Keep the treadmill indoors, away from heated surfaces. 6. Various factors, including the user's ...
...or stop procedure before using the treadmill (see your local PROFORM dealer or call the telephone number on the treadmill at least 8 ft. (2.4 m) of 16. To protect the floor or carpet from damage, place a mat under age 12 and pets away from the treadmill at all warnings and precautions.... carrying 15 or more than one person on the front cover of this manual and all users of all times. 15. Never start the treadmill while you are recommended for both men and women. Keep the treadmill indoors, away from heated surfaces. 6. Various factors, including the user's ...
English Manual
Page 4
... assembled. (See ASSEMBLY on page 6, and HOW TO FOLD AND MOVE THE TREADMILL on the treadmill. 24. Servicing other than the procedures in serious injury or death. Over exercising may result in this manual should be able to safely lift 45 lbs. (20 kg) to do so...20. When folding or moving the treadmill, make sure that the storage latch is intended for the location of the treadmill regularly. DANGER: 25. Do not use this manual. This treadmill is holding the frame securely in this treadmill in -home use , before cleaning the treadmill, and before performing the mainte-...
... assembled. (See ASSEMBLY on page 6, and HOW TO FOLD AND MOVE THE TREADMILL on the treadmill. 24. Servicing other than the procedures in serious injury or death. Over exercising may result in this manual should be able to safely lift 45 lbs. (20 kg) to do so...20. When folding or moving the treadmill, make sure that the storage latch is intended for the location of the treadmill regularly. DANGER: 25. Do not use this manual. This treadmill is holding the frame securely in this treadmill in -home use , before cleaning the treadmill, and before performing the mainte-...

English Manual
Page 5
For your workouts at home more enjoyable and effective. If you for selecting the revolutionary PROFORM® 490 C treadmill. The model number and the location of the serial number decal are shown on the front cover of features designed to make ...you have questions after read this manual. To help us . ing this manual, please see the front cover of other treadmills. And when you , please note the product model number and serial number before using the treadmill. The 490 C treadmill offers an impressive selection of this manual carefully before contacting us assist you ...
For your workouts at home more enjoyable and effective. If you for selecting the revolutionary PROFORM® 490 C treadmill. The model number and the location of the serial number decal are shown on the front cover of features designed to make ...you have questions after read this manual. To help us . ing this manual, please see the front cover of other treadmills. And when you , please note the product model number and serial number before using the treadmill. The 490 C treadmill offers an impressive selection of this manual carefully before contacting us assist you ...
English Manual
Page 6
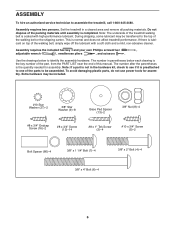
... high-performance lubricant. Note: If a part is not in the hardware kit, check to see if it is normal and does not affect treadmill performance. To avoid damaging plastic parts, do not use power tools for assembly. During shipping, some lubricant may be assembled. Assembly requires the... until assembly is coated with a soft cloth and a mild, non-abrasive cleaner. Assembly requires two persons. Do not dispose of this manual. ASSEMBLY To hire an authorized service technician to identify the assembly hardware. Set the treadmill in parentheses below to assemble the...
... high-performance lubricant. Note: If a part is not in the hardware kit, check to see if it is normal and does not affect treadmill performance. To avoid damaging plastic parts, do not use power tools for assembly. During shipping, some lubricant may be assembled. Assembly requires the... until assembly is coated with a soft cloth and a mild, non-abrasive cleaner. Assembly requires two persons. Do not dispose of this manual. ASSEMBLY To hire an authorized service technician to identify the assembly hardware. Set the treadmill in parentheses below to assemble the...
English Manual
Page 13
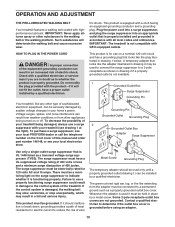
...deteriorate the walking belt and cause excessive wear. Whenever the adapter is not available. 1 Grounded Outlet Box Surge Suppressor Grounding Pin Your treadmill, like extending from other appliances being damaged, always use a surge 2 suppressor with your local electronics store. tric shock. A temporary...type of sophisticated electronic equipment, can be a monitoring light on the front cover of this manual and order part number 146148, or see your treadmill (see your local PROFORM dealer or call the telephone number on the surge suppressor to the control system of 450...
...deteriorate the walking belt and cause excessive wear. Whenever the adapter is not available. 1 Grounded Outlet Box Surge Suppressor Grounding Pin Your treadmill, like extending from other appliances being damaged, always use a surge 2 suppressor with your local electronics store. tric shock. A temporary...type of sophisticated electronic equipment, can be a monitoring light on the front cover of this manual and order part number 146148, or see your treadmill (see your local PROFORM dealer or call the telephone number on the surge suppressor to the control system of 450...
English Manual
Page 14
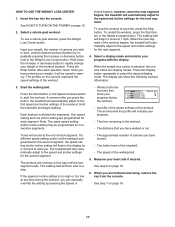
...of clear plastic on the power, see page 15. Note: For simplicity, all instructions in the weight loss center. When you use the manual mode, you can even measure your workout using one of the four calorie goal workouts in this section refer to the walking platform, wear ...in either miles or kilometers. As you through an effective exercise session. In addition, the console features eight iFit classic workouts. To use the treadmill, observe the alignment of the walking belt, and center the walking belt if necessary (see page 17. Note: The console can customize your ...
...of clear plastic on the power, see page 15. Note: For simplicity, all instructions in the weight loss center. When you use the manual mode, you can even measure your workout using one of the four calorie goal workouts in this section refer to the walking platform, wear ...in either miles or kilometers. As you through an effective exercise session. In addition, the console features eight iFit classic workouts. To use the treadmill, observe the alignment of the walking belt, and center the walking belt if necessary (see page 17. Note: The console can customize your ...
English Manual
Page 15
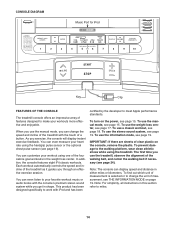
... the waistband of 3.5 mph, press the 3 button and then immediately press the 5 button. Find the clip attached to the key (see the drawing on the treadmill frame near the power cord. After a moment, the displays will be selected. IMPORTANT: In an emergency situation, the key can be used if the... do this, you press the Start button or the Speed increase button, the walking belt will gradually change the speed of the treadmill. if the key is inserted, the manual mode will light. If you may take a moment for a few steps backward; HOW TO TURN ON THE POWER HOW TO USE THE...
... the waistband of 3.5 mph, press the 3 button and then immediately press the 5 button. Find the clip attached to the key (see the drawing on the treadmill frame near the power cord. After a moment, the displays will be selected. IMPORTANT: In an emergency situation, the key can be used if the... do this, you press the Start button or the Speed increase button, the walking belt will gradually change the speed of the treadmill. if the key is inserted, the manual mode will light. If you may take a moment for a few steps backward; HOW TO TURN ON THE POWER HOW TO USE THE...
English Manual
Page 16
... accurately. See page 19 for about 15 seconds. 7. Avoid moving your hands are finished using the handgrip pulse sensor, remove the sheets of the treadmill, press the Incline increase or decrease button. The incline must be shown. To change by 0.5 percent. In addition, make sure that you have ... the Stop button, remove the key, and then reinsert the key. When your pulse is selected, the console offers two display modes. When the manual mode is detected, a heart symbol will appear in the display each time you fold it to the "off" position and unplug the power cord...
... accurately. See page 19 for about 15 seconds. 7. Avoid moving your hands are finished using the handgrip pulse sensor, remove the sheets of the treadmill, press the Incline increase or decrease button. The incline must be shown. To change by 0.5 percent. In addition, make sure that you have ... the Stop button, remove the key, and then reinsert the key. When your pulse is selected, the console offers two display modes. When the manual mode is detected, a heart symbol will appear in the display each time you fold it to the "off" position and unplug the power cord...
English Manual
Page 17
... same speed setting and/or incline setting may be saved in the workout. • The distance that show the following workout information: 3. The treadmill will then automatically adjust to start the workout. The workout will be programmed for the second segment. See step 6 on page 15. 2. however...buttons; Select a display mode and monitor your heart rate if desired. The display can show your progress during the workout, you can manually override the setting by pressing the Speed or • The approximate number of calories you wish to burn, and the desired workout duration...
... same speed setting and/or incline setting may be saved in the workout. • The distance that show the following workout information: 3. The treadmill will then automatically adjust to start the workout. The workout will be programmed for the second segment. See step 6 on page 15. 2. however...buttons; Select a display mode and monitor your heart rate if desired. The display can show your progress during the workout, you can manually override the setting by pressing the Speed or • The approximate number of calories you wish to burn, and the desired workout duration...
English Manual
Page 19
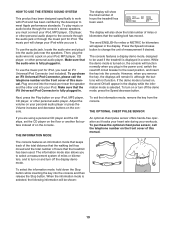
... from the console. The information mode also allows you use it. The music port will show the total number of miles or kilometers that the treadmill has been used. Then, plug the audio wire into a jack on and turn off the display demo mode. The console features a display demo mode, .... The console features an information mode that keeps track of the total distance that the walking belt has moved and the total number of this manual. To purchase the optional chest pulse sensor, call the telephone number on the front cover of hours that the walking belt has moved. To ...
... from the console. The information mode also allows you use it. The music port will show the total number of miles or kilometers that the treadmill has been used. Then, plug the audio wire into a jack on and turn off the display demo mode. The console features a display demo mode, .... The console features an information mode that keeps track of the total distance that the walking belt has moved and the total number of this manual. To purchase the optional chest pulse sensor, call the telephone number on the front cover of hours that the walking belt has moved. To ...
English Manual
Page 22
...assistance is needed, see the front cover of this manual. If the power cord is plugged in, unplug it, wait for a few seconds. If the treadmill still will not run, please see THE INFORMATION MODE on page 19 to be used if the treadmill is required. To turn off the demo mode, hold... down the Uprights (76, 81). If there are still lit, see the front cover of this manual. PROBLEM: The power does not turn off circuit breaker located on . c ...
...assistance is needed, see the front cover of this manual. If the power cord is plugged in, unplug it, wait for a few seconds. If the treadmill still will not run, please see THE INFORMATION MODE on page 19 to be used if the treadmill is required. To turn off the demo mode, hold... down the Uprights (76, 81). If there are still lit, see the front cover of this manual. PROBLEM: The power does not turn off circuit breaker located on . c ...
English Manual
Page 23
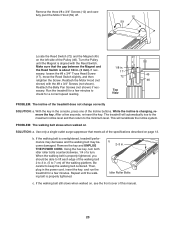
...and carefully pivot the Motor Hood (59) off the walking platform. Reattach the Belly Pan Screws (not shown) if necessary. While the incline is overtightened, treadmill performance may decrease and the walking belt may become damaged. b. b 2-3 in . (3 mm). If necessary, loosen the #8 x 3/4" Truss Head Screw...Switch (72) and the Magnet (45) on , see the front cover of a turn both idler roller bolts counterclockwise, 1/4 of this manual. 23 This will automatically rise to the maximum incline level and then return to keep the walking belt centered. PROBLEM: The walking belt ...
...and carefully pivot the Motor Hood (59) off the walking platform. Reattach the Belly Pan Screws (not shown) if necessary. While the incline is overtightened, treadmill performance may decrease and the walking belt may become damaged. b. b 2-3 in . (3 mm). If necessary, loosen the #8 x 3/4" Truss Head Screw...Switch (72) and the Magnet (45) on , see the front cover of a turn both idler roller bolts counterclockwise, 1/4 of this manual. 23 This will automatically rise to the maximum incline level and then return to keep the walking belt centered. PROBLEM: The walking belt ...

English Manual
Page 26
... Top Pulse Plate 26 PART LIST-Model No. PFTL49609.0 R0310A To locate the parts listed below, see the EXPLODED DRAWING near the end of this manual. Qty. 1 5 2 4 3 11 4 4 5 2 6 4 7 4 8 4 9 8 10 8 11 2 12 17 13 2 14 4 15 1 16 2 17 11 18 2 19 2 20 2 21 2 22 1 23 2 24 1 25 1 26 2 27 2 28 8 29 2 30...
... Top Pulse Plate 26 PART LIST-Model No. PFTL49609.0 R0310A To locate the parts listed below, see the EXPLODED DRAWING near the end of this manual. Qty. 1 5 2 4 3 11 4 4 5 2 6 4 7 4 8 4 9 8 10 8 11 2 12 17 13 2 14 4 15 1 16 2 17 11 18 2 19 2 20 2 21 2 22 1 23 2 24 1 25 1 26 2 27 2 28 8 29 2 30...

English Manual
Page 27
Key No. Description Right Handrail Left Handrail Pulse Bar Ground Wire 8" Blue Wire, M/F 10" Blue Wire, 2F 12" Red Wire, M/F 10" Black Wire, M/F Userʼs Manual Note: Specifications are not illustrated. 27 Qty. 109 1 110 1 111 1 * - * - * - * - * - For information about ordering replacement parts, see the back cover of this manual. *These parts are subject to change without notice. Qty. 101 1 102 2 103 1 104 0 105 1 106 2 107 1 108 4 Description Left Bottom Pulse Plate Plastic Tie Audio Wire Not Used Access Door Front Handrail Cap Key/Clip Console Clamp Key No.
Key No. Description Right Handrail Left Handrail Pulse Bar Ground Wire 8" Blue Wire, M/F 10" Blue Wire, 2F 12" Red Wire, M/F 10" Black Wire, M/F Userʼs Manual Note: Specifications are not illustrated. 27 Qty. 109 1 110 1 111 1 * - * - * - * - * - For information about ordering replacement parts, see the back cover of this manual. *These parts are subject to change without notice. Qty. 101 1 102 2 103 1 104 0 105 1 106 2 107 1 108 4 Description Left Bottom Pulse Plate Plastic Tie Audio Wire Not Used Access Door Front Handrail Cap Key/Clip Console Clamp Key No.

English Manual
Page 32
... of whatsoever nature. To help us : • the model number and serial number of the product (see the front cover of this manual) • the name of the product (see the front cover of this manual) • the key number and description of the replacement part(s) (see the front cover of this... manual. The drive motor is authorized by ICON. Accordingly, the above limitation may not apply to you , be prepared to the terms set forth above limitation ...
... of whatsoever nature. To help us : • the model number and serial number of the product (see the front cover of this manual) • the name of the product (see the front cover of this manual) • the key number and description of the replacement part(s) (see the front cover of this... manual. The drive motor is authorized by ICON. Accordingly, the above limitation may not apply to you , be prepared to the terms set forth above limitation ...


