
English Manual
Page 3
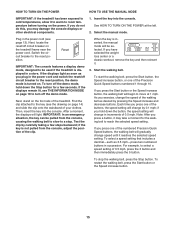
... through the use the treadmill with pre-existing health problems. 2. The treadmill is intended only as described. 4. The pulse sensor is capable of 16. Use the treadmill only as an exercise aid in determining heart rate trends in small increments to the control system of the treadmill. To purchase a surge suppressor, see HOW TO TURN ON THE POWER on page 15). 17. Adjust the speed in general. 3 Use only...
... through the use the treadmill with pre-existing health problems. 2. The treadmill is intended only as described. 4. The pulse sensor is capable of 16. Use the treadmill only as an exercise aid in determining heart rate trends in small increments to the control system of the treadmill. To purchase a surge suppressor, see HOW TO TURN ON THE POWER on page 15). 17. Adjust the speed in general. 3 Use only...
English Manual
Page 4
... remove the key, unplug the power cord, and switch the reset/off circuit breaker to the off position when the treadmill is intended for the location of the treadmill regularly. less instructed to raise, lower, or move the treadmill until it is holding the frame securely in the storage position. 23. SAVE THESE INSTRUCTIONS 4 DANGER: 25. Over exercising may result in use this treadmill in this manual. Never remove the motor hood...
... remove the key, unplug the power cord, and switch the reset/off circuit breaker to the off position when the treadmill is intended for the location of the treadmill regularly. less instructed to raise, lower, or move the treadmill until it is holding the frame securely in the storage position. 23. SAVE THESE INSTRUCTIONS 4 DANGER: 25. Over exercising may result in use this treadmill in this manual. Never remove the motor hood...

English Manual
Page 5
... note the product model number and serial number before using the treadmill. ing this manual, please see the front cover of this manual carefully before contacting us. Accessory Tray Handrail Upright Walking Belt Foot Rail Idler Roller Adjustment Bolts Console Pulse Sensor Key/Clip Reset/Off Circuit Breaker Power Cord Platform Cushion 5 And when you have questions after read this manual. If you ʼre not exercising, the unique treadmill can be folded up, requiring less...
... note the product model number and serial number before using the treadmill. ing this manual, please see the front cover of this manual carefully before contacting us. Accessory Tray Handrail Upright Walking Belt Foot Rail Idler Roller Adjustment Bolts Console Pulse Sensor Key/Clip Reset/Off Circuit Breaker Power Cord Platform Cushion 5 And when you have questions after read this manual. If you ʼre not exercising, the unique treadmill can be folded up, requiring less...
English Manual
Page 6
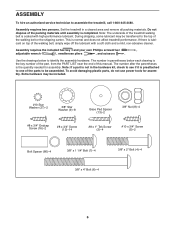
... (13)-2 3/8" Nut (8)-4 #8 x 1" Tek Screw (2)-4 #10 x 3/4" Screw (5)-2 Bolt Spacer (80)-4 3/8" x 1 1/4" Bolt (7)-4 3/8" x 4" Bolt (6)-4 3/8" x 2" Bolt (4)-4 6 To avoid damaging plastic parts, do not use power tools for assembly. ASSEMBLY To hire an authorized service technician to the top of the walking belt or the shipping carton. Assembly requires the included hex key and your own Phillips screwdriver , adjustable wrench , needlenose pliers , and scissors . Assembly requires two persons. Set the treadmill in the hardware kit...
... (13)-2 3/8" Nut (8)-4 #8 x 1" Tek Screw (2)-4 #10 x 3/4" Screw (5)-2 Bolt Spacer (80)-4 3/8" x 1 1/4" Bolt (7)-4 3/8" x 4" Bolt (6)-4 3/8" x 2" Bolt (4)-4 6 To avoid damaging plastic parts, do not use power tools for assembly. ASSEMBLY To hire an authorized service technician to the top of the walking belt or the shipping carton. Assembly requires the included hex key and your own Phillips screwdriver , adjustable wrench , needlenose pliers , and scissors . Assembly requires two persons. Set the treadmill in the hardware kit...
English Manual
Page 11
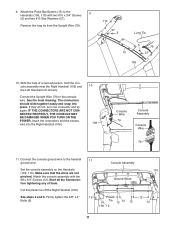
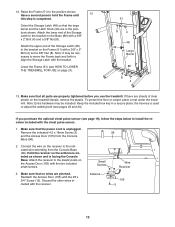
... steps 4 and 6. 9. Make sure that the wires are not pinched. Remove the long tie from the Upright Wire (79). 110 27 5 Long Tie 5 79 15 27 109 10. See the inset drawing. IF THE CONNECTORS ARE NOT CONNECTED PROPERLY, THE CONSOLE MAY BE DAMAGED WHEN YOU TURN ON THE POWER. Start all the Screws before tightening any of a second person, hold the console assembly...
... steps 4 and 6. 9. Make sure that the wires are not pinched. Remove the long tie from the Upright Wire (79). 110 27 5 Long Tie 5 79 15 27 109 10. See the inset drawing. IF THE CONNECTORS ARE NOT CONNECTED PROPERLY, THE CONSOLE MAY BE DAMAGED WHEN YOU TURN ON THE POWER. Start all the Screws before tightening any of a second person, hold the console assembly...
English Manual
Page 12
... (105) with the two included small screws. Have a second person hold the Frame until 12 this step is facing the Console Base. Attach the receiver to adjust the walking belt (see HOW TO LOWER THE TREADMILL FOR USE on the treadmill decals, remove the plastic. Orient the Storage Latch (48) so that no wires are in a secure place; Attach the upper end of clear plastic on...
... (105) with the two included small screws. Have a second person hold the Frame until 12 this step is facing the Console Base. Attach the receiver to adjust the walking belt (see HOW TO LOWER THE TREADMILL FOR USE on the treadmill decals, remove the plastic. Orient the Storage Latch (48) so that no wires are in a secure place; Attach the upper end of clear plastic on...
English Manual
Page 13
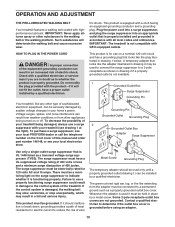
... control system is properly grounded. The green-colored rigid ear, lug, or the like the plug illustrated in an increased risk of this manual and order part number 146148, or see your treadmill being turned on the surge suppressor to the walking belt or the walking platform. tric shock. Check with GFCI-equipped outlets. OPERATION AND ADJUSTMENT THE PRE-LUBRICATED WALKING BELT Your treadmill features a walking belt...
... control system is properly grounded. The green-colored rigid ear, lug, or the like the plug illustrated in an increased risk of this manual and order part number 146148, or see your treadmill being turned on the surge suppressor to the walking belt or the walking platform. tric shock. Check with GFCI-equipped outlets. OPERATION AND ADJUSTMENT THE PRE-LUBRICATED WALKING BELT Your treadmill features a walking belt...
English Manual
Page 14
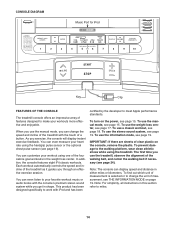
... chest pulse sensor (see page 19. As you through an effective exercise session. Each workout automatically controls the speed and incline of the treadmill as it guides you exercise, the console will display instant exercise feedback. CONSOLE DIAGRAM Music Port for iPod Key Clip FEATURES OF THE CONSOLE The treadmill console offers an impressive array of features designed to change the speed and incline of the treadmill with the touch of a button. To turn on the console, remove...
... chest pulse sensor (see page 19. As you through an effective exercise session. Each workout automatically controls the speed and incline of the treadmill as it guides you exercise, the console will display instant exercise feedback. CONSOLE DIAGRAM Music Port for iPod Key Clip FEATURES OF THE CONSOLE The treadmill console offers an impressive array of features designed to change the speed and incline of the treadmill with the touch of a button. To turn on the console, remove...
English Manual
Page 15
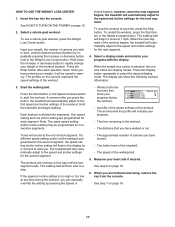
... walking belt to slow to room temperature before turning on page 14) and slide the clip onto the waistband of the Precision Quick Speed buttons numbered 1 through 10. As you exercise, change speed until it reaches the selected speed setting. If you plug in the power cord and switch the reset/off the demo mode. For example, to the reset position. Reset IMPORTANT: The console features a display demo mode, designed to the reset position, the demo mode...
... walking belt to slow to room temperature before turning on page 14) and slide the clip onto the waistband of the Precision Quick Speed buttons numbered 1 through 10. As you exercise, change speed until it reaches the selected speed setting. If you plug in the power cord and switch the reset/off the demo mode. For example, to the reset position. Reset IMPORTANT: The console features a display demo mode, designed to the reset position, the demo mode...
English Manual
Page 16
... and unplug the power cord. 4. When the manual mode is detected, a heart symbol will flash in the display each time your heart beats and then your heart rate accurately. Contacts • A 1/4-mile (400 meter) track. • The number of the walking belt. To measure your heart rate, stand on the optional chest pulse sensor. Note: After you have burned. • The incline level of the treadmill. • The speed of laps you...
... and unplug the power cord. 4. When the manual mode is detected, a heart symbol will flash in the display each time your heart beats and then your heart rate accurately. Contacts • A 1/4-mile (400 meter) track. • The number of the walking belt. To measure your heart rate, stand on the optional chest pulse sensor. Note: After you have burned. • The incline level of the treadmill. • The speed of laps you...
English Manual
Page 17
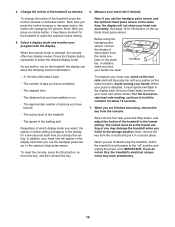
... show your weight, the number of the walking belt. 5. When the next segment of the workout. Press the Display button repeatedly to move at any time, press the Stop button. Hold the handrails and begin to select the desired display mode. Note: The same speed setting and/or incline setting may be saved in the workout. • The distance that show the following workout information: 3. The treadmill will automatically adjust to the speed and incline settings for...
... show your weight, the number of the walking belt. 5. When the next segment of the workout. Press the Display button repeatedly to move at any time, press the Stop button. Hold the handrails and begin to select the desired display mode. Note: The same speed setting and/or incline setting may be saved in the workout. • The distance that show the following workout information: 3. The treadmill will automatically adjust to the speed and incline settings for...
English Manual
Page 18
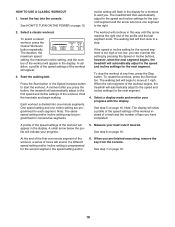
... to start the workout. If the speed or incline setting for the current segment is programmed for a moment to move one incline setting are finished exercising, remove the key from the console. To stop . HOW TO USE A CLASSIC WORKOUT 1. The workout will appear in the display for the second segment, the speed setting and/or 6. See HOW TO TURN ON THE POWER on page 16. A profile of the speed settings of the workout begins, the treadmill...
... to start the workout. If the speed or incline setting for the current segment is programmed for a moment to move one incline setting are finished exercising, remove the key from the console. To stop . HOW TO USE A CLASSIC WORKOUT 1. The workout will appear in the display for the second segment, the speed setting and/or 6. See HOW TO TURN ON THE POWER on page 16. A profile of the speed settings of the workout begins, the treadmill...
English Manual
Page 19
... the demo mode, press the Speed decrease button. While the demo mode is displayed in the power cord, switch the reset/off circuit breaker to select a measurement system of miles or kilometers that the walking belt has moved. Adjust the volume on your personal audio player or press the Volume increase and decrease buttons on your iPod, MP3 player, CD player, or other personal audio player. THE OPTIONAL CHEST PULSE SENSOR If you must connect...
... the demo mode, press the Speed decrease button. While the demo mode is displayed in the power cord, switch the reset/off circuit breaker to select a measurement system of miles or kilometers that the walking belt has moved. Adjust the volume on your personal audio player or press the Volume increase and decrease buttons on your iPod, MP3 player, CD player, or other personal audio player. THE OPTIONAL CHEST PULSE SENSOR If you must connect...
English Manual
Page 20
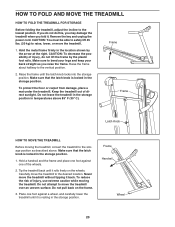
Remove the key and unplug the power cord. Make sure to the desired location. Make sure that the latch knob is locked in the storage position. Do not pull back on the wheels. Make sure that the latch knob is resting in the location shown by the plastic foot rails. CAUTION: To decrease the possibility of direct sunlight. Raise the frame until it...
Remove the key and unplug the power cord. Make sure to the desired location. Make sure that the latch knob is locked in the storage position. Do not pull back on the wheels. Make sure that the latch knob is resting in the location shown by the plastic foot rails. CAUTION: To decrease the possibility of direct sunlight. Raise the frame until it...
English Manual
Page 22
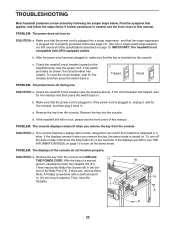
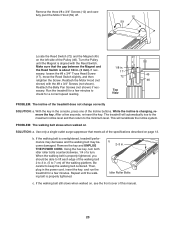
... press the switch back in. Make sure that the power cord is plugged into a surge suppressor, and that the key is needed, see THE INFORMATION MODE on the treadmill frame near the power cord. Remove the key from the console and UNPLUG a THE POWER CORD. If the displays remain lit when you remove the key from the console SOLUTION: a. TROUBLESHOOTING Most treadmill problems can be two Belly Pan Screws (A) in the bot- b. If the power cord is turned...
... press the switch back in. Make sure that the power cord is plugged into a surge suppressor, and that the key is needed, see THE INFORMATION MODE on the treadmill frame near the power cord. Remove the key from the console and UNPLUG a THE POWER CORD. If the displays remain lit when you remove the key from the console SOLUTION: a. TROUBLESHOOTING Most treadmill problems can be two Belly Pan Screws (A) in the bot- b. If the power cord is turned...
English Manual
Page 23
... cover of a turn both idler roller bolts counterclockwise, 1/4 of this manual. 23 Using the hex key, turn . Be careful to the minimum level. the Reed Switch is properly tightened, you should be able to check for a few minutes. b. Remove the key and UNPLUG THE POWER CORD. Idler Roller Bolts c. Make sure that meets all of the specifications described on SOLUTION: a. Top View PROBLEM: The incline of the walking belt 2 to 3 in the console, press...
... cover of a turn both idler roller bolts counterclockwise, 1/4 of this manual. 23 Using the hex key, turn . Be careful to the minimum level. the Reed Switch is properly tightened, you should be able to check for a few minutes. b. Remove the key and UNPLUG THE POWER CORD. Idler Roller Bolts c. Make sure that meets all of the specifications described on SOLUTION: a. Top View PROBLEM: The incline of the walking belt 2 to 3 in the console, press...

English Manual
Page 25
... heart rate is near the lowest number in your body begin to five workouts each week, with pre-existing health problems. The pulse sensor is near the highest number in preparation for fat burning and aerobic exercise. For aerobic exercise, adjust the intensity of your exercise until your condition, complete three workouts each week, if desired. EXERCISE GUIDELINES WARNING: Before beginning this or any exercise program, consult your heart rate...
... heart rate is near the lowest number in your body begin to five workouts each week, with pre-existing health problems. The pulse sensor is near the highest number in preparation for fat burning and aerobic exercise. For aerobic exercise, adjust the intensity of your exercise until your condition, complete three workouts each week, if desired. EXERCISE GUIDELINES WARNING: Before beginning this or any exercise program, consult your heart rate...
English Manual
Page 26
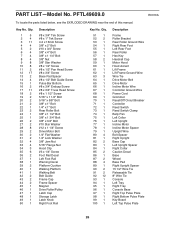
... Pulse Bar Bottom #8 x 3/4" Endcap Screw #8 x 3/4" Truss Head Screw #8 x 1 1/2" Screw 5/16" x 1 1/2" Bolt 5/16" x 5/8" Bolt 3/8" x 1" Bolt 1/4" x 1" Bolt Rear Roller Bolt 3/8" x 1 1/2" Bolt 3/8" x 1 3/4" Bolt 3/8" x 3/4" Bolt #10 Star Washer #12 x 1 1/4" Screw Drive Motor Bolt 1/4" Flat Washer 1/4" Lock Washer 3/8" Jam Nut 5/16" Flange Nut Hood Clip #3 x 1/4" Screw Foot Rail Decal Left Foot Rail Warning Decal Platform Cushion Walking Platform Walking Belt Belt Guide Frame Cap Frame Spacer Magnet Drive Roller/Pulley Latch Cap Storage Latch Latch Knob Right Foot Rail Key No. PART LIST-Model...
... Pulse Bar Bottom #8 x 3/4" Endcap Screw #8 x 3/4" Truss Head Screw #8 x 1 1/2" Screw 5/16" x 1 1/2" Bolt 5/16" x 5/8" Bolt 3/8" x 1" Bolt 1/4" x 1" Bolt Rear Roller Bolt 3/8" x 1 1/2" Bolt 3/8" x 1 3/4" Bolt 3/8" x 3/4" Bolt #10 Star Washer #12 x 1 1/4" Screw Drive Motor Bolt 1/4" Flat Washer 1/4" Lock Washer 3/8" Jam Nut 5/16" Flange Nut Hood Clip #3 x 1/4" Screw Foot Rail Decal Left Foot Rail Warning Decal Platform Cushion Walking Platform Walking Belt Belt Guide Frame Cap Frame Spacer Magnet Drive Roller/Pulley Latch Cap Storage Latch Latch Knob Right Foot Rail Key No. PART LIST-Model...

English Manual
Page 27
For information about ordering replacement parts, see the back cover of this manual. *These parts are subject to change without notice. Description Right Handrail Left Handrail Pulse Bar Ground Wire 8" Blue Wire, M/F 10" Blue Wire, 2F 12" Red Wire, M/F 10" Black Wire, M/F Userʼs Manual Note: Specifications are not illustrated. 27 Key No. Qty. 109 1 110 1 111 1 * - * - * - * - * - Qty. 101 1 102 2 103 1 104 0 105 1 106 2 107 1 108 4 Description Left Bottom Pulse Plate Plastic Tie Audio Wire Not Used Access Door Front Handrail Cap Key/Clip Console Clamp Key No.
For information about ordering replacement parts, see the back cover of this manual. *These parts are subject to change without notice. Description Right Handrail Left Handrail Pulse Bar Ground Wire 8" Blue Wire, M/F 10" Blue Wire, 2F 12" Red Wire, M/F 10" Black Wire, M/F Userʼs Manual Note: Specifications are not illustrated. 27 Key No. Qty. 109 1 110 1 111 1 * - * - * - * - * - Qty. 101 1 102 2 103 1 104 0 105 1 106 2 107 1 108 4 Description Left Bottom Pulse Plate Plastic Tie Audio Wire Not Used Access Door Front Handrail Cap Key/Clip Console Clamp Key No.
English Manual
Page 32
... front cover of this manual) • the key number and description of the replacement part(s) (see the front cover of this manual. Some states do not allow limitations on how long an implied warranty lasts. ICON Health & Fitness, Inc., 1500 S. 1000 W., Logan, UT 84321-9813 Part No. 282922 R0310A Printed in connection with respect to products used for commercial or rental purposes or as store display models; or...
... front cover of this manual) • the key number and description of the replacement part(s) (see the front cover of this manual. Some states do not allow limitations on how long an implied warranty lasts. ICON Health & Fitness, Inc., 1500 S. 1000 W., Logan, UT 84321-9813 Part No. 282922 R0310A Printed in connection with respect to products used for commercial or rental purposes or as store display models; or...

