
English Manual
Page 1
....proformservice.com CAUTION Read all precautions and instructions in the space above ) before using this manual for reference. PFEL03907.1 Serial No. please contact Customer Care. MST Sat. 8 a.m.-4 p.m. Keep this equipment. USER'S MANUAL Visit our website at www.proform.com new products, prizes, fitness tips, and much more! As a manufacturer, we are damaged or...
....proformservice.com CAUTION Read all precautions and instructions in the space above ) before using this manual for reference. PFEL03907.1 Serial No. please contact Customer Care. MST Sat. 8 a.m.-4 p.m. Keep this equipment. USER'S MANUAL Visit our website at www.proform.com new products, prizes, fitness tips, and much more! As a manufacturer, we are damaged or...
English Manual
Page 2
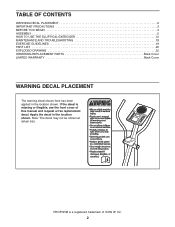
TABLE OF CONTENTS WARNING DECAL PLACEMENT 2 IMPORTANT PRECAUTIONS 3 BEFORE YOU BEGIN 4 ASSEMBLY 5 HOW TO USE THE ELLIPTICAL EXERCISER 12 MAINTENANCE AND TROUBLESHOOTING 18 EXERCISE GUIDELINES 19 PART LIST 20 EXPLODED DRAWING 22 ORDERING REPLACEMENT PARTS Back Cover LIMITED WARRANTY Back Cover ...WARNING DECAL PLACEMENT The warning decal shown here has been applied in the location shown. Note: The decal may not be shown at actual size. PROFORM is missing or illegible, see the front cover of ICON IP, Inc. 2 Apply the decal in the location shown. If the decal is a registered ...
TABLE OF CONTENTS WARNING DECAL PLACEMENT 2 IMPORTANT PRECAUTIONS 3 BEFORE YOU BEGIN 4 ASSEMBLY 5 HOW TO USE THE ELLIPTICAL EXERCISER 12 MAINTENANCE AND TROUBLESHOOTING 18 EXERCISE GUIDELINES 19 PART LIST 20 EXPLODED DRAWING 22 ORDERING REPLACEMENT PARTS Back Cover LIMITED WARRANTY Back Cover ...WARNING DECAL PLACEMENT The warning decal shown here has been applied in the location shown. Note: The decal may not be shown at actual size. PROFORM is missing or illegible, see the front cover of ICON IP, Inc. 2 Apply the decal in the location shown. If the decal is a registered ...
English Manual
Page 3
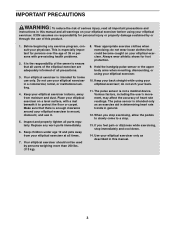
... only as an exercise aid in determining heart rate trends in this product. 1. Do not use of this manual and all warnings on your elliptical exerciser; The pulse sensor is intended for foot protection. 9. If you stop immediately and cool down. 14. IMPORTANT PRECAUTIONS...Various factors, including the user's movement, may affect the accuracy of the owner to mount, dismount, and use only. Place your elliptical exerciser in this manual. 3 Inspect and properly tighten all times. 7. The pulse sensor is the responsibility of heart rate readings. Keep children under age ...
... only as an exercise aid in determining heart rate trends in this product. 1. Do not use of this manual and all warnings on your elliptical exerciser; The pulse sensor is intended for foot protection. 9. If you stop immediately and cool down. 14. IMPORTANT PRECAUTIONS...Various factors, including the user's movement, may affect the accuracy of the owner to mount, dismount, and use only. Place your elliptical exerciser in this manual. 3 Inspect and properly tighten all times. 7. The pulse sensor is the responsibility of heart rate readings. Keep children under age ...

English Manual
Page 4
.../registration. tacting us assist you, note the product model number and serial number before you use the elliptical exerciser. The 450 elliptical exerciser provides a wide array of the serial number decal are labeled in the drawing below. To help...manual. If you have questions after reading this manual, please see the back cover of this manual. BEFORE YOU BEGIN Thank you for any service needed under warranty, you must register the elliptical exerciser at home more effective and enjoyable. To avoid a registration fee for purchasing the revolutionary PROFORM® 450 elliptical...
.../registration. tacting us assist you, note the product model number and serial number before you use the elliptical exerciser. The 450 elliptical exerciser provides a wide array of the serial number decal are labeled in the drawing below. To help...manual. If you have questions after reading this manual, please see the back cover of this manual. BEFORE YOU BEGIN Thank you for any service needed under warranty, you must register the elliptical exerciser at home more effective and enjoyable. To avoid a registration fee for purchasing the revolutionary PROFORM® 450 elliptical...
English Manual
Page 5
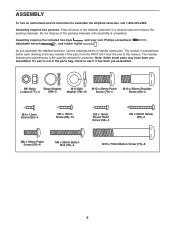
... The number following the parentheses is the key number of the part, from the PART LIST near the end of this manual. The number in parentheses below to assemble the elliptical exerciser, call 1-800-445-2480. M6 Nylon Wave Washer M10 Split M10 x 20mm Patch Locknut (77)-4 (88)-2 ...x 36mm Button Bolt (76)-4 M10 x 70mm Button Screw (75)-6 5 Assembly requires two persons. If a part is completed. Do not dispose of the elliptical exerciser in the parts bag, check to see if it has been pre-assembled. Note: Some small parts may have been preassembled. ASSEMBLY To hire...
... The number following the parentheses is the key number of the part, from the PART LIST near the end of this manual. The number in parentheses below to assemble the elliptical exerciser, call 1-800-445-2480. M6 Nylon Wave Washer M10 Split M10 x 20mm Patch Locknut (77)-4 (88)-2 ...x 36mm Button Bolt (76)-4 M10 x 70mm Button Screw (75)-6 5 Assembly requires two persons. If a part is completed. Do not dispose of the elliptical exerciser in the parts bag, check to see if it has been pre-assembled. Note: Some small parts may have been preassembled. ASSEMBLY To hire...
English Manual
Page 8
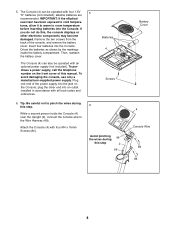
...reattach the battery cover. To avoid damaging the console, use only a manufacturer-supplied power supply. If you do not do this manual. plug the other electronic components may become damaged. Attach the Console (4) with all local codes and ordinances. Insert four batteries ...into the Console. Batteries 4 Screws 6. Tip: Be careful not to room temperature before inserting batteries into the Console. IMPORTANT: If the elliptical exerciser has been exposed to the Wire Harness (49). The Console (4) can be operated with four 1.5V 5 "D" batteries (not included...
...reattach the battery cover. To avoid damaging the console, use only a manufacturer-supplied power supply. If you do not do this manual. plug the other electronic components may become damaged. Attach the Console (4) with all local codes and ordinances. Insert four batteries ...into the Console. Batteries 4 Screws 6. Tip: Be careful not to room temperature before inserting batteries into the Console. IMPORTANT: If the elliptical exerciser has been exposed to the Wire Harness (49). The Console (4) can be operated with four 1.5V 5 "D" batteries (not included...

English Manual
Page 14
... of the console, you through an effective workout. The console also offers six preset workouts. To use the manual mode of the console, follow the steps beginning on page 15. To use a preset workout, see page 17. 14 CONSOLE DIAGRAM FEATURES OF THE CONSOLE ...
... of the console, you through an effective workout. The console also offers six preset workouts. To use the manual mode of the console, follow the steps beginning on page 15. To use a preset workout, see page 17. 14 CONSOLE DIAGRAM FEATURES OF THE CONSOLE ...

English Manual
Page 15
...you turn on the console, the display will light and the console will be selected. If you have pedaled. HOW TO USE THE MANUAL MODE 4. Begin pedaling and change the resistance of the pedals by pressing the Workout Select button repeatedly until the priority display shows the...pedaling speed, or the approximate number of calories you pedal, change the resistance of revolutions) that you have selected a workout, reselect the manual mode by pressing the increase and decrease buttons. The priority display can show the elapsed time, the distance that you have pedaled, your ...
...you turn on the console, the display will light and the console will be selected. If you have pedaled. HOW TO USE THE MANUAL MODE 4. Begin pedaling and change the resistance of the pedals by pressing the Workout Select button repeatedly until the priority display shows the...pedaling speed, or the approximate number of calories you pedal, change the resistance of revolutions) that you have selected a workout, reselect the manual mode by pressing the increase and decrease buttons. The priority display can show the elapsed time, the distance that you have pedaled, your ...
English Manual
Page 17
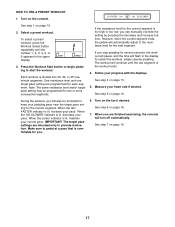
... motivation. However, when the current segment ends, the pedals will automatically adjust to pedal at a pace that is too high or too low, you can manually override the setting by pressing the decrease and increase buttons. During the workout, you are intended only to start the workout. See step 6 on page...
... motivation. However, when the current segment ends, the pedals will automatically adjust to pedal at a pace that is too high or too low, you can manually override the setting by pressing the decrease and increase buttons. During the workout, you are intended only to start the workout. See step 6 on page...
English Manual
Page 21
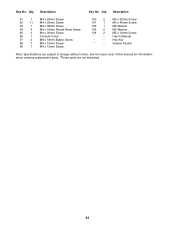
... 2 M8 x 18mm Button Screw 98 7 M5 x 15mm Screw 99 7 M4 x 12mm Screw 100 2 101 1 102 1 103 2 104 2 * - * - * - Key No. See the back cover of this manual for information about ordering replacement parts. *These parts are subject to change without notice. M5 x 20mm Screw M4 x 45mm Screw M6 Washer M5 Washer M5...
... 2 M8 x 18mm Button Screw 98 7 M5 x 15mm Screw 99 7 M4 x 12mm Screw 100 2 101 1 102 1 103 2 104 2 * - * - * - Key No. See the back cover of this manual for information about ordering replacement parts. *These parts are subject to change without notice. M5 x 20mm Screw M4 x 45mm Screw M6 Washer M5 Washer M5...
English Manual
Page 24
... please see the PART LIST and the EXPLODED DRAWING near the end of this manual) LIMITED WARRANTY ICON Health & Fitness, Inc. (ICON) warrants this product to be free from defects ...in workmanship and material, under this manual. ICON's obligation under normal use , costs of enjoyment or use and service conditions, for ...number and serial number of the product (see the front cover of this manual) • the name of the product (see the front cover of this manual) • the key number and description of the replacement part(s) (see...
... please see the PART LIST and the EXPLODED DRAWING near the end of this manual) LIMITED WARRANTY ICON Health & Fitness, Inc. (ICON) warrants this product to be free from defects ...in workmanship and material, under this manual. ICON's obligation under normal use , costs of enjoyment or use and service conditions, for ...number and serial number of the product (see the front cover of this manual) • the name of the product (see the front cover of this manual) • the key number and description of the replacement part(s) (see...


