
English Manual
Page 1
... CONTACT THE STORE; USER'S MANUAL Visit our website at www.proform.com new products, prizes, fitness tips, and much more! PFEL03907.1 Serial No. MST ON THE WEB: www.proformservice.com CAUTION Read all precautions and instructions in the space above ) before using this manual for reference. MST Sat. 8 a.m.-4 p.m. Model No. If you have questions, or if parts are committed to providing...
... CONTACT THE STORE; USER'S MANUAL Visit our website at www.proform.com new products, prizes, fitness tips, and much more! PFEL03907.1 Serial No. MST ON THE WEB: www.proformservice.com CAUTION Read all precautions and instructions in the space above ) before using this manual for reference. MST Sat. 8 a.m.-4 p.m. Model No. If you have questions, or if parts are committed to providing...
English Manual
Page 2
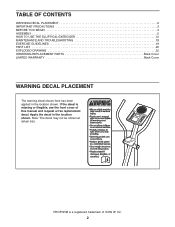
... 4 ASSEMBLY 5 HOW TO USE THE ELLIPTICAL EXERCISER 12 MAINTENANCE AND TROUBLESHOOTING 18 EXERCISE GUIDELINES 19 PART LIST 20 EXPLODED DRAWING 22 ORDERING REPLACEMENT PARTS Back Cover LIMITED WARRANTY Back Cover WARNING DECAL PLACEMENT The warning decal shown here has been applied in the location shown. PROFORM is missing or illegible, see the front cover of ICON IP, Inc. 2 If the decal is a registered trademark of this manual and request a free replacement decal...
... 4 ASSEMBLY 5 HOW TO USE THE ELLIPTICAL EXERCISER 12 MAINTENANCE AND TROUBLESHOOTING 18 EXERCISE GUIDELINES 19 PART LIST 20 EXPLODED DRAWING 22 ORDERING REPLACEMENT PARTS Back Cover LIMITED WARRANTY Back Cover WARNING DECAL PLACEMENT The warning decal shown here has been applied in the location shown. PROFORM is missing or illegible, see the front cover of ICON IP, Inc. 2 If the decal is a registered trademark of this manual and request a free replacement decal...
English Manual
Page 3
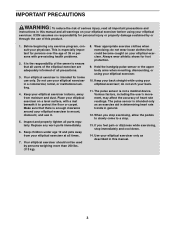
... worn parts immediately. 6. Your elliptical exerciser is the responsibility of the owner to mount, dismount, and use only. Place your elliptical exerciser on your elliptical exerciser in general. 12. Wear appropriate exercise clothes when exercising; Replace any exercise program, consult your elliptical exerciser; Do not use of this manual. 3 The pulse sensor is not a medical device. do not arch your elliptical exerciser. 10. When you feel pain or dizziness while exercising, stop . 13. ICON assumes...
... worn parts immediately. 6. Your elliptical exerciser is the responsibility of the owner to mount, dismount, and use only. Place your elliptical exerciser on your elliptical exerciser in general. 12. Wear appropriate exercise clothes when exercising; Replace any exercise program, consult your elliptical exerciser; Do not use of this manual. 3 The pulse sensor is not a medical device. do not arch your elliptical exerciser. 10. When you feel pain or dizziness while exercising, stop . 13. ICON assumes...

English Manual
Page 4
... the parts that are shown on the front cover of this manual. BEFORE YOU BEGIN Thank you for any service needed under warranty, you must register the elliptical exerciser at home more effective and enjoyable. The 450 elliptical exerciser provides a wide array of features designed to make your benefit, read this manual carefully before con- Upper Body Arm Fan Console Pulse Sensor Water Bottle Holder* Pedal Disc Wheel Pedal Adjustment Knob *No...
... the parts that are shown on the front cover of this manual. BEFORE YOU BEGIN Thank you for any service needed under warranty, you must register the elliptical exerciser at home more effective and enjoyable. The 450 elliptical exerciser provides a wide array of features designed to make your benefit, read this manual carefully before con- Upper Body Arm Fan Console Pulse Sensor Water Bottle Holder* Pedal Disc Wheel Pedal Adjustment Knob *No...
English Manual
Page 5
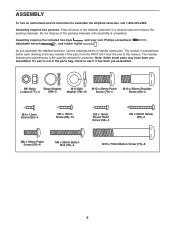
If a part is the key number of the part, from the PART LIST near the end of this manual. Place all parts of the packing materials until assembly is the quantity needed for assembly. M6 Nylon Wave Washer M10 Split M10 x 20mm Patch Locknut (77)-4 (88)-2 Washer (78)-10 Screw (79)-4 M10 x 35mm Shoulder Screw (63)-2 M4 x 12mm Screw (99)-4 M4 x 16mm Screw (84)-10 M4...
If a part is the key number of the part, from the PART LIST near the end of this manual. Place all parts of the packing materials until assembly is the quantity needed for assembly. M6 Nylon Wave Washer M10 Split M10 x 20mm Patch Locknut (77)-4 (88)-2 Washer (78)-10 Screw (79)-4 M10 x 35mm Shoulder Screw (63)-2 M4 x 12mm Screw (99)-4 M4 x 16mm Screw (84)-10 M4...

English Manual
Page 6
Repeat this step to the Frame with two M4 x 16mm Screws (84). 1. While another person lifts the rear of the Frame (1) with an M10 x 35mm Shoulder Screw (63). 2 63 50 Repeat this step to attach the other Wheel (50). 48 1 84 1 50 63 6 Attach a Wheel (50) to the front of the Frame (1), attach a Frame Cover (48) to attach the other Frame Cover (48). 48 84 2. To make assembly easier, read the 1 information on page 5 before you begin assembling the elliptical exerciser.
Repeat this step to the Frame with two M4 x 16mm Screws (84). 1. While another person lifts the rear of the Frame (1) with an M10 x 35mm Shoulder Screw (63). 2 63 50 Repeat this step to attach the other Wheel (50). 48 1 84 1 50 63 6 Attach a Wheel (50) to the front of the Frame (1), attach a Frame Cover (48) to attach the other Frame Cover (48). 48 84 2. To make assembly easier, read the 1 information on page 5 before you begin assembling the elliptical exerciser.

English Manual
Page 7
... pinching the Wire Harness (49) during this step 99 95 7 Attach the Upright (2) to the Wire Harness (49). Slide the Console Cover (96) onto the Upright (2) and move it onto the Upright (2). Tie the lower end of the elliptical exerciser before tightening the other two Patch Screws. 2 79 78 49 1 Wire Tie Avoid pinching the Wire Harness (49) during this step 78 79 78 79 4. 3. Attach the Water Bottle...
... pinching the Wire Harness (49) during this step 99 95 7 Attach the Upright (2) to the Wire Harness (49). Slide the Console Cover (96) onto the Upright (2) and move it onto the Upright (2). Tie the lower end of the elliptical exerciser before tightening the other two Patch Screws. 2 79 78 49 1 Wire Tie Avoid pinching the Wire Harness (49) during this step 78 79 78 79 4. 3. Attach the Water Bottle...
English Manual
Page 8
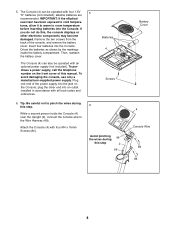
... manual. To purchase a power supply, call the telephone number on the Console; To avoid damaging the console, use only a manufacturer-supplied power supply. Tip: Be careful not to cold tempera- Insert four batteries into the jack on the front cover of this , the console displays or other end into the Console. IMPORTANT: If the elliptical exerciser has been exposed to pinch the wires during this step. Plug...
... manual. To purchase a power supply, call the telephone number on the Console; To avoid damaging the console, use only a manufacturer-supplied power supply. Tip: Be careful not to cold tempera- Insert four batteries into the jack on the front cover of this , the console displays or other end into the Console. IMPORTANT: If the elliptical exerciser has been exposed to pinch the wires during this step. Plug...

English Manual
Page 9
Slide the Console Cover (96) (see the drawing 7 in step 6) upward to the left Pedal Arm (14) with four M4 x 16mm Round Head Screws (94). 4 96 94 94 8. Repeat this step on the right side of the elliptical exerciser. 8 12 14 78 78 75 84 9 Attach the Console Cover with three M10 x 70mm Button Screws (75), three M10 Split Washers (78), and an M4 x 16mm Screw (84). Attach the Left Pedal (12) to the Console (4). 7.
Slide the Console Cover (96) (see the drawing 7 in step 6) upward to the left Pedal Arm (14) with four M4 x 16mm Round Head Screws (94). 4 96 94 94 8. Repeat this step on the right side of the elliptical exerciser. 8 12 14 78 78 75 84 9 Attach the Console Cover with three M10 x 70mm Button Screws (75), three M10 Split Washers (78), and an M4 x 16mm Screw (84). Attach the Left Pedal (12) to the Console (4). 7.

English Manual
Page 11
... Screw (80) and an Axle Cover (22) into each end of the elliptical exerciser are properly tightened. Apply a small amount of the elliptical exerciser. 6 80 Grease 22 21 22 80 14 12. Repeat this step for the other side of grease to a Pedal Arm Axle (21). 11. While another person holds the right 11 Pedal Arm (14) inside the bracket on the right Upper Body Leg...
... Screw (80) and an Axle Cover (22) into each end of the elliptical exerciser are properly tightened. Apply a small amount of the elliptical exerciser. 6 80 Grease 22 21 22 80 14 12. Repeat this step for the other side of grease to a Pedal Arm Axle (21). 11. While another person holds the right 11 Pedal Arm (14) inside the bracket on the right Upper Body Leg...

English Manual
Page 12
... Body Arms Pedals Pedal Disc 12 It is in the direction shown by the arrow below; Note: The elliptical exerciser does not have a free wheel; When the pedals are stationary, step off the lower pedal. Note: The pedal discs can turn the pedal discs in the lowest position. Then, step off the higher pedal first. Upright To dismount the elliptical exerciser, wait until the pedals come to move until you can turn the pedal...
... Body Arms Pedals Pedal Disc 12 It is in the direction shown by the arrow below; Note: The elliptical exerciser does not have a free wheel; When the pedals are stationary, step off the lower pedal. Note: The pedal discs can turn the pedal discs in the lowest position. Then, step off the higher pedal first. Upright To dismount the elliptical exerciser, wait until the pedals come to move until you can turn the pedal...

English Manual
Page 14
... change the resistance of the pedals with the touch of a button. When you use the manual mode of the console, you can even measure your heart rate using the handgrip pulse sensor. The console also offers six preset workouts. Each preset workout automatically changes the resistance of the pedals and prompts you to make your pedaling pace as it guides you exercise, the console will provide continuous exercise feedback. CONSOLE DIAGRAM FEATURES OF THE CONSOLE The advanced console...
... change the resistance of the pedals with the touch of a button. When you use the manual mode of the console, you can even measure your heart rate using the handgrip pulse sensor. The console also offers six preset workouts. Each preset workout automatically changes the resistance of the pedals and prompts you to make your pedaling pace as it guides you exercise, the console will provide continuous exercise feedback. CONSOLE DIAGRAM FEATURES OF THE CONSOLE The advanced console...

English Manual
Page 15
Follow your heart rate (see step 5 on the face of revolutions) that you have burned. Press the decrease button or begin pedaling to reach the selected resistance level. When you turn on the console. When you turn on the console, the manual mode will be selected. The lower right display-This display can show the elapsed time and the distance (total number of the console, remove the plastic. 1. Press the Display Mode button repeatedly until...
Follow your heart rate (see step 5 on the face of revolutions) that you have burned. Press the decrease button or begin pedaling to reach the selected resistance level. When you turn on the console. When you turn on the console, the manual mode will be selected. The lower right display-This display can show the elapsed time and the distance (total number of the console, remove the plastic. 1. Press the Display Mode button repeatedly until...

English Manual
Page 16
... the display and then your hands are finished exercising, the console will be reset. When your pulse is not shown, make sure that your heart rate will turn off automatically. Be careful not 16 Measure your palms resting against the metal contacts. grip pulse sensor with your heart rate if desired. Turn on Contacts the handgrip pulse sensor, remove the plastic. If the pedals do not move for...
... the display and then your hands are finished exercising, the console will be reset. When your pulse is not shown, make sure that your heart rate will turn off automatically. Be careful not 16 Measure your palms resting against the metal contacts. grip pulse sensor with your heart rate if desired. Turn on Contacts the handgrip pulse sensor, remove the plastic. If the pedals do not move for...
English Manual
Page 17
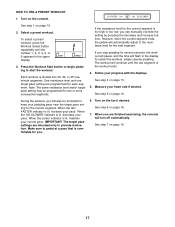
Turn on page 15. 5. Press the Workout Start button or begin pedaling to provide motivation. Note: The same resistance level and/or target pace setting may be prompted to keep your current pace. If you stop pedaling for several seconds, the workout will pause, and the time will flash in the upper display. 3. See step 4 on the console. When the GO FASTER indicator is lit...
Turn on page 15. 5. Press the Workout Start button or begin pedaling to provide motivation. Note: The same resistance level and/or target pace setting may be prompted to keep your current pace. If you stop pedaling for several seconds, the workout will pause, and the time will flash in the upper display. 3. See step 4 on the console. When the GO FASTER indicator is lit...

English Manual
Page 18
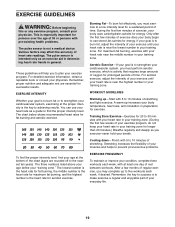
... not remove, the indi- MAINTENANCE AND TROUBLESHOOTING Inspect and tighten all parts of direct sunlight. See assembly step 5 on page 16. there are pedaling, even when the resistance of the pedals is correctly adjusted, reattach the side shields. First, remove all the screws from the console and keep the console out of the elliptical exerciser regularly. BATTERY REPLACEMENT If the console displays become dim, the batteries should be replaced; Repeat until 46 the Belt (46...
... not remove, the indi- MAINTENANCE AND TROUBLESHOOTING Inspect and tighten all parts of direct sunlight. See assembly step 5 on page 16. there are pedaling, even when the resistance of the pedals is correctly adjusted, reattach the side shields. First, remove all the screws from the console and keep the console out of the elliptical exerciser regularly. BATTERY REPLACEMENT If the console displays become dim, the batteries should be replaced; Repeat until 46 the Belt (46...
English Manual
Page 19
... a few minutes of heart rate readings. The pulse sensor is intended only as you exercise-never hold your breath. During the first few months of regular exercise, you to burn fat, adjust the intensity of time. For maximum fat burning, exercise with 5 to the nearest ten years). The three numbers listed above your age define your body uses carbohydrate calories for persons...
... a few minutes of heart rate readings. The pulse sensor is intended only as you exercise-never hold your breath. During the first few months of regular exercise, you to burn fat, adjust the intensity of time. For maximum fat burning, exercise with 5 to the nearest ten years). The three numbers listed above your age define your body uses carbohydrate calories for persons...
English Manual
Page 20
... 2 Pedal Arm Axle 22 4 Axle Cover 23 4 Pedal Arm Bushing Set 24 1 Crank Assembly 25 1 Crank Arm 26 1 Left Pedal Disc 27 1 Right Pedal Disc 28 2 Pedal Disc Cover 29 2 Adjustment Pin 30 2 Spring 31 1 Left Adjustment Bracket 32 4 Large Snap Ring 33 2 36mm x 29mm Wave Washer 34 4 Adjustment Bushing 35 2 Pedal Arm Bracket 36 2 Adjustment Knob 37 2 Fender Washer 38 2 Crank Bearing 39 1 Crank Spacer 40 1 Crank Arm Spacer 41 2 Magnet 42 1 Extended Reed Switch Wire 43 1 Right Adjustment...
... 2 Pedal Arm Axle 22 4 Axle Cover 23 4 Pedal Arm Bushing Set 24 1 Crank Assembly 25 1 Crank Arm 26 1 Left Pedal Disc 27 1 Right Pedal Disc 28 2 Pedal Disc Cover 29 2 Adjustment Pin 30 2 Spring 31 1 Left Adjustment Bracket 32 4 Large Snap Ring 33 2 36mm x 29mm Wave Washer 34 4 Adjustment Bushing 35 2 Pedal Arm Bracket 36 2 Adjustment Knob 37 2 Fender Washer 38 2 Crank Bearing 39 1 Crank Spacer 40 1 Crank Arm Spacer 41 2 Magnet 42 1 Extended Reed Switch Wire 43 1 Right Adjustment...
English Manual
Page 21
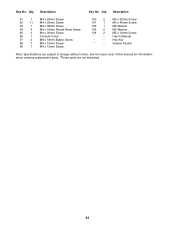
... Screw 96 1 Console Cover 97 2 M8 x 18mm Button Screw 98 7 M5 x 15mm Screw 99 7 M4 x 12mm Screw 100 2 101 1 102 1 103 2 104 2 * - * - * - M5 x 20mm Screw M4 x 45mm Screw M6 Washer M5 Washer M5 x 10mm Screw User's Manual Hex Key Grease Packet Note: Specifications are not illustrated. 21 See the back cover of this manual for information about ordering replacement parts. *These parts are subject to change without notice. Qty. Key No. Description Key No...
... Screw 96 1 Console Cover 97 2 M8 x 18mm Button Screw 98 7 M5 x 15mm Screw 99 7 M4 x 12mm Screw 100 2 101 1 102 1 103 2 104 2 * - * - * - M5 x 20mm Screw M4 x 45mm Screw M6 Washer M5 Washer M5 x 10mm Screw User's Manual Hex Key Grease Packet Note: Specifications are not illustrated. 21 See the back cover of this manual for information about ordering replacement parts. *These parts are subject to change without notice. Qty. Key No. Description Key No...
English Manual
Page 24
... replacement part(s) (see the front cover of whatsoever nature. To help us : • the model number and serial number of the product (see the front cover of this manual) • the name of the product (see the front cover of this manual. ICON's obligation under normal use and service conditions, for a particular purpose is limited in connection with the use , costs of removal, installation or other warranties and any implied warranties...
... replacement part(s) (see the front cover of whatsoever nature. To help us : • the model number and serial number of the product (see the front cover of this manual) • the name of the product (see the front cover of this manual. ICON's obligation under normal use and service conditions, for a particular purpose is limited in connection with the use , costs of removal, installation or other warranties and any implied warranties...

