
English Manual
Page 3
...a garage or covered patio, or near water. 5. When connecting the power cord (see your local PROFORM dealer or call 1-888-533- 15. Use only a single-outlet surge suppressor that meets all times.... 7. Always hold the handrails while using the treadmill. The sensor is damaged, the walking belt may change speed, accelerate, or stop unexpectedly, which may affect the accuracy of heart rate ... dust. Wear appropriate exercise clothes when using the treadmill. 16. Always wear athletic shoes. Adjust the speed in small increments to raise, lower, or move the treadmill until it is ...
...a garage or covered patio, or near water. 5. When connecting the power cord (see your local PROFORM dealer or call 1-888-533- 15. Use only a single-outlet surge suppressor that meets all times.... 7. Always hold the handrails while using the treadmill. The sensor is damaged, the walking belt may change speed, accelerate, or stop unexpectedly, which may affect the accuracy of heart rate ... dust. Wear appropriate exercise clothes when using the treadmill. 16. Always wear athletic shoes. Adjust the speed in small increments to raise, lower, or move the treadmill until it is ...
English Manual
Page 5
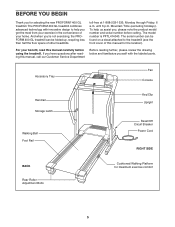
...manual for maximum exercise comfort 5 Accessory Tray Fan Console Handrail Storage Latch Walking Belt Foot Rail Key/Clip Upright Reset/Off Circuit Breaker Power Cord RIGHT SIDE BACK Rear Roller Adjustment Bolts Cushioned Walking Platform for the location). For your home. Mountain Time (...excluding holidays). The serial number can be found on a decal attached to help us assist you for selecting the new PROFORM® 400 GL treadmill. BEFORE YOU ...
...manual for maximum exercise comfort 5 Accessory Tray Fan Console Handrail Storage Latch Walking Belt Foot Rail Key/Clip Upright Reset/Off Circuit Breaker Power Cord RIGHT SIDE BACK Rear Roller Adjustment Bolts Cushioned Walking Platform for the location). For your home. Mountain Time (...excluding holidays). The serial number can be found on a decal attached to help us assist you for selecting the new PROFORM® 400 GL treadmill. BEFORE YOU ...
English Manual
Page 6
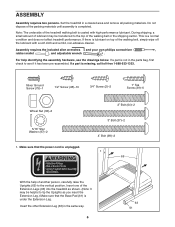
...as shown. (Note: It may be transferred to the top of the treadmill walking belt is under the Extension Leg. Assembly requires the included allen wrenches and your own phillips screwdriver , rubber mallet , and adjustable wrench . Silver Ground Screw (75)-1 1/2" Screw (48)-10 3/4" Screw (2)-2 ...1" Tek Screw (39)-6 Wheel Nut (32)-2 5/16" Star Washer (97)-2 1. Note: The underside of the walking belt or the shipping carton. For help of the ...
...as shown. (Note: It may be transferred to the top of the treadmill walking belt is under the Extension Leg. Assembly requires the included allen wrenches and your own phillips screwdriver , rubber mallet , and adjustable wrench . Silver Ground Screw (75)-1 1/2" Screw (48)-10 3/4" Screw (2)-2 ...1" Tek Screw (39)-6 Wheel Nut (32)-2 5/16" Star Washer (97)-2 1. Note: The underside of the walking belt or the shipping carton. For help of the ...
English Manual
Page 9
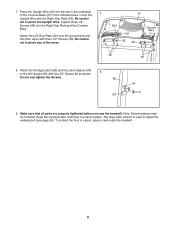
...) over the ground wire and the other wires with two 3/4" Screws (2) as shown. Attach the Storage Latch (29) and the Latch Spacer (44) 8 to adjust the walking belt (see page 26). Note: Extra hardware may be included. Cover the Upright Wire with the Right Grip Plate (36). Be careful not to pinch...
...) over the ground wire and the other wires with two 3/4" Screws (2) as shown. Attach the Storage Latch (29) and the Latch Spacer (44) 8 to adjust the walking belt (see page 26). Note: Extra hardware may be included. Cover the Upright Wire with the Right Grip Plate (36). Be careful not to pinch...
English Manual
Page 10
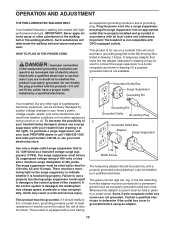
...could result in an increased risk of the treadmill. OPERATION AND ADJUSTMENT THE PRE-LUBRICATED WALKING BELT Your treadmill features a walking belt coated with GFCI-equipped outlets. Do not modify the plug provided ...off. Such substances will not fit the outlet, have a UL suppressed voltage rating of 400 volts or less and a minimum surge dissipation of electric shock. HOW TO PLUG IN... by a qualified electrician. This product is properly installed and grounded in your local PROFORM dealer or call 1-888-533-1333 and order part number 146148, or see drawing 1 at...
...could result in an increased risk of the treadmill. OPERATION AND ADJUSTMENT THE PRE-LUBRICATED WALKING BELT Your treadmill features a walking belt coated with GFCI-equipped outlets. Do not modify the plug provided ...off. Such substances will not fit the outlet, have a UL suppressed voltage rating of 400 volts or less and a minimum surge dissipation of electric shock. HOW TO PLUG IN... by a qualified electrician. This product is properly installed and grounded in your local PROFORM dealer or call 1-888-533-1333 and order part number 146148, or see drawing 1 at...
English Manual
Page 12
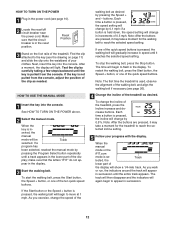
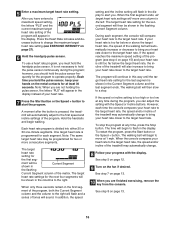
... program has been selected, reselect the manual mode by pressing the Program Select button repeatedly until a track appears in the display. 3 Start the walking belt. As you walk or run, the indicators around the track will again begin to appear in - Note: After the buttons are pressed, it reaches ...and the indicators will appear in the reset position. buttons. When the manual mode or the iFIT.com mode is pulled from the console, adjust the position of your progress with the display. Test the clip by 0.5%. If the key is pressed, the speed setting will change by ...
... program has been selected, reselect the manual mode by pressing the Program Select button repeatedly until a track appears in the display. 3 Start the walking belt. As you walk or run, the indicators around the track will again begin to appear in - Note: After the buttons are pressed, it reaches ...and the indicators will appear in the reset position. buttons. When the manual mode or the iFIT.com mode is pulled from the console, adjust the position of your progress with the display. Test the clip by 0.5%. If the key is pressed, the speed setting will change by ...
English Manual
Page 13
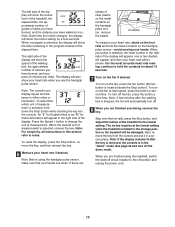
...Measure your pace (in the "demo" mode. Step onto the foot rails, press the Stop button, and adjust the incline of the treadmill to miles. The incline must be at high speed, press the button a second... time. Note: If the display remains lit after the walking belt is folded to hold the contacts for about 15 seconds. 7 Turn on the fan if desired. ...lowest setting when the treadmill is stopped, the fan will show the speed of the walking belt, the approximate number of calories you are finished using the handgrip pulse sensor, make sure that...
...Measure your pace (in the "demo" mode. Step onto the foot rails, press the Stop button, and adjust the incline of the treadmill to miles. The incline must be at high speed, press the button a second... time. Note: If the display remains lit after the walking belt is folded to hold the contacts for about 15 seconds. 7 Turn on the fan if desired. ...lowest setting when the treadmill is stopped, the fan will show the speed of the walking belt, the approximate number of calories you are finished using the handgrip pulse sensor, make sure that...
English Manual
Page 14
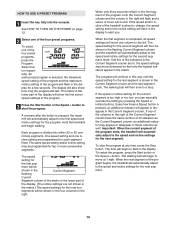
...The speed setting for the second segment will then be shown in the lower part of the program will begin walking. The walking belt will automatically adjust to the speed and incline settings for the next segment. 14 Important: When the current segment of the program ends, the treadmill ..., press the Stop button. To stop . As each segment. Note: If all speed settings will automatically adjust to flash in the display to the right will sound. The walking belt will begin to move one of the treadmill is divided into the console. Each program is about to change...
...The speed setting for the second segment will then be shown in the lower part of the program will begin walking. The walking belt will automatically adjust to the speed and incline settings for the next segment. 14 Important: When the current segment of the program ends, the treadmill ..., press the Stop button. To stop . As each segment. Note: If all speed settings will automatically adjust to flash in the display to the right will sound. The walking belt will begin to move one of the treadmill is divided into the console. Each program is about to change...
English Manual
Page 16
...the target heart rate. The target heart rate setting for each segment. When the first segment ends, all target heart rate settings will automatically adjust to the first speed and incline settings of the treadmill may automatically change to bring your heart rate closer to hold the handgrip pulse sensor.... If your heart rate closer to flash in the Current Segment column and the last segment ends. The walking belt will automatically increase or decrease to bring your heart rate is too high or too low at 1 mph. If the speed or incline setting...
...the target heart rate. The target heart rate setting for each segment. When the first segment ends, all target heart rate settings will automatically adjust to the first speed and incline settings of the treadmill may automatically change to bring your heart rate closer to hold the handgrip pulse sensor.... If your heart rate closer to flash in the Current Segment column and the last segment ends. The walking belt will automatically increase or decrease to bring your heart rate is too high or too low at 1 mph. If the speed or incline setting...

English Manual
Page 20
.... When the program is flashing, press the Start button or the Speed + button on the console. • Adjust the volume of the program. If the time is completed, the walking belt will begin to step 1 on page 19. CAUTION: Always remove iFIT.com CDs and videocassettes from the console. If... the speed or incline settings are using them. 20 After a moment, the walking belt will stop the walking belt at 1.0 mph. See step 8 on the console. To stop . When the next "chirp" is heard, the speed and/or incline ...
.... When the program is flashing, press the Start button or the Speed + button on the console. • Adjust the volume of the program. If the time is completed, the walking belt will begin to step 1 on page 19. CAUTION: Always remove iFIT.com CDs and videocassettes from the console. If... the speed or incline settings are using them. 20 After a moment, the walking belt will stop the walking belt at 1.0 mph. See step 8 on the console. To stop . When the next "chirp" is heard, the speed and/or incline ...
English Manual
Page 26
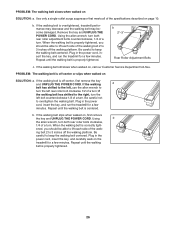
...left bolt counterclockwise 1/2 of a turn. Using b the allen wrench, turn both rear roller adjustment bolts counterclockwise, 1/4 of a turn ; Be careful to keep the walking belt centered. If the walking belt is correctly tight- Plug in the power cord, insert the key, and run the treadmill ...for a few minutes. b. When the walking belt is off the walking platform. If the walking belt is properly tightened. b 2"-3" Rear Roller Adjustment Bolts c. When the walking belt is centered. Plug in the power cord, insert the key, and run the ...
...left bolt counterclockwise 1/2 of a turn. Using b the allen wrench, turn both rear roller adjustment bolts counterclockwise, 1/4 of a turn ; Be careful to keep the walking belt centered. If the walking belt is correctly tight- Plug in the power cord, insert the key, and run the treadmill ...for a few minutes. b. When the walking belt is off the walking platform. If the walking belt is properly tightened. b 2"-3" Rear Roller Adjustment Bolts c. When the walking belt is centered. Plug in the power cord, insert the key, and run the ...
English Manual
Page 28
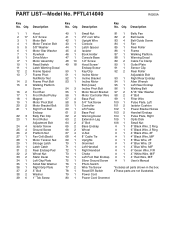
... Platform Screw Foot Rail Front Roller/Pulley Magnet Motor Pivot Bolt Motor Bracket Bolt Right Foot Rail Endcap Belly Pan Clip Front Roller Adjustment Bolt Isolator Screw Ground Screw Platform Nut Fan Grill (Back) Motor Tension Nut Storage Latch Latch Catch Rear Endcap Pad Wheel Nut ... Screw Fan Rear Roller Frame Walking Platform Warning Decal Cable Tie Clamp Outlet Plate Sensor Clip Rear Roller Adjustable Bolt Right Rear Endcap Allen Wrench Left Rear Endcap Walking Belt 5/16" Star Washer 4" Bolt Filter Wire Pulse Plate, Left Isolator Cushion Power Bracket Screw Handrail Endcap Pulse Plate,...
... Platform Screw Foot Rail Front Roller/Pulley Magnet Motor Pivot Bolt Motor Bracket Bolt Right Foot Rail Endcap Belly Pan Clip Front Roller Adjustment Bolt Isolator Screw Ground Screw Platform Nut Fan Grill (Back) Motor Tension Nut Storage Latch Latch Catch Rear Endcap Pad Wheel Nut ... Screw Fan Rear Roller Frame Walking Platform Warning Decal Cable Tie Clamp Outlet Plate Sensor Clip Rear Roller Adjustable Bolt Right Rear Endcap Allen Wrench Left Rear Endcap Walking Belt 5/16" Star Washer 4" Bolt Filter Wire Pulse Plate, Left Isolator Cushion Power Bracket Screw Handrail Endcap Pulse Plate,...


