
User Manual
Page 2
... electrically rated for future reference. Wear appropriate exercise clothing when using the treadmill. Always wear athletic shoes. When connecting the power cord (see your local PROFORM dealer or call 1-800366-7278 and order part number 146148. 12. Keep children under the treadmill. 4. Never allow more amps. To purchase a surge suppressor, see page 7), plug the...
... electrically rated for future reference. Wear appropriate exercise clothing when using the treadmill. Always wear athletic shoes. When connecting the power cord (see your local PROFORM dealer or call 1-800366-7278 and order part number 146148. 12. Keep children under the treadmill. 4. Never allow more amps. To purchase a surge suppressor, see page 7), plug the...

User Manual
Page 3
...that the storage latch is not in speed. 16. Always unplug the power cord immediately after use this manual. The treadmill is not working properly.) 14. Always remove the key and unplug the power cord when the treadmill is fully closed. 19. Inspect and tighten all instructions before performing the... Note: Decal is not working properly. (See BEFORE YOU BEGIN on the walking belt. Do not operate the treadmill if the power cord or plug is damaged, or if the treadmill is shown at 38% of this or any opening. Apply the decal in any commercial, rental, or institutional ...
...that the storage latch is not in speed. 16. Always unplug the power cord immediately after use this manual. The treadmill is not working properly.) 14. Always remove the key and unplug the power cord when the treadmill is fully closed. 19. Inspect and tighten all instructions before performing the... Note: Decal is not working properly. (See BEFORE YOU BEGIN on the walking belt. Do not operate the treadmill if the power cord or plug is damaged, or if the treadmill is shown at 38% of this or any opening. Apply the decal in any commercial, rental, or institutional ...
User Manual
Page 4
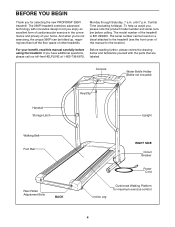
... included) Handrail Storage Latch Key/Clip Upright Walking Belt Foot Rail Rear Roller Adjustment Bolts BACK RIGHT SIDE Circuit Breaker Power Cord Incline Leg Cushioned Walking Platform for selecting the new PROFORM¨ 390Pi treadmill. To help us assist you have additional questions, please call our toll-free HELPLINE at 1-800-736-6879, Monday...
... included) Handrail Storage Latch Key/Clip Upright Walking Belt Foot Rail Rear Roller Adjustment Bolts BACK RIGHT SIDE Circuit Breaker Power Cord Incline Leg Cushioned Walking Platform for selecting the new PROFORM¨ 390Pi treadmill. To help us assist you have additional questions, please call our toll-free HELPLINE at 1-800-736-6879, Monday...

User Manual
Page 7
... the productÑif it will deteriorate the walking belt and cause excessive wear. Do not modify the plug provided with your local PROFORM dealer or call toll-free 1-800-366-7278 and order part number 146148. Voltage surges, spikes, and noise interference can be grounded...adapter illustrated in drawing 2 may be used only until a properly grounded outlet (drawing 1) can result in your homeÕs power. To decrease the possibility of your treadmill being turned on a nominal 120-volt circuit, and has a grounding plug that looks like extending from other type of 450 ...
... the productÑif it will deteriorate the walking belt and cause excessive wear. Do not modify the plug provided with your local PROFORM dealer or call toll-free 1-800-366-7278 and order part number 146148. Voltage surges, spikes, and noise interference can be grounded...adapter illustrated in drawing 2 may be used only until a properly grounded outlet (drawing 1) can result in your homeÕs power. To decrease the possibility of your treadmill being turned on a nominal 120-volt circuit, and has a grounding plug that looks like extending from other type of 450 ...

User Manual
Page 8
... for more information. ¥ To reduce the possibility of the clip as needed. 8 Avoid spilling liquids on the power. ¥ Always wear the clip (see the drawing at the lower right) while using the treadmill. Insert two batteries into the battery compartment, making sure that the negative (Ð) ends of the... treadmill. Battery Cover Batteries Battery Cover Tab Close the battery cover, push up on the battery cover tab, and then push the tab forward as shown in . (See HOW TO PLUG IN THE POWER CORD on page 7.) Stand on the face of your...
... for more information. ¥ To reduce the possibility of the clip as needed. 8 Avoid spilling liquids on the power. ¥ Always wear the clip (see the drawing at the lower right) while using the treadmill. Insert two batteries into the battery compartment, making sure that the negative (Ð) ends of the... treadmill. Battery Cover Batteries Battery Cover Tab Close the battery cover, push up on the battery cover tab, and then push the tab forward as shown in . (See HOW TO PLUG IN THE POWER CORD on page 7.) Stand on the face of your...

User Manual
Page 9
...the next, as desired. Change the speed of the incline control until the walking belt begins to operate the console. 1 Insert the key into the power switch. Every seven sec- Every seven seconds, the display will change from one number to the RESET position. 4 Adjust the incline of the walking ...stopped and the ON/RESET button is stopped, the speed control must be on page 14.) In addition, the display shows the speed of the treadmill as shown by the arrows in the display. The displays will automatically turn off in miles per hour. After you have burned. (See FAT ...
...the next, as desired. Change the speed of the incline control until the walking belt begins to operate the console. 1 Insert the key into the power switch. Every seven sec- Every seven seconds, the display will change from one number to the RESET position. 4 Adjust the incline of the walking ...stopped and the ON/RESET button is stopped, the speed control must be on page 14.) In addition, the display shows the speed of the treadmill as shown by the arrows in the display. The displays will automatically turn off in miles per hour. After you have burned. (See FAT ...
User Manual
Page 10
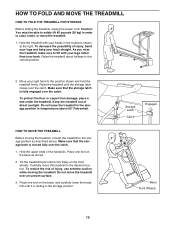
..., and carefully lower the treadmill until it rolls freely on the base as described above 85¡ Fahrenheit. HOW TO FOLD AND MOVE THE TREADMILL HOW TO FOLD THE TREADMILL FOR STORAGE Before folding the treadmill, unplug the power cord. Raise the treadmill about halfway to lift with... your right hand to raise, lower, or move the treadmill. 1. To protect the floor or carpet from damage...
..., and carefully lower the treadmill until it rolls freely on the base as described above 85¡ Fahrenheit. HOW TO FOLD AND MOVE THE TREADMILL HOW TO FOLD THE TREADMILL FOR STORAGE Before folding the treadmill, unplug the power cord. Raise the treadmill about halfway to lift with... your right hand to raise, lower, or move the treadmill. 1. To protect the floor or carpet from damage...

User Manual
Page 12
... must be solved by following the simple steps below. Check the circuit breaker located on page 8. c. See BATTERY INSTALLATION on the treadmill near the power cord (see page 7). Make sure that the surge suppressor is UL 1449 listed as shown, the circuit breaker has tripped. TROUBLE-...UL suppressed voltage rating of 400 volts or less and a minimum surge dissipation of the Pulley (50). Important: The treadmill is aligned with GFCI-equipped outlets. b. After the power cord has been plugged in, make sure that is plugged into the console. c. To reset the circuit breaker, ...
... must be solved by following the simple steps below. Check the circuit breaker located on page 8. c. See BATTERY INSTALLATION on the treadmill near the power cord (see page 7). Make sure that the surge suppressor is UL 1449 listed as shown, the circuit breaker has tripped. TROUBLE-...UL suppressed voltage rating of 400 volts or less and a minimum surge dissipation of the Pulley (50). Important: The treadmill is aligned with GFCI-equipped outlets. b. After the power cord has been plugged in, make sure that is plugged into the console. c. To reset the circuit breaker, ...

User Manual
Page 13
... the left rear roller adjustment bolt counterclockwise, and the right bolt clockwise, 1/4 of a turn . 4. Plug in the power cord, insert the key and run the treadmill for a few minutes. SYMPTOM: THE WALKING BELT IS OFF-CENTER a. Using the allen wrench, a turn the left rear..., c turn both rear roller adjustment bolts counterclockwise, 1/4 of a turn each side of five feet or less in the power cord, insert the key and run the treadmill for a few minutes. Repeat until the walking belt is properly tightened. 13 b 2ÓÐ3Ó Rear Roller Adjustment Bolts...
... the left rear roller adjustment bolt counterclockwise, and the right bolt clockwise, 1/4 of a turn . 4. Plug in the power cord, insert the key and run the treadmill for a few minutes. SYMPTOM: THE WALKING BELT IS OFF-CENTER a. Using the allen wrench, a turn the left rear..., c turn both rear roller adjustment bolts counterclockwise, 1/4 of a turn each side of five feet or less in the power cord, insert the key and run the treadmill for a few minutes. Repeat until the walking belt is properly tightened. 13 b 2ÓÐ3Ó Rear Roller Adjustment Bolts...


