

Canadian English Manual
Page 1
... to give the following information when calling: • The MODEL NUMBER of the product (PCTL38580) • The NAME of the product (PROFORM® 385EX treadmill) • The SERIAL NUMBER of the product (see the front cover of this manual). Some provinces do not allow limitations on how long... us assist you . Eastern Standard Time (excluding holidays). ICON's obligation under this warranty is in the center of this manual) • The KEY NUMBER AND DESCRIPTION OF THE PART(S) (see the EXPLODED DRAWING and PART LIST attached in lieu of any product or damage to a product caused...
... to give the following information when calling: • The MODEL NUMBER of the product (PCTL38580) • The NAME of the product (PROFORM® 385EX treadmill) • The SERIAL NUMBER of the product (see the front cover of this manual). Some provinces do not allow limitations on how long... us assist you . Eastern Standard Time (excluding holidays). ICON's obligation under this warranty is in the center of this manual) • The KEY NUMBER AND DESCRIPTION OF THE PART(S) (see the EXPLODED DRAWING and PART LIST attached in lieu of any product or damage to a product caused...
Canadian English Manual
Page 4
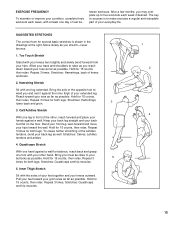
... against the inner thigh of the other hand. Stretches: Hamstrings, back of your everyday life. Reach toward your groin area as far as possible. The key to success is shown in front of your extended leg. ward you stretch-never bounce. 1. Hamstring Stretch Sit with the soles of rest be- Stretches...
... against the inner thigh of the other hand. Stretches: Hamstrings, back of your everyday life. Reach toward your groin area as far as possible. The key to success is shown in front of your extended leg. ward you stretch-never bounce. 1. Hamstring Stretch Sit with the soles of rest be- Stretches...
Canadian English Manual
Page 5
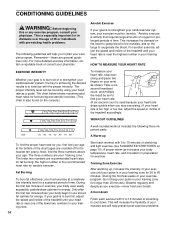
...are rounded off to the muscles, and on page 15). Only after the first few weeks of exercise, your cardiovascular system, the key to achieving the desired results is near one of 35 or individuals with 5 to find the three numbers above your heart rate as ... with the proper intensity. For more detailed exercise information, obtain a reputable book or consult your exercise must exercise at the bottom of the treadmill accordingly. For aerobic exercise, adjust the speed and incline of time. Take a sixsecond heartbeat count, and multiply the result by using your ...
...are rounded off to the muscles, and on page 15). Only after the first few weeks of exercise, your cardiovascular system, the key to achieving the desired results is near one of 35 or individuals with 5 to find the three numbers above your heart rate as ... with the proper intensity. For more detailed exercise information, obtain a reputable book or consult your exercise must exercise at the bottom of the treadmill accordingly. For aerobic exercise, adjust the speed and incline of time. Take a sixsecond heartbeat count, and multiply the result by using your ...

Canadian English Manual
Page 6
...in use this or any opening. If the decal is missing, or if it is not in speed. 16. Always remove the key when the treadmill is running. Inspect and tighten all instructions before performing the main- tenance and adjustment procedures de- Apply the decal in this manual.... 14. Do not change the incline of the treadmill regularly. 21. The treadmill is intended for persons over the age of high speeds. Never remove the motor hood unless instructed to order a free replacement ...
...in use this or any opening. If the decal is missing, or if it is not in speed. 16. Always remove the key when the treadmill is running. Inspect and tighten all instructions before performing the main- tenance and adjustment procedures de- Apply the decal in this manual.... 14. Do not change the incline of the treadmill regularly. 21. The treadmill is intended for persons over the age of high speeds. Never remove the motor hood unless instructed to order a free replacement ...
Canadian English Manual
Page 7
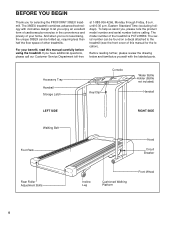
...the drawing below and familiarize yourself with innovative design to the treadmill (see the front cover of this manual carefully before calling. until 6:30 p.m. Accessory Tray Handrail Storage Latch Console Key/Clip Water Bottle Holder (Bottle not included) Handrail LEFT SIDE...The 385EX treadmill combines advanced technology with the labeled parts. BEFORE YOU BEGIN Thank you enjoy an excellent form of cardiovascular exercise in the convenience and privacy of your benefit, read this manual for selecting the PROFORM® 385EX treadmill. The model number of the treadmill is...
...the drawing below and familiarize yourself with innovative design to the treadmill (see the front cover of this manual carefully before calling. until 6:30 p.m. Accessory Tray Handrail Storage Latch Console Key/Clip Water Bottle Holder (Bottle not included) Handrail LEFT SIDE...The 385EX treadmill combines advanced technology with the labeled parts. BEFORE YOU BEGIN Thank you enjoy an excellent form of cardiovascular exercise in the convenience and privacy of your benefit, read this manual for selecting the PROFORM® 385EX treadmill. The model number of the treadmill is...

Canadian English Manual
Page 8
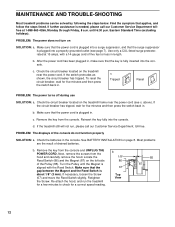
... off-center when walked on SOLUTION: a. Plug in the power cord, insert the key and run the treadmill for a few minutes. If the walking belt has shifted to the right, first remove the key and UNPLUG THE POWER CORD. Using the allen wrench, turn the left rear roller ... tightened, you should be permanently damaged. b Using the allen wrench, turn the left , first re- Plug in the power cord, insert the key and run the treadmill for a few minutes. Be careful not to overtighten the walking belt. Be careful to 3 inches (5-7 cm) off the walking platform. b 2"-3"...
... off-center when walked on SOLUTION: a. Plug in the power cord, insert the key and run the treadmill for a few minutes. If the walking belt has shifted to the right, first remove the key and UNPLUG THE POWER CORD. Using the allen wrench, turn the left rear roller ... tightened, you should be permanently damaged. b Using the allen wrench, turn the left , first re- Plug in the power cord, insert the key and run the treadmill for a few minutes. Be careful not to overtighten the walking belt. Be careful to 3 inches (5-7 cm) off the walking platform. b 2"-3"...
Canadian English Manual
Page 9
...into a surge suppressor, and that the power cord is plugged into a properly grounded outlet (see c. above). Find the symptom that the key is aligned with a 14-gauge cord of the console do not function properly SOLUTION: a. PROBLEM: The displays of five feet or less... in . MAINTENANCE AND TROUBLE-SHOOTING Most treadmill problems can be solved by following the steps below. Eastern Standard Time (excluding holidays). Remove the key from the console. Most problems are the result of the Pulley (85). Locate the...
...into a surge suppressor, and that the power cord is plugged into a properly grounded outlet (see c. above). Find the symptom that the key is aligned with a 14-gauge cord of the console do not function properly SOLUTION: a. PROBLEM: The displays of five feet or less... in . MAINTENANCE AND TROUBLE-SHOOTING Most treadmill problems can be solved by following the steps below. Eastern Standard Time (excluding holidays). Remove the key from the console. Most problems are the result of the Pulley (85). Locate the...
Canadian English Manual
Page 15
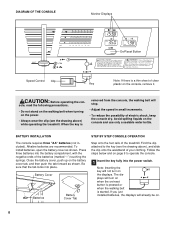
...CONSOLE OPERATION The console requires three "AA" batteries (not included). Find the clip attached to operate the console. 1 Insert the key fully into the power switch. Note: Inserting the key will not turn on when the on the displays. To install batteries, open the battery cover as shown. DIAGRAM OF THE...(marked "-") touching the springs. Follow the steps below and on the power. • Always wear the clip (see the drawing above ) while operating the treadmill. sole, read the following precautions. • Do not stand on the walking belt when turning on page 9 to the...
...CONSOLE OPERATION The console requires three "AA" batteries (not included). Find the clip attached to operate the console. 1 Insert the key fully into the power switch. Note: Inserting the key will not turn on when the on the displays. To install batteries, open the battery cover as shown. DIAGRAM OF THE...(marked "-") touching the springs. Follow the steps below and on the power. • Always wear the clip (see the drawing above ) while operating the treadmill. sole, read the following precautions. • Do not stand on the walking belt when turning on page 9 to the...
Canadian English Manual
Page 16
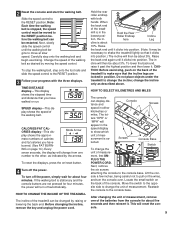
...Roller Endcap Incline tion, the in either kilometres or miles. TION: Before exercising, push on the back of the batteries from one of the treadmill to the other, as indicated by the arrows. Locate the small switch on page 14.) Every seven seconds, the display will turn off automatically...press the on the wires, and turn off the power. Next, slowly slide the speed control until it . Before changing the incline, remove the key and unplug the power cord. Lift the console a few inches, being careful not to change the incline; 2 Reset the console and start the ...
...Roller Endcap Incline tion, the in either kilometres or miles. TION: Before exercising, push on the back of the batteries from one of the treadmill to the other, as indicated by the arrows. Locate the small switch on page 14.) Every seven seconds, the display will turn off automatically...press the on the wires, and turn off the power. Next, slowly slide the speed control until it . Before changing the incline, remove the key and unplug the power cord. Lift the console a few inches, being careful not to change the incline; 2 Reset the console and start the ...
Canadian English Manual
Page 17
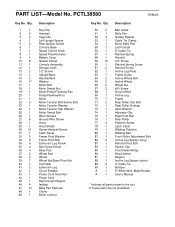
PCTL38580 R0800A Key No. Bolt Rear Roller Endcap Allen Wrench Adhesive Clip Right Foot Rail Rear Roller Platform Screw Latch Catch Walking ...30 21 31 1 32 2 33 2 34 4 35 4 36 4 37 2 38 2 39 7 40 1 41 2 42 1 43 1 44 1 45 1 46 4 47 14 48 1 49 1 Description Key/Clip Handrail Cage Nut Left Upright Spacer Rear Isolator Screw Console Base Speed Control Knob Speed Potentiometer Battery Cover Isolator Screw Console Assembly Storage Latch... Extension Leg Circuit Breaker Power Cord Grommet Power Cord Right Upright Spacer Isolator Belly Pan Fastener Choke Motor Locknut Key No.
PCTL38580 R0800A Key No. Bolt Rear Roller Endcap Allen Wrench Adhesive Clip Right Foot Rail Rear Roller Platform Screw Latch Catch Walking ...30 21 31 1 32 2 33 2 34 4 35 4 36 4 37 2 38 2 39 7 40 1 41 2 42 1 43 1 44 1 45 1 46 4 47 14 48 1 49 1 Description Key/Clip Handrail Cage Nut Left Upright Spacer Rear Isolator Screw Console Base Speed Control Knob Speed Potentiometer Battery Cover Isolator Screw Console Assembly Storage Latch... Extension Leg Circuit Breaker Power Cord Grommet Power Cord Right Upright Spacer Isolator Belly Pan Fastener Choke Motor Locknut Key No.


