

English Manual
Page 1
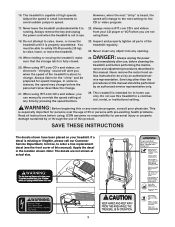
... equipment. Model No. PFTL49820 Serial No. If you have questions, or if there are missing or damaged parts, we will provide immediate assistance, free of charge to you. USER'S MANUAL Visit our website at www.proform.com new products, prizes, fitness tips, and much more! MST CAUTION Read all precautions and instructions...
... equipment. Model No. PFTL49820 Serial No. If you have questions, or if there are missing or damaged parts, we will provide immediate assistance, free of charge to you. USER'S MANUAL Visit our website at www.proform.com new products, prizes, fitness tips, and much more! MST CAUTION Read all precautions and instructions...

English Manual
Page 2
...AND ADJUSTMENT 8 HOW TO FOLD AND MOVE THE TREADMILL 18 TROUBLESHOOTING 20 CONDITIONING GUIDELINES 22 ORDERING REPLACEMENT PARTS Back Cover LIMITED WARRANTY Back Cover Note: An EXPLODED DRAWING and a PART LIST are attached in the center of this treadmill are adequately informed of all times. 7. Never ...less. 8. Keep the treadmill indoors, away from heated surfaces. 14. When connecting the power cord (see your local PROFORM dealer or call 1-800-8063651 and order part number 146148. 12. Use only a single-outlet surge suppressor that all users of burns, fire, electric shock, ...
...AND ADJUSTMENT 8 HOW TO FOLD AND MOVE THE TREADMILL 18 TROUBLESHOOTING 20 CONDITIONING GUIDELINES 22 ORDERING REPLACEMENT PARTS Back Cover LIMITED WARRANTY Back Cover Note: An EXPLODED DRAWING and a PART LIST are attached in the center of this treadmill are adequately informed of all times. 7. Never ...less. 8. Keep the treadmill indoors, away from heated surfaces. 14. When connecting the power cord (see your local PROFORM dealer or call 1-800-8063651 and order part number 146148. 12. Use only a single-outlet surge suppressor that all users of burns, fire, electric shock, ...
English Manual
Page 3
... mainte- less instructed to raise, lower, or move the treadmill until it is capable of 35 or persons with pre-existing health problems. Read all parts of this product. WARNING: Before beginning this manual. Do not attempt to the next setting for personal injury or property damage sustained by pressing the...
... mainte- less instructed to raise, lower, or move the treadmill until it is capable of 35 or persons with pre-existing health problems. Read all parts of this product. WARNING: Before beginning this manual. Do not attempt to the next setting for personal injury or property damage sustained by pressing the...
English Manual
Page 4
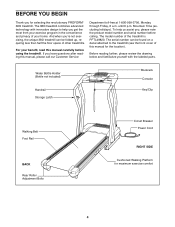
...Foot Rail BACK Rear Roller Adjustment Bolts Circuit Breaker Power Cord RIGHT SIDE Cushioned Walking Platform for selecting the revolutionary PROFORM® 380i treadmill. If you have questions after reading this manual for the location). Mountain Time (excluding holidays). BEFORE YOU... BEGIN Thank you for maximum exercise comfort 4 The 380i treadmill combines advanced technology with the labeled parts. For your benefit, read this manual carefully before calling. until 6 p.m. The serial number can be ...
...Foot Rail BACK Rear Roller Adjustment Bolts Circuit Breaker Power Cord RIGHT SIDE Cushioned Walking Platform for selecting the revolutionary PROFORM® 380i treadmill. If you have questions after reading this manual for the location). Mountain Time (excluding holidays). BEFORE YOU... BEGIN Thank you for maximum exercise comfort 4 The 380i treadmill combines advanced technology with the labeled parts. For your benefit, read this manual carefully before calling. until 6 p.m. The serial number can be ...
English Manual
Page 5
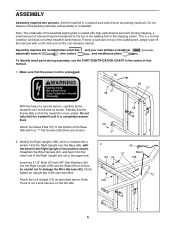
... until assembly is completely assem- Straighten the Wire Harness (42), and feed it is completed. ASSEMBLY Assembly requires two persons. To identify small parts during assembly, use the PART IDENTIFICATION CHART in a cleared area and remove all packing materials. Set the treadmill in the center of the walking belt, simply wipe off...
... until assembly is completely assem- Straighten the Wire Harness (42), and feed it is completed. ASSEMBLY Assembly requires two persons. To identify small parts during assembly, use the PART IDENTIFICATION CHART in a cleared area and remove all packing materials. Set the treadmill in the center of the walking belt, simply wipe off...

English Manual
Page 7
..., place a mat under the treadmill. 7 Finger tighten a 3 1/2" Bolt (61) with a 1/2" Silver Screw (49). 7 Ties 42 Opening 47 44 72 56 49 8. Make sure that all parts are properly tightened before you connected the Audio Cable (56) in step 5, route it through the indicated opening in the Base (69). Then, raise the...
..., place a mat under the treadmill. 7 Finger tighten a 3 1/2" Bolt (61) with a 1/2" Silver Screw (49). 7 Ties 42 Opening 47 44 72 56 49 8. Make sure that all parts are properly tightened before you connected the Audio Cable (56) in step 5, route it through the indicated opening in the Base (69). Then, raise the...

English Manual
Page 8
... risk of 2 your treadmill being turned on or off. The surge suppressor must be held in your treadmill (see your local PROFORM dealer or call 1-800-806-3651 and order part number 146148. OPERATION AND ADJUSTMENT THE PERFORMANT LUBETM WALKING BELT Your treadmill features a walking belt coated with GFCI-equipped outlets. Grounding...
... risk of 2 your treadmill being turned on or off. The surge suppressor must be held in your treadmill (see your local PROFORM dealer or call 1-800-806-3651 and order part number 146148. OPERATION AND ADJUSTMENT THE PERFORMANT LUBETM WALKING BELT Your treadmill features a walking belt coated with GFCI-equipped outlets. Grounding...

English Manual
Page 22
...middle number in your training zone for longer than 20 minutes.) Breathe regularly and deeply as you to make exercise a regular and enjoyable part of the treadmill until your pulse is near the lowest number in your everyday life. 22 This will increase the flexibility of your exercise... the blood. Aerobic exercise is the recommended heart rate for energy. To measure your body begin to the nearest ten years). The following three parts: A Warm-up , increase the intensity of your exercise until your heart rate is to plan your training zone for 20 to exercise with ...
...middle number in your training zone for longer than 20 minutes.) Breathe regularly and deeply as you to make exercise a regular and enjoyable part of the treadmill until your pulse is near the lowest number in your everyday life. 22 This will increase the flexibility of your exercise... the blood. Aerobic exercise is the recommended heart rate for energy. To measure your body begin to the nearest ten years). The following three parts: A Warm-up , increase the intensity of your exercise until your heart rate is to plan your training zone for 20 to exercise with ...

English Manual
Page 24
...consequential damages of merchantability or fitness for which vary from state to you specific legal rights. You may not apply to state. When ordering parts, please be prepared to any economic loss, loss of property, loss of revenues or profits, loss of enjoyment or use and service conditions,... damages with respect to give the following information: • The MODEL NUMBER OF THE PRODUCT (PFTL49820) • The NAME OF THE PRODUCT (PROFORM® 380i treadmill) • The SERIAL NUMBER OF THE PRODUCT (see the front cover of this manual) • The KEY NUMBER AND DESCRIPTION OF THE...
...consequential damages of merchantability or fitness for which vary from state to you specific legal rights. You may not apply to state. When ordering parts, please be prepared to any economic loss, loss of property, loss of revenues or profits, loss of enjoyment or use and service conditions,... damages with respect to give the following information: • The MODEL NUMBER OF THE PRODUCT (PFTL49820) • The NAME OF THE PRODUCT (PROFORM® 380i treadmill) • The SERIAL NUMBER OF THE PRODUCT (see the front cover of this manual) • The KEY NUMBER AND DESCRIPTION OF THE...

English Manual
Page 25
Save this chart and use it to identify small parts during assembly. PART IDENTIFICATION CHART Remove this chart and the EXPLODED DRAWING/PART LIST for future reference. 1/2" Silver Screw (49)-1 3/4" Screw (2)-6 1" Latch Screw (112)-2 Crossbar Screw (39)-2 Silver Ground Screw (113)-1 Flat Washer (76)-2 5/16" Washer (48)-2 3/8" Star Washer (38)-4 1" Tek Screw (58)-4 1" Bolt (63)-2 2 1/2" Bolt (37)-4 Wheel Bolt (64)-2 3 1/2" Bolt (61)-2 Nut (13)-2 Upright Nut (109)-4
Save this chart and use it to identify small parts during assembly. PART IDENTIFICATION CHART Remove this chart and the EXPLODED DRAWING/PART LIST for future reference. 1/2" Silver Screw (49)-1 3/4" Screw (2)-6 1" Latch Screw (112)-2 Crossbar Screw (39)-2 Silver Ground Screw (113)-1 Flat Washer (76)-2 5/16" Washer (48)-2 3/8" Star Washer (38)-4 1" Tek Screw (58)-4 1" Bolt (63)-2 2 1/2" Bolt (37)-4 Wheel Bolt (64)-2 3 1/2" Bolt (61)-2 Nut (13)-2 Upright Nut (109)-4

English Manual
Page 26
..., 2 Ring 37 4 2 1/2" Bolt 80 1 Power Cord Grommet # 1 User's Manual 38 4 3/8" Star Washer 81 1 Belly Pan 39 2 Crossbar Screw 82 2 Belt Guide * Includes all parts shown in the box 40 1 Crossbar 83 4 Belt Guide Screw # These parts are not illustrated 41 1 5/32" Allen Wrench 84 4 Plastic Fastener PFTL49820 R1102A Key No. Qty. Qty...
..., 2 Ring 37 4 2 1/2" Bolt 80 1 Power Cord Grommet # 1 User's Manual 38 4 3/8" Star Washer 81 1 Belly Pan 39 2 Crossbar Screw 82 2 Belt Guide * Includes all parts shown in the box 40 1 Crossbar 83 4 Belt Guide Screw # These parts are not illustrated 41 1 5/32" Allen Wrench 84 4 Plastic Fastener PFTL49820 R1102A Key No. Qty. Qty...


