
English Manual
Page 3
...use. 18. Keep the treadmill indoors, away from the treadmill at a time. 9. Never start the treadmill while you are used only by or through the use the treadmill with 8 feet of clearance behind it is turned off. The treadmill is capable of this treadmill are recommended for in the treadmill. Wear appropriate clothing when using the treadmill. 15. Use the treadmill...17. No other than the procedures in this manual should be used or oxygen is administered. 13. Never leave the treadmill unattended while it . ICON assumes no responsibility for longer than ...
...use. 18. Keep the treadmill indoors, away from the treadmill at a time. 9. Never start the treadmill while you are used only by or through the use the treadmill with 8 feet of clearance behind it is turned off. The treadmill is capable of this treadmill are recommended for in the treadmill. Wear appropriate clothing when using the treadmill. 15. Use the treadmill...17. No other than the procedures in this manual should be used or oxygen is administered. 13. Never leave the treadmill unattended while it . ICON assumes no responsibility for longer than ...
English Manual
Page 4
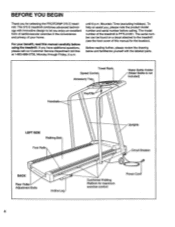
...for maximum exercise comfort Power Cord Mountain Time (excluding holidays). The 375 E treadmill combines advanced technology with the labeled parts. To help us assist you, please note the ...product model number and serial number before using the treadmill. The serial number can be found on a decal attached to let you have ...please review the drawing below and familiarize yourself with innovative design to the treadmill (see the front cover of the treadmill is not included) Handrails Key/Clip LEFT SIDE Walking Belt Foot Rails ...
...for maximum exercise comfort Power Cord Mountain Time (excluding holidays). The 375 E treadmill combines advanced technology with the labeled parts. To help us assist you, please note the ...product model number and serial number before using the treadmill. The serial number can be found on a decal attached to let you have ...please review the drawing below and familiarize yourself with innovative design to the treadmill (see the front cover of the treadmill is not included) Handrails Key/Clip LEFT SIDE Walking Belt Foot Rails ...
English Manual
Page 6
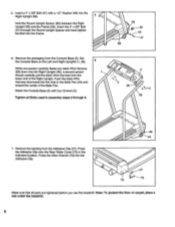
Tighten all parts are tightened before you use the treadmill. Note: To protect the floor or carpet, place a mat under the treadmill. 6 Set the Console Base on the Left and Right Uprights (1, 38). 6 While one person carefully feeds any slack Wire Harness (36) down into the Right ... "D"---47 59 5 000 0 2 36 2 38 7. Press the Allen Wrench (79) into the Adhesive Clip. ••• 36 43 75 Make sure that all Bolts used In assembly steps 2 through the Round Upright Spacer and hand tighten the Bolt into the hole in the 7 indicated location. 5.
Tighten all parts are tightened before you use the treadmill. Note: To protect the floor or carpet, place a mat under the treadmill. 6 Set the Console Base on the Left and Right Uprights (1, 38). 6 While one person carefully feeds any slack Wire Harness (36) down into the Right ... "D"---47 59 5 000 0 2 36 2 38 7. Press the Allen Wrench (79) into the Adhesive Clip. ••• 36 43 75 Make sure that all Bolts used In assembly steps 2 through the Round Upright Spacer and hand tighten the Bolt into the hole in the 7 indicated location. 5.
English Manual
Page 7
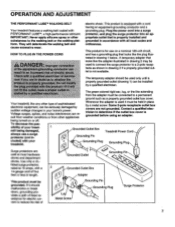
... voltage changes in drawing 1 below. being damaged, always use on or off. To decrease the pos- OPERATION AND ADJUSTMENT THE PERFORMANT LUBEim WALKING BELT Your treadmill features a walking belt coated with your treadmill. 0 Grounding Plug Grounding Plug Surge protectors are not grounded... cause excessive wear. HOW TO PLUG IN THE POWER CORD resu C tied 0 0O electric shock. Your treadmill, like the adapter illustrated in drawing 2 may be used only until a properly grounded outlet (drawing 1) can be seriously damaged by a qualified electrician. Some 2-pole...
... voltage changes in drawing 1 below. being damaged, always use on or off. To decrease the pos- OPERATION AND ADJUSTMENT THE PERFORMANT LUBEim WALKING BELT Your treadmill features a walking belt coated with your treadmill. 0 Grounding Plug Grounding Plug Surge protectors are not grounded... cause excessive wear. HOW TO PLUG IN THE POWER CORD resu C tied 0 0O electric shock. Your treadmill, like the adapter illustrated in drawing 2 may be used only until a properly grounded outlet (drawing 1) can be seriously damaged by a qualified electrician. Some 2-pole...
English Manual
Page 10
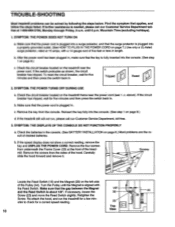
...free. 3. After the power cord has been plugged in . Check the circuit breaker located on the left side of the treadmill. SYMPTOM: THE POWER TURNS OFF DURING USE a. Make sure that the key is about 1/8". Remove the four screws from the sides of drained batteries. Make sure that... applies, and follow the steps listed. TROUBLE-SHOOTING Most treadmill problems can be solved by following the steps below. b. Remove ...
...free. 3. After the power cord has been plugged in . Check the circuit breaker located on the left side of the treadmill. SYMPTOM: THE POWER TURNS OFF DURING USE a. Make sure that the key is about 1/8". Remove the four screws from the sides of drained batteries. Make sure that... applies, and follow the steps listed. TROUBLE-SHOOTING Most treadmill problems can be solved by following the steps below. b. Remove ...
English Manual
Page 11
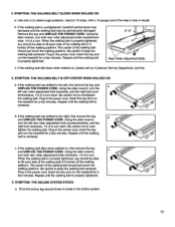
... break in the power cord, insert the key and run the treadmill for a few minutes. Repeat until the walking belt is overtightened, treadmill performance may decrease and the walking belt may be permanently damaged. Using the alien wrench, turn the left rear roller adjustment bolt counterclockwise,... slows when walked on , first remove the key and UNPLUG THE POWER CORD. Using the alien wrench, turn each . Plug in the power cord, insert the key and run the treadmill for a few minutes. Using the alien wrench, turn both rear roller adjustment bolts counterclockwise, 1/4 of a turn...
... break in the power cord, insert the key and run the treadmill for a few minutes. Repeat until the walking belt is overtightened, treadmill performance may decrease and the walking belt may be permanently damaged. Using the alien wrench, turn the left rear roller adjustment bolt counterclockwise,... slows when walked on , first remove the key and UNPLUG THE POWER CORD. Using the alien wrench, turn each . Plug in the power cord, insert the key and run the treadmill for a few minutes. Using the alien wrench, turn both rear roller adjustment bolts counterclockwise, 1/4 of a turn...
English Manual
Page 12
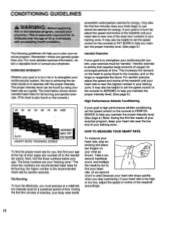
... AEROBIC 105 MAX. The three numbers are general guidelines only. During the first few minutes of the treadmill accordingly. 12 Take a sixsecond heartbeat count, and multiply the result by using your training zone. The lower two numbers are rounded off to exercise with re-ex .salty pr...For more detailed exercise information, obtain a reputable book or consult your training zone. For aerobic exercise, adjust the speed and incline of the treadmill until your heart rate is near one of time. FAT b.p.m. 95 90 FAT BURN HEART RATE TRAINING ZONES To find your heart rate. (A...
... AEROBIC 105 MAX. The three numbers are general guidelines only. During the first few minutes of the treadmill accordingly. 12 Take a sixsecond heartbeat count, and multiply the result by using your training zone. The lower two numbers are rounded off to exercise with re-ex .salty pr...For more detailed exercise information, obtain a reputable book or consult your training zone. For aerobic exercise, adjust the speed and incline of the treadmill until your heart rate is near one of time. FAT b.p.m. 95 90 FAT BURN HEART RATE TRAINING ZONES To find your heart rate. (A...


