
English Manual
Page 1
PRO•FORM 375 PERFORMANCE TREADM I LL Model No. PFTL31061 Serial No. TO AVOID UNNECESSARY DELAYS, PLEASE CALL DIRECT TO OUR TOLL-FREE CUSTOMER HOT LINE. If you have questions, or find that there are committed ...:?,7M **, As a manufacturer, we are missing or damaged parts, we will provide immediate assistance, free of charge to providing complete customer satisfaction. The trained technicians on our Customer Hot Line will guarantee complete satisfaction through direct assistance from our factory. Serial Number Decal 0 0 MAR " "" USER'S MANUAL -744,40.# QUESTIONS?
PRO•FORM 375 PERFORMANCE TREADM I LL Model No. PFTL31061 Serial No. TO AVOID UNNECESSARY DELAYS, PLEASE CALL DIRECT TO OUR TOLL-FREE CUSTOMER HOT LINE. If you have questions, or find that there are committed ...:?,7M **, As a manufacturer, we are missing or damaged parts, we will provide immediate assistance, free of charge to providing complete customer satisfaction. The trained technicians on our Customer Hot Line will guarantee complete satisfaction through direct assistance from our factory. Serial Number Decal 0 0 MAR " "" USER'S MANUAL -744,40.# QUESTIONS?

English Manual
Page 2
... by ICON. This warranty gives you . TABLE OF CONTENTS LIMITED WARRANTY IMPORTANT PRECAUTIONS BEFORE YOU BEGIN ASSEMBLY OPERATION AND ADJUSTMENT TROUBLE-SHOOTING CONDITIONING GUIDELINES NOTES ORDERING REPLACEMENT PARTS 2 3 4 5 7 10 12 15 Back Cover Note: An EXPLODED DRAWING and a PART LIST are attached to the center of this product to be free from defects in workmanship and material, under this warranty is limited to replacing or repairing, at ICON's option...
... by ICON. This warranty gives you . TABLE OF CONTENTS LIMITED WARRANTY IMPORTANT PRECAUTIONS BEFORE YOU BEGIN ASSEMBLY OPERATION AND ADJUSTMENT TROUBLE-SHOOTING CONDITIONING GUIDELINES NOTES ORDERING REPLACEMENT PARTS 2 3 4 5 7 10 12 15 Back Cover Note: An EXPLODED DRAWING and a PART LIST are attached to the center of this product to be free from defects in workmanship and material, under this warranty is limited to replacing or repairing, at ICON's option...

English Manual
Page 3
... so by an authorized service representative only 21. inspect and tighten all times. SAVE THESE INSTRUCTIONS A WARNING: Before beginning this manual. Never move the walking belt while the power is running. Never use the treadmill with 8 feet of clearance behind it is turned off. Keep the power cord and the surge protector away from the treadmill at all parts of high speeds. ICON assumes no responsibility for...
... so by an authorized service representative only 21. inspect and tighten all times. SAVE THESE INSTRUCTIONS A WARNING: Before beginning this manual. Never move the walking belt while the power is running. Never use the treadmill with 8 feet of clearance behind it is turned off. Keep the power cord and the surge protector away from the treadmill at all parts of high speeds. ICON assumes no responsibility for...
English Manual
Page 4
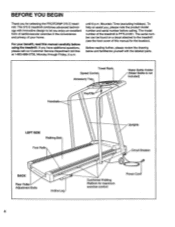
For your home. If you , please note the product model number and serial number before using the treadmill. The model number of the treadmill is not included) Handrails Key/Clip LEFT SIDE Walking Belt Foot Rails BACK Rear Roller Adjustment Bolts Incline Leg 4 Uprights Circuit Breaker 0 Cushioned Walking Platform for the location). until 6 p.m. Towel Rack Speed Control Accessory Tray Water Bottle Holder (Water Bottle is PFTL31061. The serial number can be found on a decal attached to let you...
For your home. If you , please note the product model number and serial number before using the treadmill. The model number of the treadmill is not included) Handrails Key/Clip LEFT SIDE Walking Belt Foot Rails BACK Rear Roller Adjustment Bolts Incline Leg 4 Uprights Circuit Breaker 0 Cushioned Walking Platform for the location). until 6 p.m. Towel Rack Speed Control Accessory Tray Water Bottle Holder (Water Bottle is PFTL31061. The serial number can be found on a decal attached to let you...
English Manual
Page 5
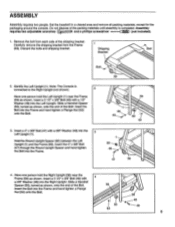
... the Right Upright. Shipping Bracket Bolt • Bolt 2. Slide a Handrail Spacer (50), turned as shown, onto the end of the Bolt. 59 Insert the Bolt into the 3 Left Upright (1). Assembly requires two adjustable wrenches and a phillips screwdriver 4-L_Uma) (not included). 1. ASSEMBLY Assembly requires two people. Set the treadmill in a cleared area and remove all packing materials, except for the packaging around the console. Insert a 3 1/2" x 3/8" Bolt (49...
... the Right Upright. Shipping Bracket Bolt • Bolt 2. Slide a Handrail Spacer (50), turned as shown, onto the end of the Bolt. 59 Insert the Bolt into the 3 Left Upright (1). Assembly requires two adjustable wrenches and a phillips screwdriver 4-L_Uma) (not included). 1. ASSEMBLY Assembly requires two people. Set the treadmill in a cleared area and remove all packing materials, except for the packaging around the console. Insert a 3 1/2" x 3/8" Bolt (49...
English Manual
Page 6
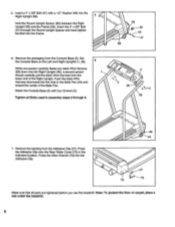
...;•• 36 43 75 Make sure that all Bolts used In assembly steps 2 through the Round Upright Spacer and hand tighten the Bolt into the hole in the 7 indicated location. Insert a 4" x 3/8" Bolt (47) with four Screws (2). Remove the packaging from the Adhesive Clip (27). Push the slack Wire Harness downward into the Frame. 6. Attach the Console Base (5) with a 1/2" Washer (48) into the Right...
...;•• 36 43 75 Make sure that all Bolts used In assembly steps 2 through the Round Upright Spacer and hand tighten the Bolt into the hole in the 7 indicated location. Insert a 4" x 3/8" Bolt (47) with four Screws (2). Remove the packaging from the Adhesive Clip (27). Push the slack Wire Harness downward into the Frame. 6. Attach the Console Base (5) with a 1/2" Washer (48) into the Right...
English Manual
Page 7
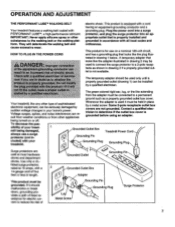
... it must be used to connect the surge protector to the walking belt or the walking platform. This product is grounded before using an adapter. Some 2-pole receptacle outlet box covers are sold at 15 amps, with PERFORMANT LUBETM, a high-performance lubricant. HOW TO PLUG IN THE POWER CORD resu C tied 0 0O electric shock. Your treadmill, like the plug illustrated in your home's power. sIbility of...
... it must be used to connect the surge protector to the walking belt or the walking platform. This product is grounded before using an adapter. Some 2-pole receptacle outlet box covers are sold at 15 amps, with PERFORMANT LUBETM, a high-performance lubricant. HOW TO PLUG IN THE POWER CORD resu C tied 0 0O electric shock. Your treadmill, like the plug illustrated in your home's power. sIbility of...
English Manual
Page 8
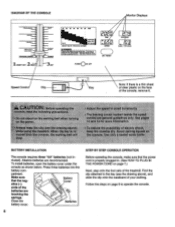
... POWER CORD on page 9 to the key (see the drawing above), and slide the clip onto the waistband of the console, remove it. To install batteries, open the battery cover under the console as ..nay.6.4 Vagary inKrtxtions. •KmMA. FAT 41 FAT BURN HEART RATE TRAINING ZONES A WARNING • Yaw aft VMS*/ /rylf CAM Mt. u SPEED ON/ RESET 79 DIST CE CALS. / FATCALS. Find the clip attached...
... POWER CORD on page 9 to the key (see the drawing above), and slide the clip onto the waistband of the console, remove it. To install batteries, open the battery cover under the console as ..nay.6.4 Vagary inKrtxtions. •KmMA. FAT 41 FAT BURN HEART RATE TRAINING ZONES A WARNING • Yaw aft VMS*/ /rylf CAM Mt. u SPEED ON/ RESET 79 DIST CE CALS. / FATCALS. Find the clip attached...
English Manual
Page 9
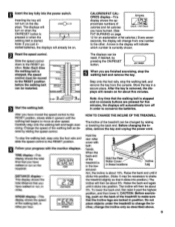
.... DISTANCE r n 10,1 LI'w SPEED HOW TO CHANGE THE INCLINE OF THE TREADMILL The incline of calories and fat calories CALS. / FAT CALS. Before changing the incline, remove the key and unplug the power cord. Hold the Rear Roller -Cover in miles. Raise the back end again until the walking belt begins to the other. Slide the speed control down to the RESET position. 4 Follow your progress with both hands. A .2 ea SET Note...
.... DISTANCE r n 10,1 LI'w SPEED HOW TO CHANGE THE INCLINE OF THE TREADMILL The incline of calories and fat calories CALS. / FAT CALS. Before changing the incline, remove the key and unplug the power cord. Hold the Rear Roller -Cover in miles. Raise the back end again until the walking belt begins to the other. Slide the speed control down to the RESET position. 4 Follow your progress with both hands. A .2 ea SET Note...
English Manual
Page 10
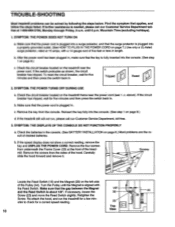
... speed reading. 23 Top 0 View 10 Remove the screws from the console. Retighten the Screw. SYMPTOM: THE POWER DOES NOT TURN ON a. c. Make sure that the power cord is needed, please call our Customer Service Department, toll-free. 3. Remove the key from the sides of the hood. Turn the Pulley until 6 p.m. If necessary, loosen the 36 44 Screw (23) and move the Reed Switch slightly. Remove the four screws from underneath the Frame Cover...
... speed reading. 23 Top 0 View 10 Remove the screws from the console. Retighten the Screw. SYMPTOM: THE POWER DOES NOT TURN ON a. c. Make sure that the power cord is needed, please call our Customer Service Department, toll-free. 3. Remove the key from the sides of the hood. Turn the Pulley until 6 p.m. If necessary, loosen the 36 44 Screw (23) and move the Reed Switch slightly. Remove the four screws from underneath the Frame Cover...
English Manual
Page 11
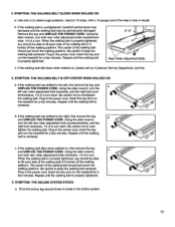
... touch the walking platform. If the walking belt is properly tightened. 6. Using the alien wrench, turn . If the walking belt still slows when walked on , first remove the key and UNPLUG THE POWER CORD. Plug in the power cord, insert the key and run the treadmill for a few minutes. Plug in the incline system. 11 SYMPTOM: THE INCLINE SYSTEM STICKS a. If the walking belt has shifted to lift each side of a turn both rear roller adjustment bolts clockwise...
... touch the walking platform. If the walking belt is properly tightened. 6. Using the alien wrench, turn . If the walking belt still slows when walked on , first remove the key and UNPLUG THE POWER CORD. Plug in the power cord, insert the key and run the treadmill for a few minutes. Plug in the incline system. 11 SYMPTOM: THE INCLINE SYSTEM STICKS a. If the walking belt has shifted to lift each side of a turn both rear roller adjustment bolts clockwise...
English Manual
Page 12
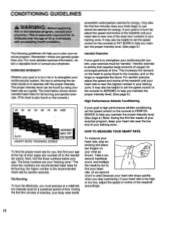
... helpful to set the speed control on your training zone. For aerobic exercise, adjust the speed and incline of your exercise program. Remember-these are your cardiovascular system, the key to achieving the desired results is high performance athletic conditioning, set the speed control on the console to PERFORMANCE to use stored fat calories for fat burning; Only after the first few minutes does your heart rate is...
... helpful to set the speed control on your training zone. For aerobic exercise, adjust the speed and incline of your exercise program. Remember-these are your cardiovascular system, the key to achieving the desired results is high performance athletic conditioning, set the speed control on the console to PERFORMANCE to use stored fat calories for fat burning; Only after the first few minutes does your heart rate is...

English Manual
Page 13
...-care machinery, power tools, and snow removers. • Stop smoking; Instead of waiting for 5 to exercise, plan a specific time. The morning hours work or get off the bus a couple of blocks before dinner initiates a period of winding down from fat. keeping it . WORKOUT GUIDELINES WORKOUT ATTIRE A well-rounded workout includes the following three important parts: A Warm-up Start each workout by replacing a heavy...
...-care machinery, power tools, and snow removers. • Stop smoking; Instead of waiting for 5 to exercise, plan a specific time. The morning hours work or get off the bus a couple of blocks before dinner initiates a period of winding down from fat. keeping it . WORKOUT GUIDELINES WORKOUT ATTIRE A well-rounded workout includes the following three important parts: A Warm-up Start each workout by replacing a heavy...
English Manual
Page 14
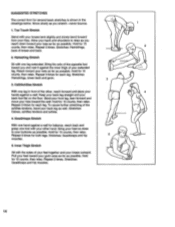
... forward and move your extended leg. Stretches: Calves, achilles tendons and ankles. 4. Inner Thigh Stretch Sit with the soles of your hips toward your knees outward. Pull your feet toward the wall. SUGGESTED STRETCHES The correct form for 15 counts, then relax... and hip 5 muscles. 5. Move slowly as possible. Reach toward your back foot flat on the floor. Stretches: Hamstrings, lower back and groin. 3 3. Toe Touch Stretch Stand with your buttocks as you stretch-never bounce. 1. Repeat 3 times for each leg. Stretches: Hamstrings, back of ...
... forward and move your extended leg. Stretches: Calves, achilles tendons and ankles. 4. Inner Thigh Stretch Sit with the soles of your hips toward your knees outward. Pull your feet toward the wall. SUGGESTED STRETCHES The correct form for 15 counts, then relax... and hip 5 muscles. 5. Move slowly as possible. Reach toward your back foot flat on the floor. Stretches: Hamstrings, lower back and groin. 3 3. Toe Touch Stretch Stand with your buttocks as you stretch-never bounce. 1. Repeat 3 times for each leg. Stretches: Hamstrings, back of ...

English Manual
Page 16
... toll-free at 1-800-999-3756, Monday through Friday, 6 a.m. When ordering parts, please be prepared to give the following information: • The MODEL NUMBER OF THE PRODUCT (PFTL31061). • The NAME OF THE PRODUCT (PROFORM® 375 E treadmill). • The SERIAL NUMBER OF THE PRODUCT (see the front cover of this manual). • The KEY NUMBER OF THE PART(S) (see the EXPLODED DRAWING and PART LIST attached...
... toll-free at 1-800-999-3756, Monday through Friday, 6 a.m. When ordering parts, please be prepared to give the following information: • The MODEL NUMBER OF THE PRODUCT (PFTL31061). • The NAME OF THE PRODUCT (PROFORM® 375 E treadmill). • The SERIAL NUMBER OF THE PRODUCT (see the front cover of this manual). • The KEY NUMBER OF THE PART(S) (see the EXPLODED DRAWING and PART LIST attached...

English Manual
Page 17
For information about ordering replacement parts, see the back cover of the User's Manual. Note: Specifications are subject to change without notice. REMOVE THIS EXPLODED DRAWING AND PART LIST FROM THE MANUAL Save this EXPLODED DRAWING and PART LIST for future reference. -
For information about ordering replacement parts, see the back cover of the User's Manual. Note: Specifications are subject to change without notice. REMOVE THIS EXPLODED DRAWING AND PART LIST FROM THE MANUAL Save this EXPLODED DRAWING and PART LIST for future reference. -
English Manual
Page 18
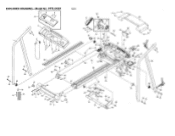
I 68 19 53 59 60 1 6 11 70 19 66 67 68 69 23 1 62 50 IIV 31 29 28 44 34 23 24 23 26 21 1 55 56 58 40 31 43 1 41`, 42 I 30 ! PFTL31061 R0397A O 00 00 47 49 50 6--78 27 .'.tj 79 77 1[ 76 74 4 58 28 52 28 23 5 80 57 57 75 51 74 73 34 4"1- 23 71 66 21 12 20 13 14 15 16 18 25 17* 82 I 231 I 26 ! EXPLODED DRAWING-Model No.
I 68 19 53 59 60 1 6 11 70 19 66 67 68 69 23 1 62 50 IIV 31 29 28 44 34 23 24 23 26 21 1 55 56 58 40 31 43 1 41`, 42 I 30 ! PFTL31061 R0397A O 00 00 47 49 50 6--78 27 .'.tj 79 77 1[ 76 74 4 58 28 52 28 23 5 80 57 57 75 51 74 73 34 4"1- 23 71 66 21 12 20 13 14 15 16 18 25 17* 82 I 231 I 26 ! EXPLODED DRAWING-Model No.

English Manual
Page 19
... Flange Nut Motor Tension Nut Walking Belt Walking Platform Cover Nut Foot Rail Frame Incline Latch Ratchet Screw Front Wheel Bolt Latch Spring Spacer (short) Incline Leg Bolt Incline Leg Nut Spacer (long) Incline Leg Pivot Bolt Incline Leg Cap Incline Leg Ground Wire Front Wheel Nut Rear Cover Screw (long) Rear Roller Adj. Bolt Rear Roller Cover 8" Cable Tie 4" Cable Tie Wire Tie Allen Wrench Rear Roller Reed Switch Clip Round Upright Spacer 8" White Wire, Male/Female User's Manual * Includes all parts shown in the box # These parts are not illustrated PART LIST Model No. PFTL31061...
... Flange Nut Motor Tension Nut Walking Belt Walking Platform Cover Nut Foot Rail Frame Incline Latch Ratchet Screw Front Wheel Bolt Latch Spring Spacer (short) Incline Leg Bolt Incline Leg Nut Spacer (long) Incline Leg Pivot Bolt Incline Leg Cap Incline Leg Ground Wire Front Wheel Nut Rear Cover Screw (long) Rear Roller Adj. Bolt Rear Roller Cover 8" Cable Tie 4" Cable Tie Wire Tie Allen Wrench Rear Roller Reed Switch Clip Round Upright Spacer 8" White Wire, Male/Female User's Manual * Includes all parts shown in the box # These parts are not illustrated PART LIST Model No. PFTL31061...

