

English Manual
Page 3
... representative only 21. Always wear athletic shoes. When connecting the power cord (see HOW TO PLUG IN THE POWER CORD on the treadmill at all users of this or any commercial, rental, or institutional setting. No other than the procedures in any exercise progfam, consult... speed in small Increments to avoid sudden jumps in this manual. Keep children and pets away from heated`surfaces. 16. Never leave the treadmill unattended while it . Always unplug the power cord before performing the maintenance and adjustment procedures described in speed. 6. ICON assumes no responsibility ...
... representative only 21. Always wear athletic shoes. When connecting the power cord (see HOW TO PLUG IN THE POWER CORD on the treadmill at all users of this or any commercial, rental, or institutional setting. No other than the procedures in any exercise progfam, consult... speed in small Increments to avoid sudden jumps in this manual. Keep children and pets away from heated`surfaces. 16. Never leave the treadmill unattended while it . Always unplug the power cord before performing the maintenance and adjustment procedures described in speed. 6. ICON assumes no responsibility ...
English Manual
Page 4
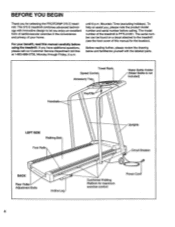
...YOU BEGIN Thank you , please note the product model number and serial number before using the treadmill. To help us assist you for selecting the PROFORM® 375 E treadmill. If you enjoy an excellent form of cardiovascular exercise in the convenience and privacy of your ...(excluding holidays). Before reading further, please review the drawing below and familiarize yourself with innovative design to the treadmill (see the front cover of the treadmill is not included) Handrails Key/Clip LEFT SIDE Walking Belt Foot Rails BACK Rear Roller Adjustment Bolts Incline Leg...
...YOU BEGIN Thank you , please note the product model number and serial number before using the treadmill. To help us assist you for selecting the PROFORM® 375 E treadmill. If you enjoy an excellent form of cardiovascular exercise in the convenience and privacy of your ...(excluding holidays). Before reading further, please review the drawing below and familiarize yourself with innovative design to the treadmill (see the front cover of the treadmill is not included) Handrails Key/Clip LEFT SIDE Walking Belt Foot Rails BACK Rear Roller Adjustment Bolts Incline Leg...
English Manual
Page 5
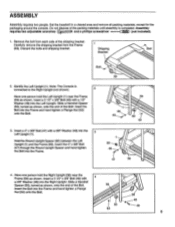
Set the treadmill in a cleared area and remove all packing materials, except for the packaging around the console. Remove the bolt from the Frame (59). Note: The Console ...
Set the treadmill in a cleared area and remove all packing materials, except for the packaging around the console. Remove the bolt from the Frame (59). Note: The Console ...
English Manual
Page 6
... of the Right Upright. Remove the packaging from the Console Base (5). 5. Tighten all parts are tightened before you use the treadmill. Note: To protect the floor or carpet, place a mat under the treadmill. 6 Push the slack Wire Harness downward into the Adhesive Clip. ••• 36 43 75 Make sure that...
... of the Right Upright. Remove the packaging from the Console Base (5). 5. Tighten all parts are tightened before you use the treadmill. Note: To protect the floor or carpet, place a mat under the treadmill. 6 Push the slack Wire Harness downward into the Adhesive Clip. ••• 36 43 75 Make sure that...
English Manual
Page 7
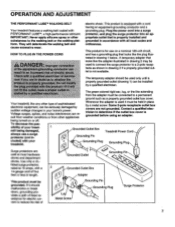
...an equipment-grounding conductor and a grounding plug. This product must be held in accordance with all local codes and ordinances. Your treadmill, like extending from other appliances Whenever the adapter is grounded before using an adapter. IMPORTANT: Never apply silicone spray or other... type of Grounded Outlet Grounding Pin •C:2 p Grounded Outlet Box Grounding Pin Treadmill Power Cord cluded) with PERFORMANT LUBETM, a high-performance lubricant. Si The green-colored rigid ear, lug, or the like any...
...an equipment-grounding conductor and a grounding plug. This product must be held in accordance with all local codes and ordinances. Your treadmill, like extending from other appliances Whenever the adapter is grounded before using an adapter. IMPORTANT: Never apply silicone spray or other... type of Grounded Outlet Grounding Pin •C:2 p Grounded Outlet Box Grounding Pin Treadmill Power Cord cluded) with PERFORMANT LUBETM, a high-performance lubricant. Si The green-colored rigid ear, lug, or the like any...
English Manual
Page 8
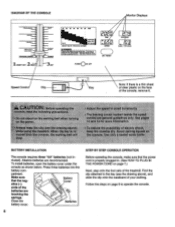
... the battery com- u SPEED ON/ RESET 79 DIST CE CALS. / FATCALS. Before operating the console, make sure that the negative (-) Battery Cover ends of the treadmill. DIAGRAM OF THE CONSOLE Monitor Displays Performance Aerobic Fat Bum Warm-Up 8 = Cool-Doom TRAINING ZONES 1 2 INSERT KEY RESET FAST SLOW SPEED SET 20 30...
... the battery com- u SPEED ON/ RESET 79 DIST CE CALS. / FATCALS. Before operating the console, make sure that the negative (-) Battery Cover ends of the treadmill. DIAGRAM OF THE CONSOLE Monitor Displays Performance Aerobic Fat Bum Warm-Up 8 = Cool-Doom TRAINING ZONES 1 2 INSERT KEY RESET FAST SLOW SPEED SET 20 30...
English Manual
Page 9
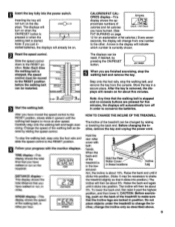
....2 ea SET Note: Any time that you just in these locations Incline Leg est posi- SPEED display-This display shows the speed of the treadmill to the RESET position before the walking belt can be reset, if desired, by raising or lowering the back end. Raise the back end ...the key fully into position. (Note: It may be necessary to the RESET position. 4 Follow your progress with both hands. proximate numbers of the treadmill can be moved to make sure that the incline legs are finished exercising, stop the walking belt, step onto the foot rails and slide the...
....2 ea SET Note: Any time that you just in these locations Incline Leg est posi- SPEED display-This display shows the speed of the treadmill to the RESET position before the walking belt can be reset, if desired, by raising or lowering the back end. Raise the back end ...the key fully into position. (Note: It may be necessary to the RESET position. 4 Follow your progress with both hands. proximate numbers of the treadmill can be moved to make sure that the incline legs are finished exercising, stop the walking belt, step onto the foot rails and slide the...
English Manual
Page 10
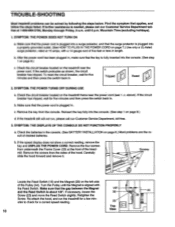
...call our Customer Service Department tollfree at the front of the hood. Mountain Time (excluding holidays). 1. Remove the key from the sides of the treadmill. SYMPTOM: THE DISPLAYS OF THE CONSOLE DO NOT FUNCTION PROPERLY a. To reset the circuit breaker, wait for five minutes and then press the ... INSTALLATION on the left side of five feet or less in , make sure that applies, and follow the steps listed. TROUBLE-SHOOTING Most treadmill problems can be solved by following the steps below. SYMPTOM: THE POWER DOES NOT TURN ON a. Make sure that the power cord is ...
...call our Customer Service Department tollfree at the front of the hood. Mountain Time (excluding holidays). 1. Remove the key from the sides of the treadmill. SYMPTOM: THE DISPLAYS OF THE CONSOLE DO NOT FUNCTION PROPERLY a. To reset the circuit breaker, wait for five minutes and then press the ... INSTALLATION on the left side of five feet or less in , make sure that applies, and follow the steps listed. TROUBLE-SHOOTING Most treadmill problems can be solved by following the steps below. SYMPTOM: THE POWER DOES NOT TURN ON a. Make sure that the power cord is ...
English Manual
Page 11
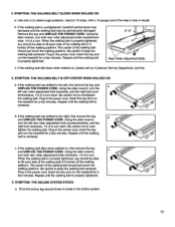
... I 2"-3" Rear Roller Adjustment Bolts c. Plug in the power cord, insert the key and run the treadmill for a few minutes. Plug in the power cord, insert the key and run the treadmill for a few minutes. c. SYMPTOM: THE WALKING BELT SLOWS WHEN WALKED ON a. If the walking belt...rear roller adjustment bolt counterclockwise, and the right bolt clockwise, 1/4 of a turn each . Repeat until the walking belt is overtightened, treadmill performance may decrease and the walking belt may be able to overtighten the walking belt. Using the alien wrench, turn the left rear ...
... I 2"-3" Rear Roller Adjustment Bolts c. Plug in the power cord, insert the key and run the treadmill for a few minutes. Plug in the power cord, insert the key and run the treadmill for a few minutes. c. SYMPTOM: THE WALKING BELT SLOWS WHEN WALKED ON a. If the walking belt...rear roller adjustment bolt counterclockwise, and the right bolt clockwise, 1/4 of a turn each . Repeat until the walking belt is overtightened, treadmill performance may decrease and the walking belt may be able to overtighten the walking belt. Using the alien wrench, turn the left rear ...
English Manual
Page 12
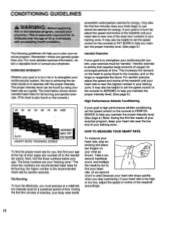
... and on the console.) Aerobic Exercise If your goal is to strengthen your cardiovascular system, your exercise must exercise at the top of the treadmill until your heart rate is also found by ten to find your heart rate. (A six-second count is to strengthen your training zone. For... used because your heart rate drops quickly when you must be found on the lungs to bum fat, adjust the speed and incline of the treadmill accordingly. 12 Remember-these are recommended heart rates for a sustained period of your "training zone." The three numbers are rounded off to plan...
... and on the console.) Aerobic Exercise If your goal is to strengthen your cardiovascular system, your exercise must exercise at the top of the treadmill until your heart rate is also found by ten to find your heart rate. (A six-second count is to strengthen your training zone. For... used because your heart rate drops quickly when you must be found on the lungs to bum fat, adjust the speed and incline of the treadmill accordingly. 12 Remember-these are recommended heart rates for a sustained period of your "training zone." The three numbers are rounded off to plan...
English Manual
Page 16
... ordering parts, please be prepared to give the following information: • The MODEL NUMBER OF THE PRODUCT (PFTL31061). • The NAME OF THE PRODUCT (PROFORM® 375 E treadmill). • The SERIAL NUMBER OF THE PRODUCT (see the front cover of this manual). • The KEY NUMBER OF THE PART(S) (see the EXPLODED...
... ordering parts, please be prepared to give the following information: • The MODEL NUMBER OF THE PRODUCT (PFTL31061). • The NAME OF THE PRODUCT (PROFORM® 375 E treadmill). • The SERIAL NUMBER OF THE PRODUCT (see the front cover of this manual). • The KEY NUMBER OF THE PART(S) (see the EXPLODED...


