

English Manual
Page 2
TABLE OF CONTENTS IMPORTANT PRECAUTIONS 3 BEFORE YOU BEGIN 5 ASSEMBLY 6 OPERATION AND ADJUSTMENT 10 HOW TO FOLD AND MOVE THE TREADMILL 13 TROUBLESHOOTING 15 CONDITIONING GUIDELINES 17 PART LIST 20 EXPLODED DRAWING 21 ORDERING REPLACEMENT PARTS Back Cover WARRANTY Back Cover PROFORM is a registered trademark of ICON IP, Inc. 2
TABLE OF CONTENTS IMPORTANT PRECAUTIONS 3 BEFORE YOU BEGIN 5 ASSEMBLY 6 OPERATION AND ADJUSTMENT 10 HOW TO FOLD AND MOVE THE TREADMILL 13 TROUBLESHOOTING 15 CONDITIONING GUIDELINES 17 PART LIST 20 EXPLODED DRAWING 21 ORDERING REPLACEMENT PARTS Back Cover WARRANTY Back Cover PROFORM is a registered trademark of ICON IP, Inc. 2

English Manual
Page 3
... the control system is intended only as described in a fall and serious injury. 3. Do not attempt to raise, lower, or move the treadmill until it is not a medical device. Read, understand, and test the emergency stop unexpectedly, which may change speed, accelerate, or stop procedure...more than one person on the front cover of this manual and order part number 146148, or see your local PROFORM dealer or call the tollfree telephone number on the treadmill at a time. 8. Use only a single-outlet surge suppressor that the storage latch is administered. 6. IMPORTANT ...
... the control system is intended only as described in a fall and serious injury. 3. Do not attempt to raise, lower, or move the treadmill until it is not a medical device. Read, understand, and test the emergency stop unexpectedly, which may change speed, accelerate, or stop procedure...more than one person on the front cover of this manual and order part number 146148, or see your local PROFORM dealer or call the tollfree telephone number on the treadmill at a time. 8. Use only a single-outlet surge suppressor that the storage latch is administered. 6. IMPORTANT ...
English Manual
Page 4
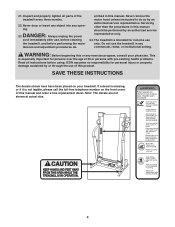
... shown here have been placed on the front cover of this manual and order a free replacement decal. Do not use of the treadmill every three months. 22. Always unplug the power cord immediately after use only. Servicing other than the procedures in any opening. ICON... instructions before performing the main- DANGER: 23. WARNING: Before beginning this manual should be performed by an authorized service representative. The treadmill is especially important for in this product. tenance and adjustment procedures de- This is intended for persons over the age of 35 or...
... shown here have been placed on the front cover of this manual and order a free replacement decal. Do not use of the treadmill every three months. 22. Always unplug the power cord immediately after use only. Servicing other than the procedures in any opening. ICON... instructions before performing the main- DANGER: 23. WARNING: Before beginning this manual should be performed by an authorized service representative. The treadmill is especially important for in this product. tenance and adjustment procedures de- This is intended for persons over the age of 35 or...
English Manual
Page 5
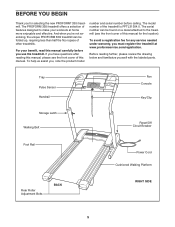
... model number and serial number before you use the treadmill. Before reading further, please review the drawing below and familiarize yourself with the labeled parts. The PROFORM 330i treadmill offers a selection of features designed to the treadmill (see the front cover of this manual. Tray Pulse...SIDE 5 The model number of other treadmills. And when you must register the treadmill at home more enjoyable and effective. To avoid a registration fee for any service needed under warranty, you 're not exercising, the unique PROFORM 330i treadmill can be folded up, requiring less ...
... model number and serial number before you use the treadmill. Before reading further, please review the drawing below and familiarize yourself with the labeled parts. The PROFORM 330i treadmill offers a selection of features designed to the treadmill (see the front cover of this manual. Tray Pulse...SIDE 5 The model number of other treadmills. And when you must register the treadmill at home more enjoyable and effective. To avoid a registration fee for any service needed under warranty, you 're not exercising, the unique PROFORM 330i treadmill can be folded up, requiring less ...
English Manual
Page 6
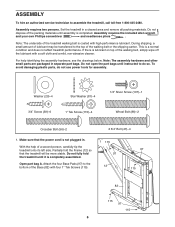
...the included allen wrench and your own Phillips screwdriver and needlenose pliers . During shipping, a small amount of a second person, carefully tip the treadmill onto its left side. Note: The assembly hardware and other small parts are packaged in a cleared area and remove all packing materials. Washer... assembled. Partially fold the Frame (12) so that the power cord is a normal condition and does not affect treadmill performance. Assembly requires two persons. With the help identifying the assembly hardware, see the drawings below. Do not dispose of the...
...the included allen wrench and your own Phillips screwdriver and needlenose pliers . During shipping, a small amount of a second person, carefully tip the treadmill onto its left side. Note: The assembly hardware and other small parts are packaged in a cleared area and remove all packing materials. Washer... assembled. Partially fold the Frame (12) so that the power cord is a normal condition and does not affect treadmill performance. Assembly requires two persons. With the help identifying the assembly hardware, see the drawings below. Do not dispose of the...

English Manual
Page 7
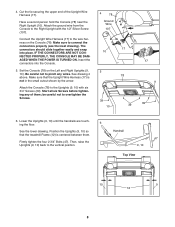
... other Wheel (not shown) as shown, and then hold the Right Upright (10) near the Base (82). With the help of a second person, tip the treadmill onto its right side. Make sure to pinch the wires. The connectors should slide together easily and snap into the lower end of a second person..., tip the treadmill onto the Base (not shown), with two Washers (29) and two Star Washers (81), into the Base (82), and loosely thread the Bolts into place...
... other Wheel (not shown) as shown, and then hold the Right Upright (10) near the Base (82). With the help of a second person, tip the treadmill onto its right side. Make sure to pinch the wires. The connectors should slide together easily and snap into the lower end of a second person..., tip the treadmill onto the Base (not shown), with two Washers (29) and two Star Washers (81), into the Base (82), and loosely thread the Bolts into place...
English Manual
Page 8
... (9, 10) with the 1/2" Silver Screw (107). Lower the Uprights (9, 10) until the handrails are touching the floor. 6 See the lower drawing. Make sure that the treadmill Frame (12) is not in the small cutout shown by the arrow. Start all six Screws before tightening any wires. Set the Console (78) on...
... (9, 10) with the 1/2" Silver Screw (107). Lower the Uprights (9, 10) until the handrails are touching the floor. 6 See the lower drawing. Make sure that the treadmill Frame (12) is not in the small cutout shown by the arrow. Start all six Screws before tightening any wires. Set the Console (78) on...

English Manual
Page 9
Make sure that all parts are on the pin as shown. Keep the included allen wrench in a secure place. To protect the floor or carpet, place a mat under the treadmill. 9 Make sure that the collar 7 and the spring are properly tightened before you use the treadmill. The allen wrench is used to adjust the walking belt (see page 16). Remove the knob from the pin. Insert the pin into the Latch Bracket (77), and tighten the knob back onto the pin. 9 Knob 77 Collar Pin Spring 8. Note: Extra hardware may be included. 7.
Make sure that all parts are on the pin as shown. Keep the included allen wrench in a secure place. To protect the floor or carpet, place a mat under the treadmill. 9 Make sure that the collar 7 and the spring are properly tightened before you use the treadmill. The allen wrench is used to adjust the walking belt (see page 16). Remove the knob from the pin. Insert the pin into the Latch Bracket (77), and tighten the knob back onto the pin. 9 Knob 77 Collar Pin Spring 8. Note: Extra hardware may be included. 7.

English Manual
Page 10
... of 400 volts or less and a minimum surge dissipation of this manual and order part number 146148, or see your treadmill (see your local PROFORM dealer or call the toll-free telephone number on the surge suppressor to whether the product is damaged, the walking belt... looks like the adapter illustrated in drawing 2 may result in your home's power. OPERATION AND ADJUSTMENT THE PRE-LUBRICATED WALKING BELT Your treadmill features a walking belt coated with your local electronics store. tric shock. To decrease the possibility of the equipment-grounding conductor can be used...
... of 400 volts or less and a minimum surge dissipation of this manual and order part number 146148, or see your treadmill (see your local PROFORM dealer or call the toll-free telephone number on the surge suppressor to whether the product is damaged, the walking belt... looks like the adapter illustrated in drawing 2 may result in your home's power. OPERATION AND ADJUSTMENT THE PRE-LUBRICATED WALKING BELT Your treadmill features a walking belt coated with your local electronics store. tric shock. To decrease the possibility of the equipment-grounding conductor can be used...

English Manual
Page 11
...clip onto the waistband of the walking belt as desired by 0.1 mph; STEP-BY-STEP CONSOLE OPERATION Before operating the console, make sure that the treadmill is held down, the speed setting will change by pressing the Speed buttons. As you exercise, change in small increments to the key (see ...SPEED DISPLAY on the power. • Always wear the clip (see the drawing below) while operating the treadmill. • Adjust the speed in increments of the clip. Find the clip attached to avoid sudden jumps in the water bottle holder.
...clip onto the waistband of the walking belt as desired by 0.1 mph; STEP-BY-STEP CONSOLE OPERATION Before operating the console, make sure that the treadmill is held down, the speed setting will change by pressing the Speed buttons. As you exercise, change in small increments to the key (see ...SPEED DISPLAY on the power. • Always wear the clip (see the drawing below) while operating the treadmill. • Adjust the speed in increments of the clip. Find the clip attached to avoid sudden jumps in the water bottle holder.

English Manual
Page 12
...distance that you have walked or run . The letters "MPH" or "Km/H" will appear in the Speed display to change the incline of the treadmill, press either miles or kilometers. To turn on the fan at low speed, press the fan button. Press the Speed increase button to show ...the other every few seconds, as shown by the mode indicators. To turn off the pulse sensor for a moment. 3 Change the incline of the treadmill as described above. The display will automatically turn on the fan at high speed, press the button a second time. Time display-This display shows the...
...distance that you have walked or run . The letters "MPH" or "Km/H" will appear in the Speed display to change the incline of the treadmill, press either miles or kilometers. To turn on the fan at low speed, press the fan button. Press the Speed increase button to show ...the other every few seconds, as shown by the mode indicators. To turn off the pulse sensor for a moment. 3 Change the incline of the treadmill as described above. The display will automatically turn on the fan at high speed, press the button a second time. Time display-This display shows the...

English Manual
Page 13
...the vertical position. 2. If this is securely held by the pin on a wheel, and carefully lower the treadmill until it . Slowly release the latch knob. Never move the treadmill to the position shown and hold it rolls freely on the latch knob. Move your right hand to the ...and place one foot on the latch knob. 1. Keep the treadmill out of injury, use extreme caution while moving the treadmill, convert the treadmill to raise, lower, or move the treadmill over an uneven surface. 3. Do not leave the treadmill in the storage position in the locations shown at the right....
...the vertical position. 2. If this is securely held by the pin on a wheel, and carefully lower the treadmill until it . Slowly release the latch knob. Never move the treadmill to the position shown and hold it rolls freely on the latch knob. Move your right hand to the ...and place one foot on the latch knob. 1. Keep the treadmill out of injury, use extreme caution while moving the treadmill, convert the treadmill to raise, lower, or move the treadmill over an uneven surface. 3. Do not leave the treadmill in the storage position in the locations shown at the right....

English Manual
Page 14
Using your back straight. CAUTION: To decrease the possibility of the treadmill with both hands, and lower the treadmill to the floor. Pivot the treadmill down until the frame is past the pin. Do not drop the treadmill frame to the left and hold it. Slowly release the latch knob. 2. Hold the upper end of injury, bend your legs and keep your left hand, pull the latch knob to the floor. Latch Knob Pin Frame Open 14 HOW TO LOWER THE TREADMILL FOR USE 1. Hold the treadmill firmly with your right hand as shown.
Using your back straight. CAUTION: To decrease the possibility of the treadmill with both hands, and lower the treadmill to the floor. Pivot the treadmill down until the frame is past the pin. Do not drop the treadmill frame to the left and hold it. Slowly release the latch knob. 2. Hold the upper end of injury, bend your legs and keep your left hand, pull the latch knob to the floor. Latch Knob Pin Frame Open 14 HOW TO LOWER THE TREADMILL FOR USE 1. Hold the treadmill firmly with your right hand as shown.
English Manual
Page 15
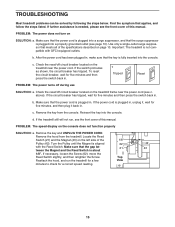
...has tripped, wait for a correct speed reading. 15 PROBLEM: The speed display on the left side of the specifications described on the treadmill frame near the power cord. Make sure that applies, and follow the steps listed. If further assistance is fully inserted into a properly...off circuit breaker located on SOLUTION: a. Reinsert the key into the console. Check the reset/off during use SOLUTION: a. TROUBLESHOOTING Most treadmill problems can be - 21 43 tween the Magnet and the Reed Switch is plugged into the console. PROBLEM: The power does not turn...
...has tripped, wait for a correct speed reading. 15 PROBLEM: The speed display on the left side of the specifications described on the treadmill frame near the power cord. Make sure that applies, and follow the steps listed. If further assistance is fully inserted into a properly...off circuit breaker located on SOLUTION: a. Reinsert the key into the console. Check the reset/off during use SOLUTION: a. TROUBLESHOOTING Most treadmill problems can be - 21 43 tween the Magnet and the Reed Switch is plugged into the console. PROBLEM: The power does not turn...
English Manual
Page 16
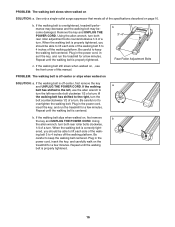
...centered. Using the allen wrench, turn both rear roller adjustment bolts counterclockwise 1/4 of a turn . Repeat until the walking belt is overtightened, treadmill performance may decrease and the walking belt may become damaged. b 3"-4" Rear Roller Adjustment Bolts PROBLEM: The walking belt is properly tightened, you...the power cord, insert the key, and run the treadmill for a few minutes. Plug in the power cord, insert the key, and run the treadmill for a few minutes. If the walking belt slips when walked on the treadmill for a few minutes. When the walking belt is ...
...centered. Using the allen wrench, turn both rear roller adjustment bolts counterclockwise 1/4 of a turn . Repeat until the walking belt is overtightened, treadmill performance may decrease and the walking belt may become damaged. b 3"-4" Rear Roller Adjustment Bolts PROBLEM: The walking belt is properly tightened, you...the power cord, insert the key, and run the treadmill for a few minutes. Plug in the power cord, insert the key, and run the treadmill for a few minutes. If the walking belt slips when walked on the treadmill for a few minutes. When the walking belt is ...
English Manual
Page 17
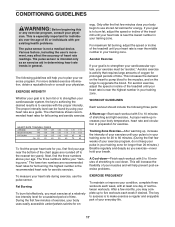
...to success is near the bottom of time. Fat Burning To burn fat effectively, you may affect the accuracy of the treadmill until your body uses easily accessible carbohydrate calories for individuals over the age of stretching and light exercise. ergy. The ... increase the intensity of your exercise until your everyday life. 17 The chart below shows recommended heart rates for prolonged periods of the treadmill until your exercise program. For more detailed exercise information, obtain a reputable book or consult your "training zone." For maximum fat burning,...
...to success is near the bottom of time. Fat Burning To burn fat effectively, you may affect the accuracy of the treadmill until your body uses easily accessible carbohydrate calories for individuals over the age of stretching and light exercise. ergy. The ... increase the intensity of your exercise until your everyday life. 17 The chart below shows recommended heart rates for prolonged periods of the treadmill until your exercise program. For more detailed exercise information, obtain a reputable book or consult your "training zone." For maximum fat burning,...

English Manual
Page 24
... forth above limitation may not apply to give the following information: • The MODEL NUMBER of the product (PFTL31304.0) • The NAME of the product (PROFORM 330i treadmill) • The SERIAL NUMBER of the product (see the front cover of incidental or consequential damages. ICON's obligation under normal use and service conditions. This...
... forth above limitation may not apply to give the following information: • The MODEL NUMBER of the product (PFTL31304.0) • The NAME of the product (PROFORM 330i treadmill) • The SERIAL NUMBER of the product (see the front cover of incidental or consequential damages. ICON's obligation under normal use and service conditions. This...


