
English Manual
Page 1
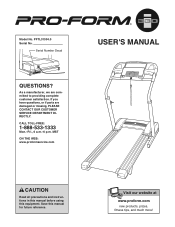
... if parts are committed to providing complete customer satisfaction. Visit our website at www.proform.com new products, prizes, fitness tips, and much more! PFTL31304.0 Serial No. CALL TOLL-FREE: 1-888-533-1333 Mon.-Fri., 6 a.m.-6 p.m. Serial Number Decal QUESTIONS? Model No. MST ON THE WEB: www.proformservice.com USER'S MANUAL CAUTION Read all precautions and instructions in this manual before using this manual for...
... if parts are committed to providing complete customer satisfaction. Visit our website at www.proform.com new products, prizes, fitness tips, and much more! PFTL31304.0 Serial No. CALL TOLL-FREE: 1-888-533-1333 Mon.-Fri., 6 a.m.-6 p.m. Serial Number Decal QUESTIONS? Model No. MST ON THE WEB: www.proformservice.com USER'S MANUAL CAUTION Read all precautions and instructions in this manual before using this manual for...

English Manual
Page 2
TABLE OF CONTENTS IMPORTANT PRECAUTIONS 3 BEFORE YOU BEGIN 5 ASSEMBLY 6 OPERATION AND ADJUSTMENT 10 HOW TO FOLD AND MOVE THE TREADMILL 13 TROUBLESHOOTING 15 CONDITIONING GUIDELINES 17 PART LIST 20 EXPLODED DRAWING 21 ORDERING REPLACEMENT PARTS Back Cover WARRANTY Back Cover PROFORM is a registered trademark of ICON IP, Inc. 2
TABLE OF CONTENTS IMPORTANT PRECAUTIONS 3 BEFORE YOU BEGIN 5 ASSEMBLY 6 OPERATION AND ADJUSTMENT 10 HOW TO FOLD AND MOVE THE TREADMILL 13 TROUBLESHOOTING 15 CONDITIONING GUIDELINES 17 PART LIST 20 EXPLODED DRAWING 21 ORDERING REPLACEMENT PARTS Back Cover WARRANTY Back Cover PROFORM is a registered trademark of ICON IP, Inc. 2

English Manual
Page 3
... cover of this manual and order part number 146148, or see OPERATION AND ADJUSTMENT on the treadmill at a time. 8. Always remove the key, unplug the power cord, and move the reset/off . Do not put the treadmill in speed. 17. Keep children under the treadmill. 4. Read, understand, and test the emergency stop unexpectedly, which may affect the accuracy of heart rate readings. Always hold the handrails while using the treadmill...
... cover of this manual and order part number 146148, or see OPERATION AND ADJUSTMENT on the treadmill at a time. 8. Always remove the key, unplug the power cord, and move the reset/off . Do not put the treadmill in speed. 17. Keep children under the treadmill. 4. Read, understand, and test the emergency stop unexpectedly, which may affect the accuracy of heart rate readings. Always hold the handrails while using the treadmill...
English Manual
Page 4
Always unplug the power cord immediately after use of this manual and order a free replacement decal. Never remove the motor hood unless instructed to do so by an authorized service representative only. 24. tenance and adjustment procedures de- SAVE THESE INSTRUCTIONS The decals shown here have been placed on the front cover of the treadmill every three months. 22. Inspect and properly tighten all instructions before performing the...
Always unplug the power cord immediately after use of this manual and order a free replacement decal. Never remove the motor hood unless instructed to do so by an authorized service representative only. 24. tenance and adjustment procedures de- SAVE THESE INSTRUCTIONS The decals shown here have been placed on the front cover of the treadmill every three months. 22. Inspect and properly tighten all instructions before performing the...
English Manual
Page 5
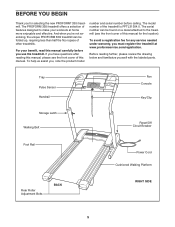
... service needed under warranty, you must register the treadmill at home more enjoyable and effective. And when you , note the product model number and serial number before you have questions after reading this manual, please see the front cover of this manual for the location). For your workouts at www.proformservice.com/registration. Tray Pulse Sensor Handrail Fan Console Key/Clip Storage Latch Walking Belt Reset/Off Circuit Breaker Foot Rail Rear Roller Adjustment Bolts BACK Power Cord Cushioned Walking...
... service needed under warranty, you must register the treadmill at home more enjoyable and effective. And when you , note the product model number and serial number before you have questions after reading this manual, please see the front cover of this manual for the location). For your workouts at www.proformservice.com/registration. Tray Pulse Sensor Handrail Fan Console Key/Clip Storage Latch Walking Belt Reset/Off Circuit Breaker Foot Rail Rear Roller Adjustment Bolts BACK Power Cord Cushioned Walking...
English Manual
Page 6
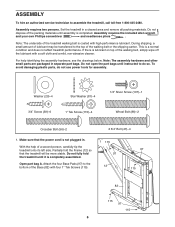
... not use power tools for assembly. Assembly requires two persons. Do not dispose of the treadmill walking belt is lubricant on top of a second person, carefully tip the treadmill onto its left side. For help of the walking belt, simply wipe off the lubricant with four 1" Tek Screws (115). 1 115 97 12 97 115 82 115 97 115 6 Open part bag A. Set the treadmill in separate part bags...
... not use power tools for assembly. Assembly requires two persons. Do not dispose of the treadmill walking belt is lubricant on top of a second person, carefully tip the treadmill onto its left side. For help of the walking belt, simply wipe off the lubricant with four 1" Tek Screws (115). 1 115 97 12 97 115 82 115 97 115 6 Open part bag A. Set the treadmill in separate part bags...

English Manual
Page 7
... a vertical position. Open part bag B. Make sure that the square hole in the Crossbar is on the Left and Right Uprights (9, 10). Have a second person hold the Right Upright against the Base. IF THE CONNECTORS ARE NOT CONNECTED PROPERLY, THE CONSOLE MAY BE DAMAGED WHEN THE POWER IS TURNED ON. Carefully wrap the wires around the connectors. Attach a Wheel (95...
... a vertical position. Open part bag B. Make sure that the square hole in the Crossbar is on the Left and Right Uprights (9, 10). Have a second person hold the Right Upright against the Base. IF THE CONNECTORS ARE NOT CONNECTED PROPERLY, THE CONSOLE MAY BE DAMAGED WHEN THE POWER IS TURNED ON. Carefully wrap the wires around the connectors. Attach a Wheel (95...
English Manual
Page 8
... the Left and Right Uprights (9, 10). Attach the ground wire from the Console to the Uprights (9, 10) with the 1/2" Silver Screw (107). IF THE CONNECTORS ARE NOT CONNECTED PROPERLY, THE CONSOLE MAY BE DAMAGED WHEN THE POWER IS TURNED ON. Start all six Screws before tightening any wires. Firmly tighten the four 2 3/4" Bolts (47). Attach the Console (78) to the Right Upright with six 3/4" Screws (39). Lower the Uprights (9, 10) until the...
... the Left and Right Uprights (9, 10). Attach the ground wire from the Console to the Uprights (9, 10) with the 1/2" Silver Screw (107). IF THE CONNECTORS ARE NOT CONNECTED PROPERLY, THE CONSOLE MAY BE DAMAGED WHEN THE POWER IS TURNED ON. Start all six Screws before tightening any wires. Firmly tighten the four 2 3/4" Bolts (47). Attach the Console (78) to the Right Upright with six 3/4" Screws (39). Lower the Uprights (9, 10) until the...

English Manual
Page 9
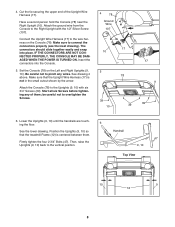
7. Insert the pin into the Latch Bracket (77), and tighten the knob back onto the pin. 9 Knob 77 Collar Pin Spring 8. Make sure that the collar 7 and the spring are properly tightened before you use the treadmill. To protect the floor or carpet, place a mat under the treadmill. 9 Note: Extra hardware may be included. The allen wrench is used to adjust the walking belt (see page 16). Make sure that all parts are on the pin as shown. Keep the included allen wrench in a secure place. Remove the knob from the pin.
7. Insert the pin into the Latch Bracket (77), and tighten the knob back onto the pin. 9 Knob 77 Collar Pin Spring 8. Make sure that the collar 7 and the spring are properly tightened before you use the treadmill. To protect the floor or carpet, place a mat under the treadmill. 9 Note: Extra hardware may be included. The allen wrench is used to adjust the walking belt (see page 16). Make sure that all parts are on the pin as shown. Keep the included allen wrench in a secure place. Remove the knob from the pin.

English Manual
Page 10
... the outlet box cover is equipped with your treadmill being turned on the surge suppressor to reduce the risk of least resistance for electric current to indicate whether it will deteriorate the walking belt and cause excessive wear. Contact a qualified electrician to the control system of your treadmill (see your home's power. HOW TO PLUG IN THE POWER CORD DANGER: Improper connection of the...
... the outlet box cover is equipped with your treadmill being turned on the surge suppressor to reduce the risk of least resistance for electric current to indicate whether it will deteriorate the walking belt and cause excessive wear. Contact a qualified electrician to the control system of your treadmill (see your home's power. HOW TO PLUG IN THE POWER CORD DANGER: Improper connection of the...

English Manual
Page 11
... start the walking belt. As you exercise, change the speed of the walking belt as desired by carefully taking a few minutes that the power cord is held down, the speed setting will light. 2 Press the Start button or the Speed increase button to a stop the walking belt, press the Stop button. Note: The console can be pulled from the console, adjust the position of the clip. Important: In an emergency situation, the key can display speed and distance in either miles...
... start the walking belt. As you exercise, change the speed of the walking belt as desired by carefully taking a few minutes that the power cord is held down, the speed setting will light. 2 Press the Start button or the Speed increase button to a stop the walking belt, press the Stop button. Note: The console can be pulled from the console, adjust the position of the clip. Important: In an emergency situation, the key can display speed and distance in either miles...

English Manual
Page 12
... walking belt. When the desired unit of fat calories and calories you use the pulse sensor (see FAT BURNING on the fan if desired. proximate numbers of measurement is selected. After a few seconds, the heart- Time display-This display shows the elapsed time you have burned (see step 5). Note: The console can display speed and distance in a secure place. 12 To change from the console. The display...
... walking belt. When the desired unit of fat calories and calories you use the pulse sensor (see FAT BURNING on the fan if desired. proximate numbers of measurement is selected. After a few seconds, the heart- Time display-This display shows the elapsed time you have burned (see step 5). Note: The console can display speed and distance in a secure place. 12 To change from the console. The display...

English Manual
Page 13
... securely held by the pin on the wheels. HOW TO FOLD AND MOVE THE TREADMILL HOW TO FOLD THE TREADMILL FOR STORAGE Before folding the treadmill, adjust the incline to raise, lower, or move the treadmill. 1. Next, unplug the power cord. CAUTION: To decrease the possibility of direct sunlight. Raise the treadmill about halfway to the desired location. Raise the treadmill until it rolls freely on the latch knob. 1. To protect the...
... securely held by the pin on the wheels. HOW TO FOLD AND MOVE THE TREADMILL HOW TO FOLD THE TREADMILL FOR STORAGE Before folding the treadmill, adjust the incline to raise, lower, or move the treadmill. 1. Next, unplug the power cord. CAUTION: To decrease the possibility of direct sunlight. Raise the treadmill about halfway to the desired location. Raise the treadmill until it rolls freely on the latch knob. 1. To protect the...

English Manual
Page 14
Slowly release the latch knob. 2. Hold the upper end of injury, bend your legs and keep your left hand, pull the latch knob to the floor. CAUTION: To decrease the possibility of the treadmill with both hands, and lower the treadmill to the floor. Hold the treadmill firmly with your right hand as shown. Using your back straight. Pivot the treadmill down until the frame is past the pin. Latch Knob Pin Frame Open 14 Do not drop the treadmill frame to the left and hold it. HOW TO LOWER THE TREADMILL FOR USE 1.
Slowly release the latch knob. 2. Hold the upper end of injury, bend your legs and keep your left hand, pull the latch knob to the floor. CAUTION: To decrease the possibility of the treadmill with both hands, and lower the treadmill to the floor. Hold the treadmill firmly with your right hand as shown. Using your back straight. Pivot the treadmill down until the frame is past the pin. Latch Knob Pin Frame Open 14 Do not drop the treadmill frame to the left and hold it. HOW TO LOWER THE TREADMILL FOR USE 1.
English Manual
Page 15
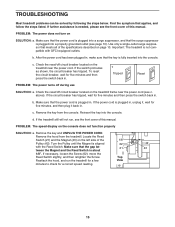
... the reset/off during use SOLUTION: a. If the switch protrudes as shown, the circuit breaker has tripped. Make sure that applies, and follow the steps listed. d. Reattach the hood, and run , see c. Remove the key and UNPLUG THE POWER CORD. PROBLEM: The power does not turn on the treadmill near the power cord (see the front cover of this manual. Remove the hood from the console. c Tripped Reset PROBLEM: The power turns off circuit breaker located...
... the reset/off during use SOLUTION: a. If the switch protrudes as shown, the circuit breaker has tripped. Make sure that applies, and follow the steps listed. d. Reattach the hood, and run , see c. Remove the key and UNPLUG THE POWER CORD. PROBLEM: The power does not turn on the treadmill near the power cord (see the front cover of this manual. Remove the hood from the console. c Tripped Reset PROBLEM: The power turns off circuit breaker located...
English Manual
Page 16
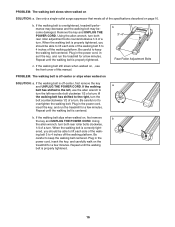
... off -center, first remove the key and UNPLUG THE POWER CORD. When the walking belt is properly tightened. 16 Be careful to overtighten the walking belt. If the walking belt is overtightened, treadmill performance may decrease and the walking belt may become damaged. Using the allen wrench, turn both rear roller adjustment bolts counterclockwise 1/4 of a turn ; Plug in the power cord, insert the key, and carefully walk on , , see the front cover of a turn . Use only a single-outlet surge...
... off -center, first remove the key and UNPLUG THE POWER CORD. When the walking belt is properly tightened. 16 Be careful to overtighten the walking belt. If the walking belt is overtightened, treadmill performance may decrease and the walking belt may become damaged. Using the allen wrench, turn both rear roller adjustment bolts counterclockwise 1/4 of a turn ; Plug in the power cord, insert the key, and carefully walk on , , see the front cover of a turn . Use only a single-outlet surge...
English Manual
Page 17
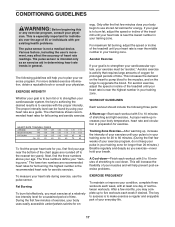
... the treadmill until your pulse is especially important for longer than 20 minutes.) Breathe regularly and deeply as you may affect the accuracy of 35 or individuals with 5 to five workouts each workout with preexisting health problems. The pulse sensor is near the middle number in your heart rate as an exercise aid in determining heart rate trends in your breath. ergy. The chart below...
... the treadmill until your pulse is especially important for longer than 20 minutes.) Breathe regularly and deeply as you may affect the accuracy of 35 or individuals with 5 to five workouts each workout with preexisting health problems. The pulse sensor is near the middle number in your heart rate as an exercise aid in determining heart rate trends in your breath. ergy. The chart below...

English Manual
Page 18
...leg, lean forward and move your hips toward your back and shoulders to your back leg as possible. To cause further stretching of your feet together and your extended leg. Bring your heel as close to relax as possible. Repeat 3 times for each leg. Repeat 3 times. Reach toward the wall. Stretches: Hamstrings, lower... on the floor. Keep your back leg straight and your toes as far as possible. Inner Thigh Stretch Sit with one leg extended. Stretches: Calves, achilles tendons, and ankles. 4. SUGGESTED STRETCHES The correct form for balance, reach back and grasp ...
...leg, lean forward and move your hips toward your back and shoulders to your back leg as possible. To cause further stretching of your feet together and your extended leg. Bring your heel as close to relax as possible. Repeat 3 times for each leg. Repeat 3 times. Reach toward the wall. Stretches: Hamstrings, lower... on the floor. Keep your back leg straight and your toes as far as possible. Inner Thigh Stretch Sit with one leg extended. Stretches: Calves, achilles tendons, and ankles. 4. SUGGESTED STRETCHES The correct form for balance, reach back and grasp ...
English Manual
Page 20
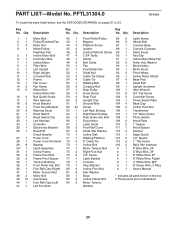
... Motor Belt Pulley/Flywheel/Fan Motor Nut Motor/Pulley/ Flywheel/ Fan Incline Motor Bolt Controller Wire Incline Motor Filter Wire Left Upright Right Upright Console Plate Frame Fan Cover Fan Screw Wheel Nut/ Incline Motor Nut Belt Guide Screw Wire Harness Hood Bracket Front Hood Bracket Warning Decal Reed Switch Reed Switch Clip Left Handrail Controller Electronics Bracket Reset/Off Circuit Breaker Power Cord Power Cord Grommet Washer Latch Assembly Incline Frame Frame Pivot Bolt Frame Pivot Spacer Tension Bushing Front Roller Adj. Washer Book Holder Motor Hood Front Wheel Incline Motor...
... Motor Belt Pulley/Flywheel/Fan Motor Nut Motor/Pulley/ Flywheel/ Fan Incline Motor Bolt Controller Wire Incline Motor Filter Wire Left Upright Right Upright Console Plate Frame Fan Cover Fan Screw Wheel Nut/ Incline Motor Nut Belt Guide Screw Wire Harness Hood Bracket Front Hood Bracket Warning Decal Reed Switch Reed Switch Clip Left Handrail Controller Electronics Bracket Reset/Off Circuit Breaker Power Cord Power Cord Grommet Washer Latch Assembly Incline Frame Frame Pivot Bolt Frame Pivot Spacer Tension Bushing Front Roller Adj. Washer Book Holder Motor Hood Front Wheel Incline Motor...
English Manual
Page 24
... by an ICON authorized service center; You may not apply to give the following information: • The MODEL NUMBER of the product (PFTL31304.0) • The NAME of the product (PROFORM 330i treadmill) • The SERIAL NUMBER of the product (see the PART LIST and the EXPLODED DRAW- The drive motor is warranted for which vary from state to you . ICON is limited to replacing or repairing, at ICON's option...
... by an ICON authorized service center; You may not apply to give the following information: • The MODEL NUMBER of the product (PFTL31304.0) • The NAME of the product (PROFORM 330i treadmill) • The SERIAL NUMBER of the product (see the PART LIST and the EXPLODED DRAW- The drive motor is warranted for which vary from state to you . ICON is limited to replacing or repairing, at ICON's option...

