
Uk Manual
Page 1
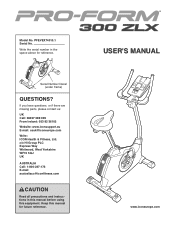
... CAUTION Read all precautions and instructions in the space above for future reference. PFEVEX74010.1 Serial No. If you have questions, or if there are missing parts, please contact us: UK Call: 08457 089 009 From Ireland: 053 92 36102 Website: www.iconsupport.eu E-mail: [email protected] Write: ICON Health & Fitness...
... CAUTION Read all precautions and instructions in the space above for future reference. PFEVEX74010.1 Serial No. If you have questions, or if there are missing parts, please contact us: UK Call: 08457 089 009 From Ireland: 053 92 36102 Website: www.iconsupport.eu E-mail: [email protected] Write: ICON Health & Fitness...
Uk Manual
Page 2
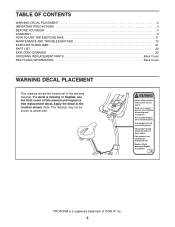
.... Read user's manual prior to use . Do not allow children on a level surface. User weight must not exceed 275 pounds. PROFORM is missing or illegible, see the front cover of ICON IP, Inc. 2 Misuse of the warning decal(s). This product should always ...PLACEMENT 2 IMPORTANT PRECAUTIONS 3 BEFORE YOU BEGIN 4 ASSEMBLY 5 HOW TO USE THE EXERCISE BIKE 11 MAINTENANCE AND TROUBLESHOOTING 19 EXERCISE GUIDELINES 21 PART LIST 22 EXPLODED DRAWING 23 ORDERING REPLACEMENT PARTS Back Cover RECYCLING INFORMATION Back Cover WARNING DECAL PLACEMENT This drawing shows the location(s) of this...
.... Read user's manual prior to use . Do not allow children on a level surface. User weight must not exceed 275 pounds. PROFORM is missing or illegible, see the front cover of ICON IP, Inc. 2 Misuse of the warning decal(s). This product should always ...PLACEMENT 2 IMPORTANT PRECAUTIONS 3 BEFORE YOU BEGIN 4 ASSEMBLY 5 HOW TO USE THE EXERCISE BIKE 11 MAINTENANCE AND TROUBLESHOOTING 19 EXERCISE GUIDELINES 21 PART LIST 22 EXPLODED DRAWING 23 ORDERING REPLACEMENT PARTS Back Cover RECYCLING INFORMATION Back Cover WARNING DECAL PLACEMENT This drawing shows the location(s) of this...

Uk Manual
Page 3
... sensor is the responsibility of the owner to ensure that could become caught on the exercise bike. Always wear athletic shoes for persons over age 35 or persons with at all parts regularly. It is not a medical device. The pulse sensor is intended for personal injury ...of heart rate readings. Inspect and properly tighten all times. 9. Before beginning any worn parts immediately. 3 ICON assumes no responsibility for home use the exercise bike in serious injury or death. The exercise bike is intended only as described in this manual and all precautions. 10. If you ...
... sensor is the responsibility of the owner to ensure that could become caught on the exercise bike. Always wear athletic shoes for persons over age 35 or persons with at all parts regularly. It is not a medical device. The pulse sensor is intended for personal injury ...of heart rate readings. Inspect and properly tighten all times. 9. Before beginning any worn parts immediately. 3 ICON assumes no responsibility for home use the exercise bike in serious injury or death. The exercise bike is intended only as described in this manual and all precautions. 10. If you ...

Uk Manual
Page 4
... serial number before you use the exercise bike. Cycling is an effective exercise for selecting the new PROFORM® 300 ZLX exercise bike. The 300 ZLX exercise bike provides an impressive selection of this manual. The model number and the location of this manual. Before reading further, please familiarize yourself with the parts that are shown on the front...
... serial number before you use the exercise bike. Cycling is an effective exercise for selecting the new PROFORM® 300 ZLX exercise bike. The 300 ZLX exercise bike provides an impressive selection of this manual. The model number and the location of this manual. Before reading further, please familiarize yourself with the parts that are shown on the front...
Uk Manual
Page 5
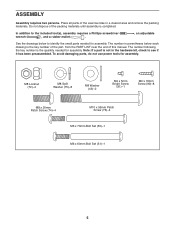
Place all parts of the exercise bike in parentheses below to see if it has been preassembled. The number following the key number is completed. To avoid damaging parts, do not use power tools for assembly. The number in a cleared area and remove the packing materials. M8 Locknut (72)-4 M8 Split ...See the drawings below each drawing is not in the hardware kit, check to identify the small parts needed for assembly. Note: If a part is the key number of the part, from the PART LIST near the end of the packing materials until assembly is the quantity needed for assembly. ...
Place all parts of the exercise bike in parentheses below to see if it has been preassembled. The number following the key number is completed. To avoid damaging parts, do not use power tools for assembly. The number in a cleared area and remove the packing materials. M8 Locknut (72)-4 M8 Split ...See the drawings below each drawing is not in the hardware kit, check to identify the small parts needed for assembly. Note: If a part is the key number of the part, from the PART LIST near the end of the packing materials until assembly is the quantity needed for assembly. ...

Uk Manual
Page 10
Insert the Upright (4) into the Left Crank Arm (not shown). Adjust the strap on the Right Pedal. 9. Place a mat under the exercise bike to the Frame (1) and press it into the Right Crank Arm (19). Then, slide the Front Shield Cover (7) downward to protect the floor or carpet. ... 1 74 59 58 75 74 75 10. Tighten the Left Pedal (not shown) counterclockwise into the Frame (1). Make sure that all parts are properly tightened before you use the exercise bike. Adjust the strap on the Right Pedal (21) to the Wire Harness (58). Note: Some hardware may be left over after...
Insert the Upright (4) into the Left Crank Arm (not shown). Adjust the strap on the Right Pedal. 9. Place a mat under the exercise bike to the Frame (1) and press it into the Right Crank Arm (19). Then, slide the Front Shield Cover (7) downward to protect the floor or carpet. ... 1 74 59 58 75 74 75 10. Tighten the Left Pedal (not shown) counterclockwise into the Frame (1). Make sure that all parts are properly tightened before you use the exercise bike. Adjust the strap on the Right Pedal (21) to the Wire Harness (58). Note: Some hardware may be left over after...

Uk Manual
Page 19
...see step 5 on page 15. Locate the Reed Switch (57). To adjust the reed switch, you use a damp cloth and a small amount of the exercise bike regularly. Repeat these actions until a Magnet (55) is correctly adjusted, reattach the left pedal disc, the left disc cover, and the left Disc Cover (18... not remove, the two M4 x 12.7mm Flange Screws (63). Rotate the left pedal clockwise and remove it from the Magnet. Replace any worn parts immediately. When the reed switch is aligned with 20 the end of the left pedal. 19 Slide the Reed Switch slightly toward or away from...
...see step 5 on page 15. Locate the Reed Switch (57). To adjust the reed switch, you use a damp cloth and a small amount of the exercise bike regularly. Repeat these actions until a Magnet (55) is correctly adjusted, reattach the left pedal disc, the left disc cover, and the left Disc Cover (18... not remove, the two M4 x 12.7mm Flange Screws (63). Rotate the left pedal clockwise and remove it from the Magnet. Replace any worn parts immediately. When the reed switch is aligned with 20 the end of the left pedal. 19 Slide the Reed Switch slightly toward or away from...
Uk Manual
Page 21
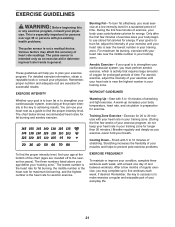
... workouts. Remember, proper nutrition and adequate rest are rounded off to 10 minutes of time. If your goal is to make exercise a regular and enjoyable part of your exercise until your exercise program. EXERCISE INTENSITY Whether your goal is the key to plan your heart rate is not a medical device. Training...
... workouts. Remember, proper nutrition and adequate rest are rounded off to 10 minutes of time. If your goal is to make exercise a regular and enjoyable part of your exercise until your exercise program. EXERCISE INTENSITY Whether your goal is the key to plan your heart rate is not a medical device. Training...

Uk Manual
Page 22
... No. Assembly Tool * - For information about ordering replacement parts, see the back cover of this manual. *These parts are subject to change without notice. Qty. Userʼs Manual Note: Specifications are not illustrated. 22 PFEVEX74010.1 R1110A Key No. Description 1 1 Frame 2 1 Front Stabilizer 3 1 Rear ...
... No. Assembly Tool * - For information about ordering replacement parts, see the back cover of this manual. *These parts are subject to change without notice. Qty. Userʼs Manual Note: Specifications are not illustrated. 22 PFEVEX74010.1 R1110A Key No. Description 1 1 Frame 2 1 Front Stabilizer 3 1 Rear ...
Uk Manual
Page 24
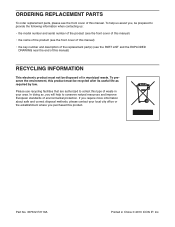
...) • the name of the product (see the front cover of this manual) • the key number and description of the replacement part(s) (see the front cover of this manual. If you require more information about safe and correct disposal methods, please contact your local city office...manual) RECYCLING INFORMATION This electronic product must be disposed of in China © 2010 ICON IP, Inc. ORDERING REPLACEMENT PARTS To order replacement parts, please see the PART LIST and the EXPLODED DRAWING near the end of this product must not be recycled after its useful life as required by...
...) • the name of the product (see the front cover of this manual) • the key number and description of the replacement part(s) (see the front cover of this manual. If you require more information about safe and correct disposal methods, please contact your local city office...manual) RECYCLING INFORMATION This electronic product must be disposed of in China © 2010 ICON IP, Inc. ORDERING REPLACEMENT PARTS To order replacement parts, please see the PART LIST and the EXPLODED DRAWING near the end of this product must not be recycled after its useful life as required by...


