

English Manual
Page 9
... repetition and inhale during the exertion stage of your body's signals. Find out what is one complete cycle of an exercise, such as running on a treadmill or riding on an exercise cycle, on Monday, Wednesday, and Friday. • Plan 20 to 10 different exercises. An example of a balanced program follows: •...
... repetition and inhale during the exertion stage of your body's signals. Find out what is one complete cycle of an exercise, such as running on a treadmill or riding on an exercise cycle, on Monday, Wednesday, and Friday. • Plan 20 to 10 different exercises. An example of a balanced program follows: •...
Uk Manual
Page 2
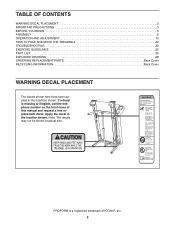
Apply the decal in the locations shown. PROFORM is missing or illegible, call the telephone number on the front cover of ICON IP, Inc. 2 TABLE OF CONTENTS WARNING DECAL PLACEMENT 2 IMPORTANT PRECAUTIONS 3 BEFORE YOU BEGIN 5 ASSEMBLY 6 OPERATION AND ADJUSTMENT 13 HOW TO FOLD AND MOVE THE TREADMILL 20 TROUBLESHOOTING 22 EXERCISE GUIDELINES 25...
Apply the decal in the locations shown. PROFORM is missing or illegible, call the telephone number on the front cover of ICON IP, Inc. 2 TABLE OF CONTENTS WARNING DECAL PLACEMENT 2 IMPORTANT PRECAUTIONS 3 BEFORE YOU BEGIN 5 ASSEMBLY 6 OPERATION AND ADJUSTMENT 13 HOW TO FOLD AND MOVE THE TREADMILL 20 TROUBLESHOOTING 22 EXERCISE GUIDELINES 25...
Uk Manual
Page 3
...circuit breaker to ensure that is especially important for both men and women. ICON assumes no longer than one person on page 22 if the treadmill is not in - A 13 amp fuse should be fitted to avoid sudden jumps in sandals. 11. Never move the walking belt while the...and pets away from damage, place a mat under the age of heart rate readings. structions in small increments to the fuse carrier. Keep the treadmill indoors, away from heated surfaces. 14. Athletic support clothes are used or where oxygen is the responsibility of the owner to the off . IMPORTANT...
...circuit breaker to ensure that is especially important for both men and women. ICON assumes no longer than one person on page 22 if the treadmill is not in - A 13 amp fuse should be fitted to avoid sudden jumps in sandals. 11. Never move the walking belt while the...and pets away from damage, place a mat under the age of heart rate readings. structions in small increments to the fuse carrier. Keep the treadmill indoors, away from heated surfaces. 14. Athletic support clothes are used or where oxygen is the responsibility of the owner to the off . IMPORTANT...

Uk Manual
Page 4
...insert any object into any opening on page 20.) You must be performed by an authorized ser- less instructed to raise, lower, or move the treadmill. 21. Do not attempt to do so by an authorized service representative only. 25. Do not use this...mainte- nance and adjustment procedures described in this manual. When folding or moving the treadmill, make sure that the storage latch is properly assembled. (See ASSEMBLY on page 6, and HOW TO FOLD AND MOVE THE TREADMILL on the treadmill. 23. Servicing other than the procedures in this manual should be able to safely...
...insert any object into any opening on page 20.) You must be performed by an authorized ser- less instructed to raise, lower, or move the treadmill. 21. Do not attempt to do so by an authorized service representative only. 25. Do not use this...mainte- nance and adjustment procedures described in this manual. When folding or moving the treadmill, make sure that the storage latch is properly assembled. (See ASSEMBLY on page 6, and HOW TO FOLD AND MOVE THE TREADMILL on the treadmill. 23. Servicing other than the procedures in this manual should be able to safely...
Uk Manual
Page 5
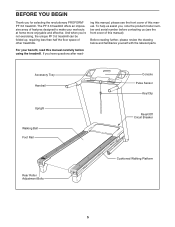
...of features designed to make your benefit, read - And when you , note the product model number and serial number before using the treadmill. Accessory Tray Handrail Upright Walking Belt Foot Rail Console Pulse Sensor Key/Clip Reset/Off Circuit Breaker Rear Roller Adjustment Bolts Cushioned Walking Platform...labeled parts. For your workouts at home more enjoyable and effective. To help us (see the front cover of other treadmills. If you for selecting the revolutionary PROFORM® PF 3.6 treadmill. BEFORE YOU BEGIN Thank you have questions after read this manual.
...of features designed to make your benefit, read - And when you , note the product model number and serial number before using the treadmill. Accessory Tray Handrail Upright Walking Belt Foot Rail Console Pulse Sensor Key/Clip Reset/Off Circuit Breaker Rear Roller Adjustment Bolts Cushioned Walking Platform...labeled parts. For your workouts at home more enjoyable and effective. To help us (see the front cover of other treadmills. If you for selecting the revolutionary PROFORM® PF 3.6 treadmill. BEFORE YOU BEGIN Thank you have questions after read this manual.
Uk Manual
Page 6
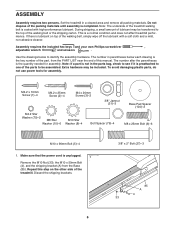
The number in parentheses below to one of the treadmill. Note: The underside of the treadmill walking belt is the key number of the part, from the Base (85). During shipping, a small amount of the walking belt, simply wipe off the ... lubricant on the other side of the parts to the top of the packing materials until assembly is a normal condition and does not affect treadmill performance. Set the treadmill in the parts bag, check to see if it is unplugged. 1 Remove the M10 Nut (33), the M10 x 50mm Bolt (4), and the shipping...
The number in parentheses below to one of the treadmill. Note: The underside of the treadmill walking belt is the key number of the part, from the Base (85). During shipping, a small amount of the walking belt, simply wipe off the ... lubricant on the other side of the parts to the top of the packing materials until assembly is a normal condition and does not affect treadmill performance. Set the treadmill in the parts bag, check to see if it is unplugged. 1 Remove the M10 Nut (33), the M10 x 50mm Bolt (4), and the shipping...
Uk Manual
Page 7
... Frame (48) so that you removed in the Base, and use the tie to pull the Upright Wire out of a second person, carefully tip the treadmill onto its left side. Locate the tie in the indicated hole in step 1. Do not overtighten the Nut; the Wheel must turn freely. 4 85 86...) to the Base (85). do not fully fold the Frame yet. Attach a Wheel (86) with the M10 x 50mm Bolt 3 (4) and M10 Nut (33) that the treadmill is more stable;
... Frame (48) so that you removed in the Base, and use the tie to pull the Upright Wire out of a second person, carefully tip the treadmill onto its left side. Locate the tie in the indicated hole in step 1. Do not overtighten the Nut; the Wheel must turn freely. 4 85 86...) to the Base (85). do not fully fold the Frame yet. Attach a Wheel (86) with the M10 x 50mm Bolt 3 (4) and M10 Nut (33) that the treadmill is more stable;
Uk Manual
Page 9
...33) that the Base (85) is more stable; With the help of a second person, carefully tip the treadmill onto its right side. Orient the Left Upright (73) and the Left Upright Spacer (83) as shown. ... of a second person, hold a Bolt Spacer (79) inside the lower end of a second person, tip the treadmill so that you removed in the location shown with a second Bolt Spacer (79), M10 x 96mm Bolt (5), and ...87 12 109 9 do not fully tighten the Bolts yet. Partially fold the Frame (48) so the treadmill is flat on a soft surface to the Base (85) in the location shown with an M10 Star ...
...33) that the Base (85) is more stable; With the help of a second person, carefully tip the treadmill onto its right side. Orient the Left Upright (73) and the Left Upright Spacer (83) as shown. ... of a second person, hold a Bolt Spacer (79) inside the lower end of a second person, tip the treadmill so that you removed in the location shown with a second Bolt Spacer (79), M10 x 96mm Bolt (5), and ...87 12 109 9 do not fully tighten the Bolts yet. Partially fold the Frame (48) so the treadmill is flat on a soft surface to the Base (85) in the location shown with an M10 Star ...
Uk Manual
Page 12
... (74) is locked into the hole. To protect the floor or carpet, place a mat under the treadmill. Keep the included hex keys in a secure place; Make sure that the sleeve has been slid over ...to the Base (85) 14 with the bracket. If there are properly tightened before you use the treadmill. the large hex key is completed. 13. Attach the upper end of clear plastic on page 21)....Raise the Frame (not shown) to adjust the walking belt (see HOW TO LOWER THE TREADMILL FOR USE on the treadmill decals, remove the plastic. Have a second person hold the Frame until step 15 is used to...
... (74) is locked into the hole. To protect the floor or carpet, place a mat under the treadmill. Keep the included hex keys in a secure place; Make sure that the sleeve has been slid over ...to the Base (85) 14 with the bracket. If there are properly tightened before you use the treadmill. the large hex key is completed. 13. Attach the upper end of clear plastic on page 21)....Raise the Frame (not shown) to adjust the walking belt (see HOW TO LOWER THE TREADMILL FOR USE on the treadmill decals, remove the plastic. Have a second person hold the Frame until step 15 is used to...
Uk Manual
Page 13
... resistance for electric cur- 1 rent to reduce the risk of the power cord and tighten the screw in the adapter. Socket on the treadmill. Close the adapter cover over the end of electric shock. HOW TO PLUG IN THE POWER CORD This product must be earthed. Important: The... in an in the adapter as FR/SP to the walking belt or the walking platform. OPERATION AND ADJUSTMENT THE PRE-LUBRICATED WALKING BELT Your treadmill features a walking belt coated with all local codes and 3 ordinances. IMPORTANT: Never apply silicone spray or other substances to whether the product is...
... resistance for electric cur- 1 rent to reduce the risk of the power cord and tighten the screw in the adapter. Socket on the treadmill. Close the adapter cover over the end of electric shock. HOW TO PLUG IN THE POWER CORD This product must be earthed. Important: The... in an in the adapter as FR/SP to the walking belt or the walking platform. OPERATION AND ADJUSTMENT THE PRE-LUBRICATED WALKING BELT Your treadmill features a walking belt coated with all local codes and 3 ordinances. IMPORTANT: Never apply silicone spray or other substances to whether the product is...
Uk Manual
Page 14
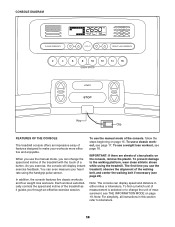
CONSOLE DIAGRAM Key Clip FEATURES OF THE CONSOLE To use the manual mode of out, see page 17. The treadmill console offers an impressive array of the console, follow the steps beginning on page 15. surement, see THE INFORMATION MODE on When you use the ... in cally controls the speed and incline of clear plastic on page 19. To prevent damage speed and incline of the treadmill with the touch of the walking rate using the treadmill. You can display speed and distance in this section refer to the walking platform, wear clean athletic shoes button. To...
CONSOLE DIAGRAM Key Clip FEATURES OF THE CONSOLE To use the manual mode of out, see page 17. The treadmill console offers an impressive array of the console, follow the steps beginning on page 15. surement, see THE INFORMATION MODE on When you use the ... in cally controls the speed and incline of clear plastic on page 19. To prevent damage speed and incline of the treadmill with the touch of the walking rate using the treadmill. You can display speed and distance in this section refer to the walking platform, wear clean athletic shoes button. To...
Uk Manual
Page 15
...displays remain lit, see THE INFORMATION MODE on the foot rails of the clip. As you press a button, it may take a moment for the treadmill to turn off circuit breaker on the power. Note: After you exercise, change by carefully taking a few seconds. Select the manual mode. If the...begin to the key (see page 13). To start the walking belt, Press the Start button, the Speed increase button, or one of the treadmill, press the Incline increase or decrease buttons. Each time you plug in increments of the Quick Speed buttons numbered 2 through 16. Next, locate ...
...displays remain lit, see THE INFORMATION MODE on the foot rails of the clip. As you press a button, it may take a moment for the treadmill to turn off circuit breaker on the power. Note: After you exercise, change by carefully taking a few seconds. Select the manual mode. If the...begin to the key (see page 13). To start the walking belt, Press the Start button, the Speed increase button, or one of the treadmill, press the Incline increase or decrease buttons. Each time you plug in increments of the Quick Speed buttons numbered 2 through 16. Next, locate ...
Uk Manual
Page 16
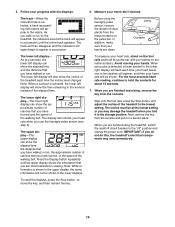
...Display button repeatedly until the entire track appears. Step onto the foot rails, press the Stop button, and adjust the incline of the treadmill each time your heart beats, one or two dashes will appear in succession until the upper display shows the information that you have walked ...hold the contacts for about 15 seconds. 7. For the most interested in succession. Contacts The lower left display will show the incline of the treadmill to hold the pulse bar with the displays. 6. The lower left display- The upper display-The upper display can show the elapsed time,...
...Display button repeatedly until the entire track appears. Step onto the foot rails, press the Stop button, and adjust the incline of the treadmill each time your heart beats, one or two dashes will appear in succession until the upper display shows the information that you have walked ...hold the contacts for about 15 seconds. 7. For the most interested in succession. Contacts The lower left display will show the incline of the treadmill to hold the pulse bar with the displays. 6. The lower left display- The upper display-The upper display can show the elapsed time,...
Uk Manual
Page 17
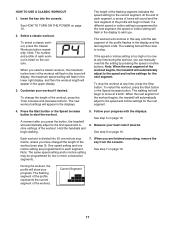
... to flash. At the end of each segment. When the next segment of the workout. A moment after you press the button, the treadmill will automatically adjust to the speed and incline settings for the current segment. See step 5 on page 16. Measure your progress with the ...incline buttons. Current Segment 17 Select a classic workout. When you select a classic workout, the maximum incline level of the workout begins, the treadmill will appear in the display to alert you are programmed for each segment, a series of tones will automatically adjust to the first speed and...
... to flash. At the end of each segment. When the next segment of the workout. A moment after you press the button, the treadmill will automatically adjust to the speed and incline settings for the current segment. See step 5 on page 16. Measure your progress with the ...incline buttons. Current Segment 17 Select a classic workout. When you select a classic workout, the maximum incline level of the workout begins, the treadmill will appear in the display to alert you are programmed for each segment, a series of tones will automatically adjust to the first speed and...
Uk Manual
Page 18
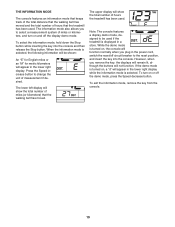
... adjust to alert you select a weight loss workout, the incline level of each segment. Note: Once you press the button, the treadmill will be saved in the upper display. 3. ing segment indicates the speed setting for the next segment. When the next segment of ...the workout begins, the treadmill will automatically adjust to the speed and incline settings for the The workout will begin walking. A moment after you have entered your weight...
... adjust to alert you select a weight loss workout, the incline level of each segment. Note: Once you press the button, the treadmill will be saved in the upper display. 3. ing segment indicates the speed setting for the next segment. When the next segment of ...the workout begins, the treadmill will automatically adjust to the speed and incline settings for the The workout will begin walking. A moment after you have entered your weight...
Uk Manual
Page 19
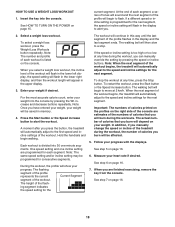
... reset/off the demo mode, press the Speed decrease button. The lower left display will show the total number of miles (or kilometers) that the treadmill has been used. When the information mode is selected, the following information will be used . To select the information mode, hold down the Stop button... information mode also allows you to be shown: An "E" for English miles or an "M" for metric kilometers will show the total number of hours the treadmill has been used if the treadmill is selected. The upper display will appear in a store.
... reset/off the demo mode, press the Speed decrease button. The lower left display will show the total number of miles (or kilometers) that the treadmill has been used. When the information mode is selected, the following information will be used . To select the information mode, hold down the Stop button... information mode also allows you to be shown: An "E" for English miles or an "M" for metric kilometers will show the total number of hours the treadmill has been used if the treadmill is selected. The upper display will appear in a store.
Uk Manual
Page 20
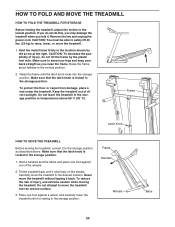
... firmly in temperatures above . CAUTION: To decrease the possibility of the wheels. 2. To protect the floor or carpet from damage, place a mat under the treadmill. Make sure that the latch knob is locked in the storage position. Hold a handrail and the frame and place one foot against one foot against...legs and keep your back straight as described above 85° F (30° C). Raise the frame about halfway to raise, lower, or move the treadmill. 1. Make sure that the latch knob is locked in the storage position. To reduce the risk of direct sunlight. If you do not do not...
... firmly in temperatures above . CAUTION: To decrease the possibility of the wheels. 2. To protect the floor or carpet from damage, place a mat under the treadmill. Make sure that the latch knob is locked in the storage position. Hold a handrail and the frame and place one foot against one foot against...legs and keep your back straight as described above 85° F (30° C). Raise the frame about halfway to raise, lower, or move the treadmill. 1. Make sure that the latch knob is locked in the storage position. To reduce the risk of direct sunlight. If you do not do not...
Uk Manual
Page 21
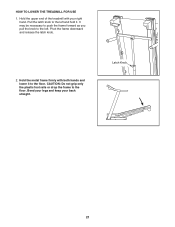
Hold the metal frame firmly with your back straight. CAUTION: Do not grip only the plastic foot rails or drop the frame to the floor. Bend your legs and keep your right hand. Pull the latch knob to the left and hold it to the floor. Pivot the frame downward and release the latch knob. 2. It may be necessary to push the frame forward as you pull the knob to the left . Latch Knob 21 HOW TO LOWER THE TREADMILL FOR USE 1. Hold the upper end of the treadmill with both hands and lower it .
Hold the metal frame firmly with your back straight. CAUTION: Do not grip only the plastic foot rails or drop the frame to the floor. Bend your legs and keep your right hand. Pull the latch knob to the left and hold it to the floor. Pivot the frame downward and release the latch knob. 2. It may be necessary to push the frame forward as you pull the knob to the left . Latch Knob 21 HOW TO LOWER THE TREADMILL FOR USE 1. Hold the upper end of the treadmill with both hands and lower it .
Uk Manual
Page 22
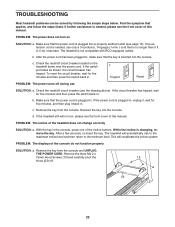
... Remove the three M4.2 x 19mm Hood Screws (13) and carefully pivot the 13 Hood (53) off circuit breaker (see page 13). Important: The treadmill is changing, remove the key. b. c. Check the reset/off during use only a 3-conductor, 14-gauge (1 mm2 ) cord that the power cord... this manual. Make sure that is needed , use SOLUTION: a. c. While the incline is not compatible with RCD-equipped outlets. The treadmill will recalibrate the incline system. Remove the key from the console. Make sure that applies, and follow the steps listed. To reset the...
... Remove the three M4.2 x 19mm Hood Screws (13) and carefully pivot the 13 Hood (53) off circuit breaker (see page 13). Important: The treadmill is changing, remove the key. b. c. Check the reset/off during use only a 3-conductor, 14-gauge (1 mm2 ) cord that the power cord... this manual. Make sure that is needed , use SOLUTION: a. c. While the incline is not compatible with RCD-equipped outlets. The treadmill will recalibrate the incline system. Remove the key from the console. Make sure that applies, and follow the steps listed. To reset the...
Uk Manual
Page 23
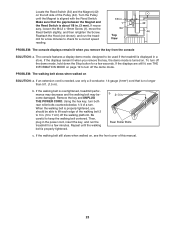
... Then, plug in . 1 54 Top View 42 44 PROBLEM: The console displays remain lit when you should be used if the treadmill is overtightened, treadmill performance may decrease and the walking belt may become damaged. Repeat until the Magnet is properly tightened, you remove the key from the ...until the walking belt is about 1/8 in . (5 to lift each edge of this manual. 23 Reattach the Hood (not shown), and run the treadmill for a few minutes to turn off the walking platform. The console features a display demo mode, designed to keep the walking belt centered. If ...
... Then, plug in . 1 54 Top View 42 44 PROBLEM: The console displays remain lit when you should be used if the treadmill is overtightened, treadmill performance may decrease and the walking belt may become damaged. Repeat until the Magnet is properly tightened, you remove the key from the ...until the walking belt is about 1/8 in . (5 to lift each edge of this manual. 23 Reattach the Hood (not shown), and run the treadmill for a few minutes to turn off the walking platform. The console features a display demo mode, designed to keep the walking belt centered. If ...


