
English Manual
Page 3
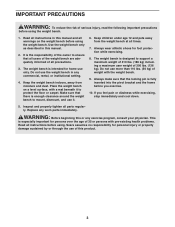
... for foot protection while exercising. 8. WARNING: 6. Do not use the weight bench in this manual and all warnings on a level surface, with pre-existing health problems. Read all instructions before using the weight bench. 1. Do not use more than 110 lbs. (50 kg) of this manual. 2. Sears assumes no responsibility for...
... for foot protection while exercising. 8. WARNING: 6. Do not use the weight bench in this manual and all warnings on a level surface, with pre-existing health problems. Read all instructions before using the weight bench. 1. Do not use more than 110 lbs. (50 kg) of this manual. 2. Sears assumes no responsibility for...
Uk Manual
Page 3
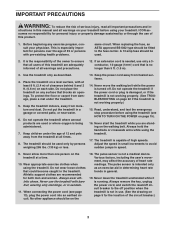
...3conductor, 14-gauge (1mm2) cord that blocks air openings. Never move the walking belt while the power is turned off position when the treadmill is running. Adjust the speed in small increments to the off . Athletic support clothes are used . 2. Always remove the key, unplug.... Keep the power cord away from damage, place a mat under the age of all important precautions and in use the treadmill with pre-existing health problems. same circuit. Wear appropriate exercise clothes when using your physician. Never allow more than 5 ft. (1.5 m). 3. No other appliance should be...
...3conductor, 14-gauge (1mm2) cord that blocks air openings. Never move the walking belt while the power is turned off position when the treadmill is running. Adjust the speed in small increments to the off . Athletic support clothes are used . 2. Always remove the key, unplug.... Keep the power cord away from damage, place a mat under the age of all important precautions and in use the treadmill with pre-existing health problems. same circuit. Wear appropriate exercise clothes when using your physician. Never allow more than 5 ft. (1.5 m). 3. No other appliance should be...
Uk Manual
Page 22
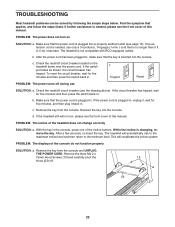
...After the power cord has been plugged in . c Tripped Reset PROBLEM: The power turns off circuit breaker (see the front cover of the Incline buttons. Remove the key from the console and UNPLUG THE POWER CORD. The treadmill will recalibrate the incline system. Remove the three M4.2 x 19mm ... is plugged in , make sure that the key is plugged into a properly earthed outlet (see the front cover of this manual. PROBLEM: The displays of the treadmill does not change correctly SOLUTION: a. b. c. Make sure that the power cord is inserted into the console. If the power cord ...
...After the power cord has been plugged in . c Tripped Reset PROBLEM: The power turns off circuit breaker (see the front cover of the Incline buttons. Remove the key from the console and UNPLUG THE POWER CORD. The treadmill will recalibrate the incline system. Remove the three M4.2 x 19mm ... is plugged in , make sure that the key is plugged into a properly earthed outlet (see the front cover of this manual. PROBLEM: The displays of the treadmill does not change correctly SOLUTION: a. b. c. Make sure that the power cord is inserted into the console. If the power cord ...
Uk Manual
Page 23
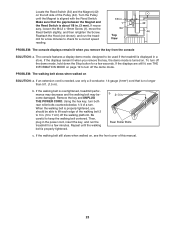
... a. If necessary, loosen the M4.2 x 19mm Screw (1), move the Reed Switch slightly, and then retighten the Screw. Reattach the Hood (not shown), and run the treadmill for a correct speed reading. 1/8 in . (5 to 7 cm) off the demo mode, hold down the Stop button for a few minutes. If the displays are still...the walking belt is about 1/8 in . The console features a display demo mode, designed to be able to lift each edge of this manual. 23 PROBLEM: The walking belt slows when walked on , see THE INFORMATION MODE on the left side of a turn off the demo mode. Be careful to ...
... a. If necessary, loosen the M4.2 x 19mm Screw (1), move the Reed Switch slightly, and then retighten the Screw. Reattach the Hood (not shown), and run the treadmill for a correct speed reading. 1/8 in . (5 to 7 cm) off the demo mode, hold down the Stop button for a few minutes. If the displays are still...the walking belt is about 1/8 in . The console features a display demo mode, designed to be able to lift each edge of this manual. 23 PROBLEM: The walking belt slows when walked on , see THE INFORMATION MODE on the left side of a turn off the demo mode. Be careful to ...
Uk Manual
Page 24
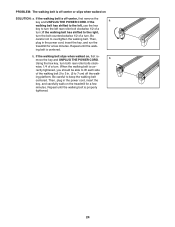
... a turn both rear roller bolts clock- Be careful to overtighten the walking belt. b. ing platform. PROBLEM: The walking belt is off the walk- If the a walking belt has shifted to the left, use the...first remove the key and UNPLUG THE POWER CORD. If the walking belt slips when walked on the treadmill for a few minutes. b Using the hex key, turn ; ing belt is cor- Then, plug in ...the power cord, insert the key, and run the treadmill for a few minutes. Repeat until the walk- if the walking belt has shifted to 7 cm) off -center ...
... a turn both rear roller bolts clock- Be careful to overtighten the walking belt. b. ing platform. PROBLEM: The walking belt is off the walk- If the a walking belt has shifted to the left, use the...first remove the key and UNPLUG THE POWER CORD. If the walking belt slips when walked on the treadmill for a few minutes. b Using the hex key, turn ; ing belt is cor- Then, plug in ...the power cord, insert the key, and run the treadmill for a few minutes. Repeat until the walk- if the walking belt has shifted to 7 cm) off -center ...

Uk Manual
Page 25
... level. For maximum fat burning, exercise with your training zone. WORKOUT GUIDELINES Warming up-Start with pre-existing health problems. The pulse sensor is intended only as a guide to prevent post-exercise problems. EXERCISE FREQUENCY To maintain or improve your training zone. A warm-up to five workouts each week, with 5 to use...
... level. For maximum fat burning, exercise with your training zone. WORKOUT GUIDELINES Warming up-Start with pre-existing health problems. The pulse sensor is intended only as a guide to prevent post-exercise problems. EXERCISE FREQUENCY To maintain or improve your training zone. A warm-up to five workouts each week, with 5 to use...

