

English Manual
Page 1
CUSTOMER CARE For service at any time, go to www.proformservice.com. MT Please do not contact the store. www.proform.com Model No. Or call 1-888-533-1333 Mon.-Fri. 6 a.m.-6 p.m. Keep this equipment. CAUTION Read all precautions and instructions in the space above for future ...reference. Serial Number Decal ACTIVATE YOUR WARRANTY To register your product and activate your warranty today, go to www.proformservice.com/ registration. USER'S MANUAL MT Sat. 8 a.m.-12 p.m. Write the serial number in this...
CUSTOMER CARE For service at any time, go to www.proformservice.com. MT Please do not contact the store. www.proform.com Model No. Or call 1-888-533-1333 Mon.-Fri. 6 a.m.-6 p.m. Keep this equipment. CAUTION Read all precautions and instructions in the space above for future ...reference. Serial Number Decal ACTIVATE YOUR WARRANTY To register your product and activate your warranty today, go to www.proformservice.com/ registration. USER'S MANUAL MT Sat. 8 a.m.-12 p.m. Write the serial number in this...

English Manual
Page 2
PROFORM is missing or illegible, see the front cover of ICON Health & Fitness, Inc. 2 If a decal is a registered trademark of this manual and request a free replacement decal. Note: The decal(s) may not be shown at actual size. IFIT is a registered trademark of... the warning decal(s). TABLE OF CONTENTS WARNING DECAL PLACEMENT 2 IMPORTANT PRECAUTIONS 3 BEFORE YOU BEGIN 6 PART IDENTIFICATION CHART 7 ASSEMBLY 8 HOW TO USE THE ELLIPTICAL 15 FCC...
PROFORM is missing or illegible, see the front cover of ICON Health & Fitness, Inc. 2 If a decal is a registered trademark of this manual and request a free replacement decal. Note: The decal(s) may not be shown at actual size. IFIT is a registered trademark of... the warning decal(s). TABLE OF CONTENTS WARNING DECAL PLACEMENT 2 IMPORTANT PRECAUTIONS 3 BEFORE YOU BEGIN 6 PART IDENTIFICATION CHART 7 ASSEMBLY 8 HOW TO USE THE ELLIPTICAL 15 FCC...
English Manual
Page 3
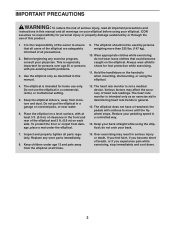
...age 35 or persons with at all parts regularly. Do not use the elliptical in a controlled way. 14. Keep the elliptical indoors, away from the elliptical at least 3 ft. (0.9 m) of clearance in this manual. 9. To protect the floor or carpet from damage, place a mat ...when mounting, dismounting, or using the elliptical; The elliptical is the responsibility of this manual and all warnings on a level surface, with pre-existing health problems. 3. Do not put the elliptical in this product. 1. Place the elliptical on your elliptical before using your back. 7. Various factors...
...age 35 or persons with at all parts regularly. Do not use the elliptical in a controlled way. 14. Keep the elliptical indoors, away from the elliptical at least 3 ft. (0.9 m) of clearance in this manual. 9. To protect the floor or carpet from damage, place a mat ...when mounting, dismounting, or using the elliptical; The elliptical is the responsibility of this manual and all warnings on a level surface, with pre-existing health problems. 3. Do not put the elliptical in this product. 1. Place the elliptical on your elliptical before using your back. 7. Various factors...
English Manual
Page 6
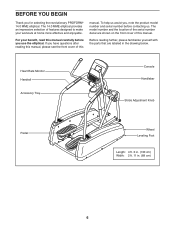
... product model number and serial number before contacting us assist you use the elliptical. If you for selecting the revolutionary PROFORM® 14.0 MME elliptical. BEFORE YOU BEGIN Thank you have questions after reading this manual, please see the front cover of this manual. Heart Rate Monitor Handrail Accessory Tray Console Handlebar Stride Adjustment Knob Pedal Wheel...
... product model number and serial number before contacting us assist you use the elliptical. If you for selecting the revolutionary PROFORM® 14.0 MME elliptical. BEFORE YOU BEGIN Thank you have questions after reading this manual, please see the front cover of this manual. Heart Rate Monitor Handrail Accessory Tray Console Handlebar Stride Adjustment Knob Pedal Wheel...

English Manual
Page 7
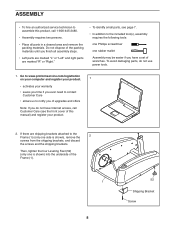
Note: If a part is not in parentheses below to see if it has been preassembled. M10 Washer (64)-4 M4 x 16mm Screw (67)-15 M6 x 12mm Screw (78)-8 M8 x 13mm Screw (62)-8 M8 x 25mm Flat Head Screw (68)-6 M10 x 20mm Screw (61)-18 7 The number in the hardware kit, check to identify the small parts needed for assembly. The number following the key number is the quantity needed for assembly. Extra parts may be included. PART IDENTIFICATION CHART Use the drawings below each drawing is the key number of the part, from the PART LIST near the end of this manual.
Note: If a part is not in parentheses below to see if it has been preassembled. M10 Washer (64)-4 M4 x 16mm Screw (67)-15 M6 x 12mm Screw (78)-8 M8 x 13mm Screw (62)-8 M8 x 25mm Flat Head Screw (68)-6 M10 x 20mm Screw (61)-18 7 The number in the hardware kit, check to identify the small parts needed for assembly. The number following the key number is the quantity needed for assembly. Extra parts may be included. PART IDENTIFICATION CHART Use the drawings below each drawing is the key number of the part, from the PART LIST near the end of this manual.
English Manual
Page 8
If there are shipping brackets attached to assemble this manual) and register your warranty • saves you time if you do not use power tools. 1. ASSEMBLY • To hire an authorized service technician to the ...
If there are shipping brackets attached to assemble this manual) and register your warranty • saves you time if you do not use power tools. 1. ASSEMBLY • To hire an authorized service technician to the ...
English Manual
Page 18
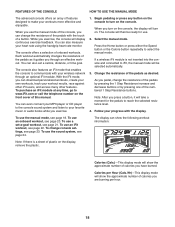
...onboard workout, see page 18. Follow your progress with your favorite music or audio books while you can show the approximate number of this manual. To use . 2. While you exercise, the console will show the approximate number of calories you turn on the front cover of ...24. The display can download personalized workouts, create your own workouts, track your heart rate using the handgrip heart rate monitor. Select the manual mode. You can also measure your workout results, race against other iFit users, and access many other features. FEATURES OF THE CONSOLE HOW...
...onboard workout, see page 18. Follow your progress with your favorite music or audio books while you can show the approximate number of this manual. To use . 2. While you exercise, the console will show the approximate number of calories you turn on the front cover of ...24. The display can download personalized workouts, create your own workouts, track your heart rate using the handgrip heart rate monitor. Select the manual mode. You can also measure your workout results, race against other iFit users, and access many other features. FEATURES OF THE CONSOLE HOW...
English Manual
Page 19
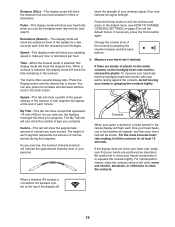
... pedaled in the workout. Resistance (Resist.)-This display mode will show the resistance level of the pedals for at least 15 seconds. Time-When the manual mode is selected, this display mode will show the elapsed time. When a workout is selected, this display mode will show the time remaining in miles...
... pedaled in the workout. Resistance (Resist.)-This display mode will show the resistance level of the pedals for at least 15 seconds. Time-When the manual mode is selected, this display mode will show the elapsed time. When a workout is selected, this display mode will show the time remaining in miles...
English Manual
Page 21
... during the workout. The time will flash in the display. Turn on the fan if desired. To set the desired goal. 3. You can manually override the setting by pressing the 1 Step Resistance buttons. Turn on the fan if desired. See step 4 on the console. Begin pedaling or... to set a calorie, distance, or time goal, first press the Set A Goal button. See step 6 on page 18. 5. When you can manually change the resistance during the workout by pressing the 1 Step Resistance buttons. Then, press the Enter button. Then, press the increase and decrease buttons next...
... during the workout. The time will flash in the display. Turn on the fan if desired. To set the desired goal. 3. You can manually override the setting by pressing the 1 Step Resistance buttons. Turn on the fan if desired. See step 4 on the console. Begin pedaling or... to set a calorie, distance, or time goal, first press the Set A Goal button. See step 6 on page 18. 5. When you can manually change the resistance during the workout by pressing the 1 Step Resistance buttons. Then, press the Enter button. Then, press the increase and decrease buttons next...
English Manual
Page 22
... use an iFit workout, make sure that type in the console. You will show your progress in the matrix will show the name of this manual. When you select a competition workout, the display may also show how much of the race you have your workout. If more information about the iFit...
... use an iFit workout, make sure that type in the console. You will show your progress in the matrix will show the name of this manual. When you select a competition workout, the display may also show how much of the race you have your workout. If more information about the iFit...
English Manual
Page 23
...will display several optional screens. While the settings mode is connected, the display will appear in miles or kilometers) that has been pedaled on the elliptical. Contrast Level-The currently selected contrast level will then check for the audio coach will appear in the display. To select the settings mode, ... button. Send/Receive-The words SEND/RECEIVE DATA will appear in the display. Exit the settings mode. Press the Settings button to select the manual mode or the iFit menu as desired. The lower section of measurement, press the Enter button repeatedly.
...will display several optional screens. While the settings mode is connected, the display will appear in miles or kilometers) that has been pedaled on the elliptical. Contrast Level-The currently selected contrast level will then check for the audio coach will appear in the display. To select the settings mode, ... button. Send/Receive-The words SEND/RECEIVE DATA will appear in the display. Exit the settings mode. Press the Settings button to select the manual mode or the iFit menu as desired. The lower section of measurement, press the Enter button repeatedly.

English Manual
Page 25
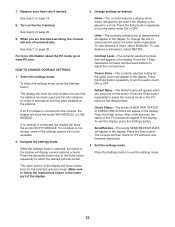
... manual. Before adjusting the reed switch, unplug the power adapter. Then, plug in the power adapter. 25 Next, locate the Reed Switch (86). IMPORTANT: To avoid damage to or away from the Magnet (88), and then retighten the Screws. HOW TO LEVEL THE ELLIPTICAL If the elliptical ...the Screws (67, 73) from the Right Outer and Inner Shields (17, 19); MAINTENANCE AND TROUBLESHOOTING MAINTENANCE Inspect and tighten all of the elliptical regularly. played heart rate appears to be adjusted. Use a standard screwdriver and pry the Right Rail Cover (7) upward. Loosen, but do not ...
... manual. Before adjusting the reed switch, unplug the power adapter. Then, plug in the power adapter. 25 Next, locate the Reed Switch (86). IMPORTANT: To avoid damage to or away from the Magnet (88), and then retighten the Screws. HOW TO LEVEL THE ELLIPTICAL If the elliptical ...the Screws (67, 73) from the Right Outer and Inner Shields (17, 19); MAINTENANCE AND TROUBLESHOOTING MAINTENANCE Inspect and tighten all of the elliptical regularly. played heart rate appears to be adjusted. Use a standard screwdriver and pry the Right Rail Cover (7) upward. Loosen, but do not ...

English Manual
Page 28
... Bottom Cover M4 x 16mm Bright Screw Pivot Screw Idler Screw M6 Washer Left Pedal Knob Cover Assembly Tool Grease Packet User's Manual Note: Specifications are not illustrated. 28 Qty. 51 2 52 4 53 1 54 1 55 1 56 2 57 1 ... * - PART LIST Model No. For information about ordering replacement parts, see the back cover of this manual. *These parts are subject to change without notice. PFEL58015.0 R1214A Key No. Qty. 1 1 2 1 3 1 4 1 5 1 6 1 7 1 8 2 9 1 10 1 11 1 12 1 13 1 14 1 15 1 16 1 17 1 18 1 19 1 20 1 21 1 22 1 23 1...
... Bottom Cover M4 x 16mm Bright Screw Pivot Screw Idler Screw M6 Washer Left Pedal Knob Cover Assembly Tool Grease Packet User's Manual Note: Specifications are not illustrated. 28 Qty. 51 2 52 4 53 1 54 1 55 1 56 2 57 1 ... * - PART LIST Model No. For information about ordering replacement parts, see the back cover of this manual. *These parts are subject to change without notice. PFEL58015.0 R1214A Key No. Qty. 1 1 2 1 3 1 4 1 5 1 6 1 7 1 8 2 9 1 10 1 11 1 12 1 13 1 14 1 15 1 16 1 17 1 18 1 19 1 20 1 21 1 22 1 23 1...
English Manual
Page 32
...contacting us: • the model number and serial number of the product (see the front cover of this manual) • the name of the product (see the front cover of this manual) • the key number and description of the replacement part(s) (see the PART LIST and the EXPLODED...DRAWING near the end of this warranty is shipped to a service center, freight charges to and from defects in workmanship and material, under this manual) LIMITED WARRANTY IMPORTANT: To protect your fitness equipment with respect to repairing or replacing, at ICON's option, the product through one (1) year from...
...contacting us: • the model number and serial number of the product (see the front cover of this manual) • the name of the product (see the front cover of this manual) • the key number and description of the replacement part(s) (see the PART LIST and the EXPLODED...DRAWING near the end of this warranty is shipped to a service center, freight charges to and from defects in workmanship and material, under this manual) LIMITED WARRANTY IMPORTANT: To protect your fitness equipment with respect to repairing or replacing, at ICON's option, the product through one (1) year from...


