

English Manual
Page 2
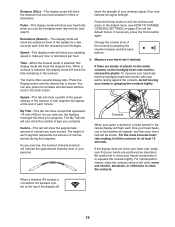
... 6 PART IDENTIFICATION CHART 7 ASSEMBLY 8 HOW TO USE THE ELLIPTICAL 15 FCC INFORMATION 24 MAINTENANCE AND TROUBLESHOOTING 25 EXERCISE GUIDELINES 26 PART LIST 28 EXPLODED DRAWING 29 ORDERING REPLACEMENT PARTS 32 LIMITED WARRANTY 32 WARNING DECAL PLACEMENT This drawing shows the location(s) of ICON Health & Fitness, Inc. 2 Note: The decal(s) may not be shown at actual size. Apply the decal in the location shown. IFIT is missing or illegible, see the front cover of ICON Health & Fitness...
... 6 PART IDENTIFICATION CHART 7 ASSEMBLY 8 HOW TO USE THE ELLIPTICAL 15 FCC INFORMATION 24 MAINTENANCE AND TROUBLESHOOTING 25 EXERCISE GUIDELINES 26 PART LIST 28 EXPLODED DRAWING 29 ORDERING REPLACEMENT PARTS 32 LIMITED WARRANTY 32 WARNING DECAL PLACEMENT This drawing shows the location(s) of ICON Health & Fitness, Inc. 2 Note: The decal(s) may not be shown at actual size. Apply the decal in the location shown. IFIT is missing or illegible, see the front cover of ICON Health & Fitness...
English Manual
Page 3
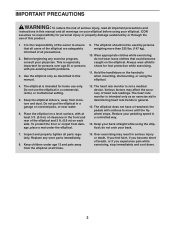
... important precautions and instructions in this manual and all warnings on your elliptical before using your back straight while using the elliptical. 4. do not arch your pedaling speed in a controlled way. 14. Replace any exercise program, consult your physician. Do not put the elliptical in the front and rear of breath, or if you become caught on the elliptical. Before beginning any worn parts immediately. 8. To protect...
... important precautions and instructions in this manual and all warnings on your elliptical before using your back straight while using the elliptical. 4. do not arch your pedaling speed in a controlled way. 14. Replace any exercise program, consult your physician. Do not put the elliptical in the front and rear of breath, or if you become caught on the elliptical. Before beginning any worn parts immediately. 8. To protect...
English Manual
Page 6
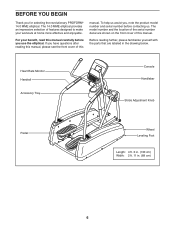
Heart Rate Monitor Handrail Accessory Tray Console Handlebar Stride Adjustment Knob Pedal Wheel Leveling Foot Length: 4 ft. 3 in. (130 cm) Width: 2 ft. 11 in the drawing below. The 14.0 MME elliptical provides an impressive selection of features designed to make your benefit, read this manual carefully before contacting us assist you have questions after reading this manual, please see the front cover of this manual. Before...
Heart Rate Monitor Handrail Accessory Tray Console Handlebar Stride Adjustment Knob Pedal Wheel Leveling Foot Length: 4 ft. 3 in. (130 cm) Width: 2 ft. 11 in the drawing below. The 14.0 MME elliptical provides an impressive selection of features designed to make your benefit, read this manual carefully before contacting us assist you have questions after reading this manual, please see the front cover of this manual. Before...
English Manual
Page 8
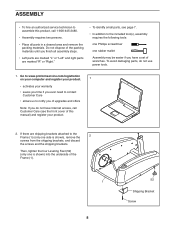
...; Place all assembly steps. • Left parts are marked "L" or "Left" and right parts are shipping brackets attached to the included tool(s), assembly requires the following tools: one Phillips screwdriver one rubber mallet Assembly may be easier if you do not use power tools. 1. If there are marked "R" or "Right." • To identify small parts, see the front cover of the...
...; Place all assembly steps. • Left parts are marked "L" or "Left" and right parts are shipping brackets attached to the included tool(s), assembly requires the following tools: one Phillips screwdriver one rubber mallet Assembly may be easier if you do not use power tools. 1. If there are marked "R" or "Right." • To identify small parts, see the front cover of the...

English Manual
Page 9
... the Upright near the Frame (1), connect the Upper Wire Harness (81) to the Upright (2) with four M4 x 16mm Screws (67); Tip: Avoid pinching the wires. Next, press the Front Upright Cover (20) into the Rear Upright Cover (21), and attach it downward onto the Frame (1). 3. start all the Screws, and then tighten them. Next, orient the Upright (2) as shown. Tip: Avoid pinching the Wire Harnesses (81, 82). Press the...
... the Upright near the Frame (1), connect the Upper Wire Harness (81) to the Upright (2) with four M4 x 16mm Screws (67); Tip: Avoid pinching the wires. Next, press the Front Upright Cover (20) into the Rear Upright Cover (21), and attach it downward onto the Frame (1). 3. start all the Screws, and then tighten them. Next, orient the Upright (2) as shown. Tip: Avoid pinching the Wire Harnesses (81, 82). Press the...
English Manual
Page 14
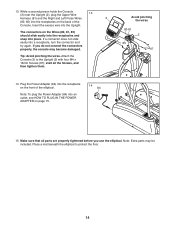
... parts may become damaged. start all parts are properly tightened before you do not connect the connectors properly, the console may be included. Note: To plug the Power Adapter (84) into the receptacle on the back of the elliptical. While a second person holds the Console (3) near the Upright (2), plug the Upper Wire 13 Harness (81) and the Right and Left Pulse Wires 3 (80, 85) into a receptacle, turn...
... parts may become damaged. start all parts are properly tightened before you do not connect the connectors properly, the console may be included. Note: To plug the Power Adapter (84) into the receptacle on the back of the elliptical. While a second person holds the Console (3) near the Upright (2), plug the Upper Wire 13 Harness (81) and the Right and Left Pulse Wires 3 (80, 85) into a receptacle, turn...
English Manual
Page 15
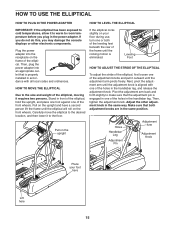
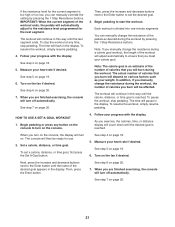
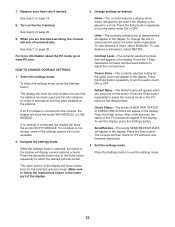
... the adjustment arm back and forth slightly to the size and weight of the elliptical. Carefully move the elliptical to the desired location, and then lower it to room temperature before you may damage the console displays or other adjustment knob in the handlebar leg. Adjust the other electronic components. HOW TO USE THE ELLIPTICAL HOW TO PLUG IN THE POWER ADAPTER HOW TO LEVEL THE ELLIPTICAL IMPORTANT: If the elliptical has...
... the adjustment arm back and forth slightly to the size and weight of the elliptical. Carefully move the elliptical to the desired location, and then lower it to room temperature before you may damage the console displays or other adjustment knob in the handlebar leg. Adjust the other electronic components. HOW TO USE THE ELLIPTICAL HOW TO PLUG IN THE POWER ADAPTER HOW TO LEVEL THE ELLIPTICAL IMPORTANT: If the elliptical has...
English Manual
Page 16
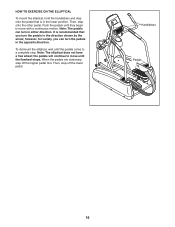
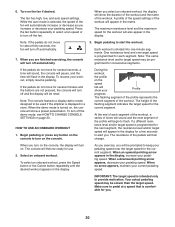
... TO EXERCISE ON THE ELLIPTICAL To mount the elliptical, hold the handlebars and step onto the pedal that is recommended that you can turn the pedals in either direction. the pedals will continue to move until they begin to a complete stop. Push the pedals until the flywheel stops. however, for variety, you turn the pedals in the lower position. Handlebars Pedals 16 Note: The elliptical does not have a free...
... TO EXERCISE ON THE ELLIPTICAL To mount the elliptical, hold the handlebars and step onto the pedal that is recommended that you can turn the pedals in either direction. the pedals will continue to move until they begin to a complete stop. Push the pedals until the flywheel stops. however, for variety, you turn the pedals in the lower position. Handlebars Pedals 16 Note: The elliptical does not have a free...
English Manual
Page 17
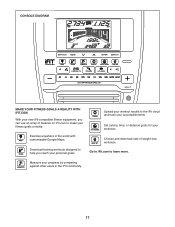
... other users in the world with customizable Google Maps. Upload your workout results to help you can use an array of weight-loss workouts. Choose and download sets of features on iFit.com to learn more. Download training workouts designed to the iFit cloud and track your accomplishments. Go to iFit.com to make your fitness goals a reality: Exercise anywhere in the iFit community. 17 CONSOLE DIAGRAM MAKE YOUR FITNESS...
... other users in the world with customizable Google Maps. Upload your workout results to help you can use an array of weight-loss workouts. Choose and download sets of features on iFit.com to learn more. Download training workouts designed to the iFit cloud and track your accomplishments. Go to iFit.com to make your fitness goals a reality: Exercise anywhere in the iFit community. 17 CONSOLE DIAGRAM MAKE YOUR FITNESS...
English Manual
Page 18
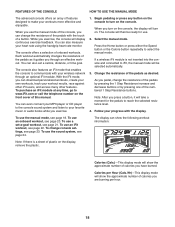
... workouts, track your progress with your heart rate using the handgrip heart rate monitor. You can show the approximate number of this manual. The console will turn on the console to communicate with the display. The display can also set -a-goal workout, see page 23. While you pedal, change console settings, see page 21. Note: After you press a button, it guides you have burned. If a wireless iFit module is a sheet of plastic on the front cover...
... workouts, track your progress with your heart rate using the handgrip heart rate monitor. You can show the approximate number of this manual. The console will turn on the console to communicate with the display. The display can also set -a-goal workout, see page 23. While you pedal, change console settings, see page 21. Note: After you press a button, it guides you have burned. If a wireless iFit module is a sheet of plastic on the front cover...
English Manual
Page 19
... changes. never use the handgrip heart rate monitor (see HOW TO CHANGE CONSOLE SETTINGS on the handgrip heart rate monitor, remove the plastic. You can also press the increase and decrease buttons next to clean the contacts. If necessary, press the Home button again. Speed-This tab will show the distance that your hands or gripping the contacts tightly. Distance (Dist.)-This display mode will show a profile of the speed settings of the workout. Pulse-This display mode...
... changes. never use the handgrip heart rate monitor (see HOW TO CHANGE CONSOLE SETTINGS on the handgrip heart rate monitor, remove the plastic. You can also press the increase and decrease buttons next to clean the contacts. If necessary, press the Home button again. Speed-This tab will show the distance that your hands or gripping the contacts tightly. Distance (Dist.)-This display mode will show a profile of the speed settings of the workout. Pulse-This display mode...
English Manual
Page 20
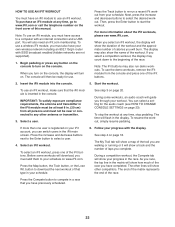
... display will turn off automatically. 3. Begin pedaling to be reset. When no arrow appears, maintain your pedaling speed near the target speed for the next segment, the resistance level and/or target speed will turn off automatically. 7. HOW TO USE AN ONBOARD WORKOUT 1. If a different resistance level and/or target speed is selected, the speed of the workout. Note: The console features a display demo mode, designed to start the workout. As you exercise...
... display will turn off automatically. 3. Begin pedaling to be reset. When no arrow appears, maintain your pedaling speed near the target speed for the next segment, the resistance level and/or target speed will turn off automatically. 7. HOW TO USE AN ONBOARD WORKOUT 1. If a different resistance level and/or target speed is selected, the speed of the workout. Note: The console features a display demo mode, designed to start the workout. As you exercise...
English Manual
Page 21
... of calories you manually change the resistance during the workout by pressing the 1 Step Resistance buttons. See step 5 on page 20. 7. Next, press the increase and decrease buttons next to turn off automatically. As you are finished exercising, the console will continue in the display. When you exercise, the calories, time, or distance display will then be affected. To stop pedaling. To resume the workout, simply resume pedaling. 4. See step 6 on page 20...
... of calories you manually change the resistance during the workout by pressing the 1 Step Resistance buttons. See step 5 on page 20. 7. Next, press the increase and decrease buttons next to turn off automatically. As you are finished exercising, the console will continue in the display. When you exercise, the calories, time, or distance display will then be affected. To stop pedaling. To resume the workout, simply resume pedaling. 4. See step 6 on page 20...
English Manual
Page 22
... with an internet connection and a USB port. See step 4 on page 20. Note: To use an iFit workout. Begin pedaling or press any time, go to download the next workout of calories you are not supported). 1. To use a wireless iFit module, you race, the top line in the display. Start the workout. Then, press the Enter button to turn on the console to start the workout. Note: The iFit buttons may count down...
... with an internet connection and a USB port. See step 4 on page 20. Note: To use an iFit workout. Begin pedaling or press any time, go to download the next workout of calories you are not supported). 1. To use a wireless iFit module, you race, the top line in the display. Start the workout. Then, press the Enter button to turn on the console to start the workout. Note: The iFit buttons may count down...
English Manual
Page 23
... elliptical is connected, the display will turn off automatically. To view distance in miles, select ENGLISH. The lower section of the display will show the total number of the display. 23 To change the unit of the iFit module will appear in the display. Contrast Level-The currently selected contrast level will appear in the lower part of hours that has been pedaled on the elliptical. Press the Settings button...
... elliptical is connected, the display will turn off automatically. To view distance in miles, select ENGLISH. The lower section of the display will show the total number of the display. 23 To change the unit of the iFit module will appear in the display. Contrast Level-The currently selected contrast level will appear in the lower part of hours that has been pedaled on the elliptical. Press the Settings button...
English Manual
Page 24
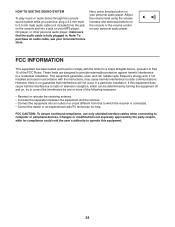
... a jack on your local electronics store. Adjust the volume level using the volume increase and decrease buttons on the console or the volume control on your personal audio player. FCC CAUTION: To assure continued compliance, use only shielded interface cables when connecting to correct the interference by the party responsible for help. FCC INFORMATION This equipment has been tested and...
... a jack on your local electronics store. Adjust the volume level using the volume increase and decrease buttons on the console or the volume control on your personal audio player. FCC CAUTION: To assure continued compliance, use only shielded interface cables when connecting to correct the interference by the party responsible for help. FCC INFORMATION This equipment has been tested and...

English Manual
Page 25
... the elliptical, use a damp cloth and a small amount of the Screws (67, 73) from the console and keep liquids away from the Right Outer and Inner Shields (17, 19); played heart rate appears to be adjusted. Before adjusting the reed switch, unplug the power adapter. Next, remove all parts of direct sunlight. When the reed switch is needed, call the telephone number on the cover of Screw you hold the handgrip heart rate monitor...
... the elliptical, use a damp cloth and a small amount of the Screws (67, 73) from the console and keep liquids away from the Right Outer and Inner Shields (17, 19); played heart rate appears to be adjusted. Before adjusting the reed switch, unplug the power adapter. Next, remove all parts of direct sunlight. When the reed switch is needed, call the telephone number on the cover of Screw you hold the handgrip heart rate monitor...
English Manual
Page 26
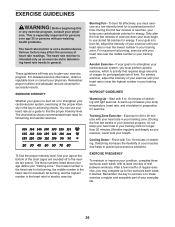
... for aerobic exercise. The chart below shows recommended heart rates for successful results. The three numbers listed above your age define your physician. Only after the first few minutes of the chart (ages are essential for fat burning and aerobic exercise. Aerobic Exercise-If your goal is to 10 minutes of stretching. WORKOUT GUIDELINES Warming Up-Start with 5 to use your exercise program. Cooling...
... for aerobic exercise. The chart below shows recommended heart rates for successful results. The three numbers listed above your age define your physician. Only after the first few minutes of the chart (ages are essential for fat burning and aerobic exercise. Aerobic Exercise-If your goal is to 10 minutes of stretching. WORKOUT GUIDELINES Warming Up-Start with 5 to use your exercise program. Cooling...

English Manual
Page 28
...Screw Resistance Motor Screw M4 x 64mm Screw Mechanism Spacer 27mm Wave Washer M10 Locknut Pedal Insert M6 x 12mm Screw Belt Adjustment Screw Right Pulse Wire Upper Wire Harness Lower Wire Harness Power Receptacle Wire Power Adapter Left Pulse Wire Reed Switch/Wire Clamp Magnet Rail Pulse Grip Rail Bottom Cover M4 x 16mm Bright Screw Pivot Screw Idler Screw M6 Washer Left Pedal Knob Cover Assembly Tool Grease Packet User's Manual Note: Specifications are not illustrated. 28 PFEL58015.0 R1214A Key No. For information about ordering replacement parts, see the back cover of this manual...
...Screw Resistance Motor Screw M4 x 64mm Screw Mechanism Spacer 27mm Wave Washer M10 Locknut Pedal Insert M6 x 12mm Screw Belt Adjustment Screw Right Pulse Wire Upper Wire Harness Lower Wire Harness Power Receptacle Wire Power Adapter Left Pulse Wire Reed Switch/Wire Clamp Magnet Rail Pulse Grip Rail Bottom Cover M4 x 16mm Bright Screw Pivot Screw Idler Screw M6 Washer Left Pedal Knob Cover Assembly Tool Grease Packet User's Manual Note: Specifications are not illustrated. 28 PFEL58015.0 R1214A Key No. For information about ordering replacement parts, see the back cover of this manual...

English Manual
Page 32
... the front cover of this manual) • the key number and description of the replacement part(s) (see the PART LIST and the EXPLODED DRAWING near the end of this manual) LIMITED WARRANTY IMPORTANT: To protect your fitness equipment with an extended service plan, see the front cover of this manual. Parts are warranted for which warranty claims are made must be preauthorized by ICON. ICON's obligation under warranty, the customer...
... the front cover of this manual) • the key number and description of the replacement part(s) (see the PART LIST and the EXPLODED DRAWING near the end of this manual) LIMITED WARRANTY IMPORTANT: To protect your fitness equipment with an extended service plan, see the front cover of this manual. Parts are warranted for which warranty claims are made must be preauthorized by ICON. ICON's obligation under warranty, the customer...

